A Gluten-free sourdough bread recipe has been a long time coming. Last year I published my gluten free sourdough starter guide, after years of experimentation. Now I’m publishing my recipe for gluten free sourdough bread itself. The process, as you’ll discover, is ever evolving, which is partly why I’ve held off posting a recipe for so long. I also quite liked having sourdough as a hobby, rather than making it work related.
That thought process, I think, has resulted in a gluten-free sourdough bread recipe that I’m really proud of. I’ve tested it all sorts of different ways, and although I am no expert, I have definitely learned a lot about sourdough.
Honestly I think the main takeaway is that every loaf is a lesson. No two are the same, and there will be both successes and ‘failures’ (that will still taste good.) Gluten free sourdough making is a ~jOurNey~, you guys.
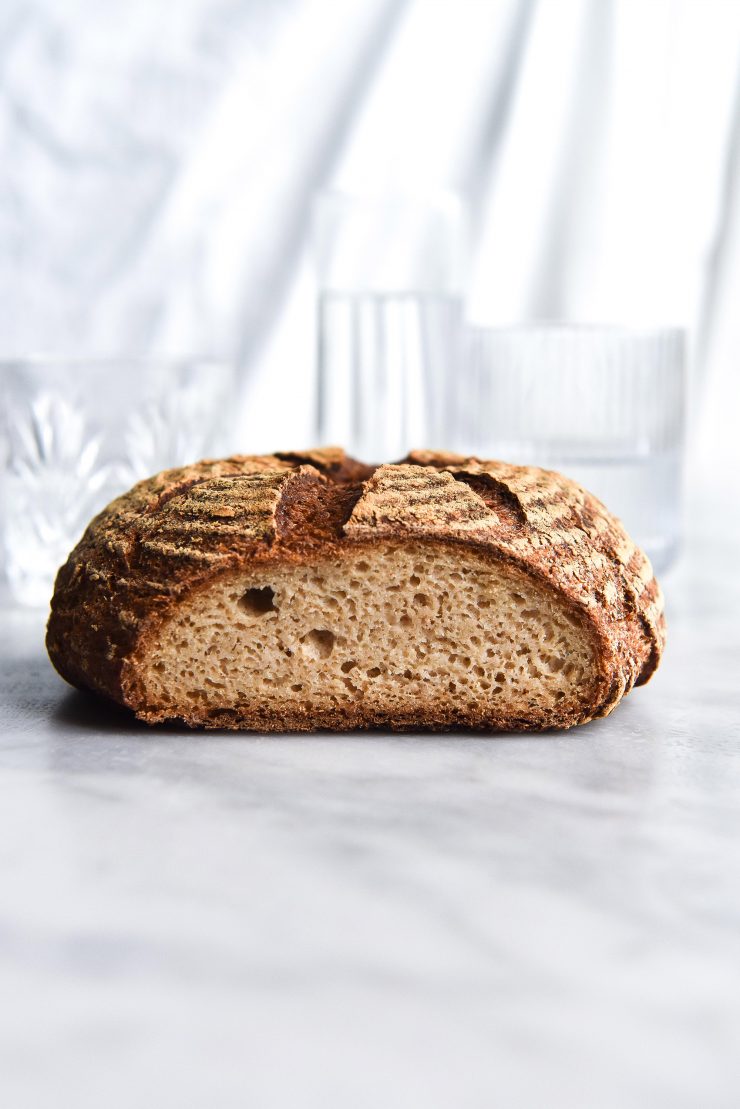
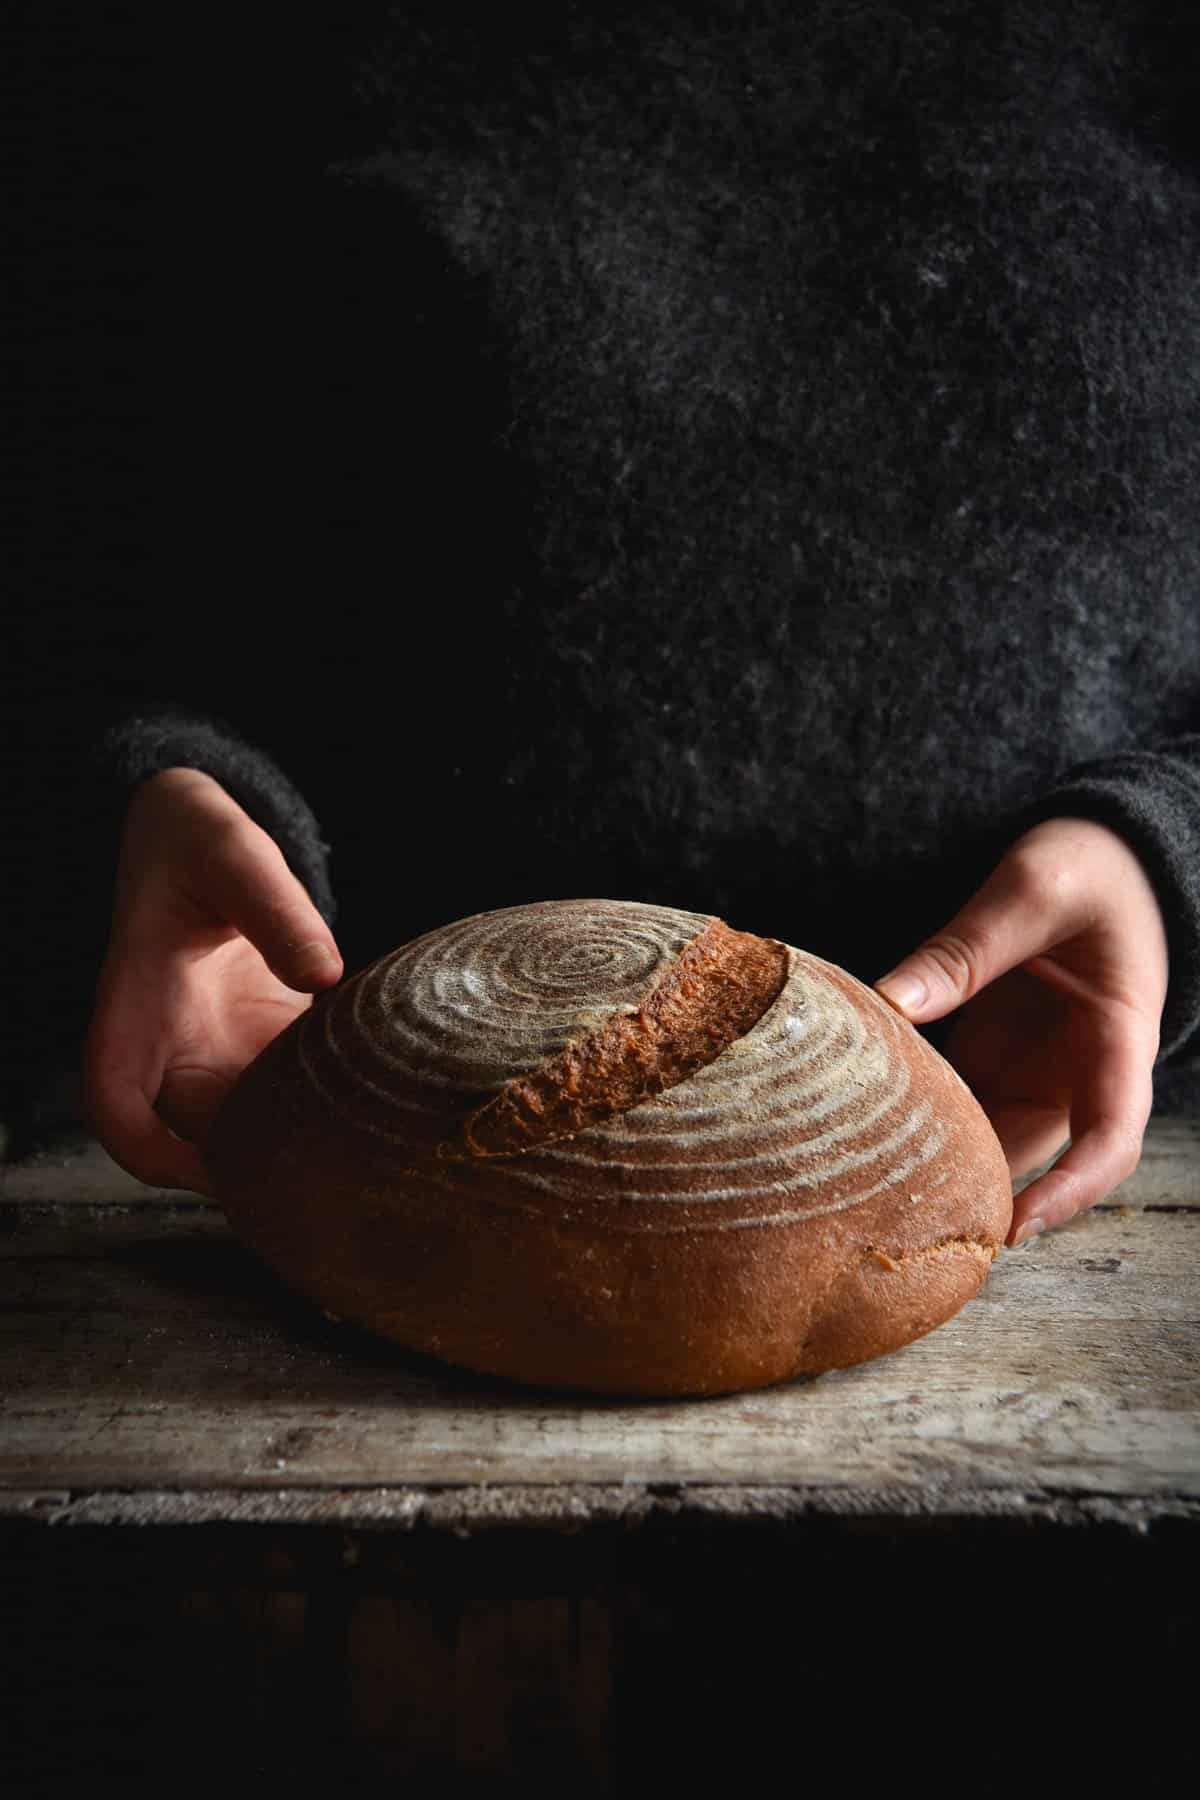
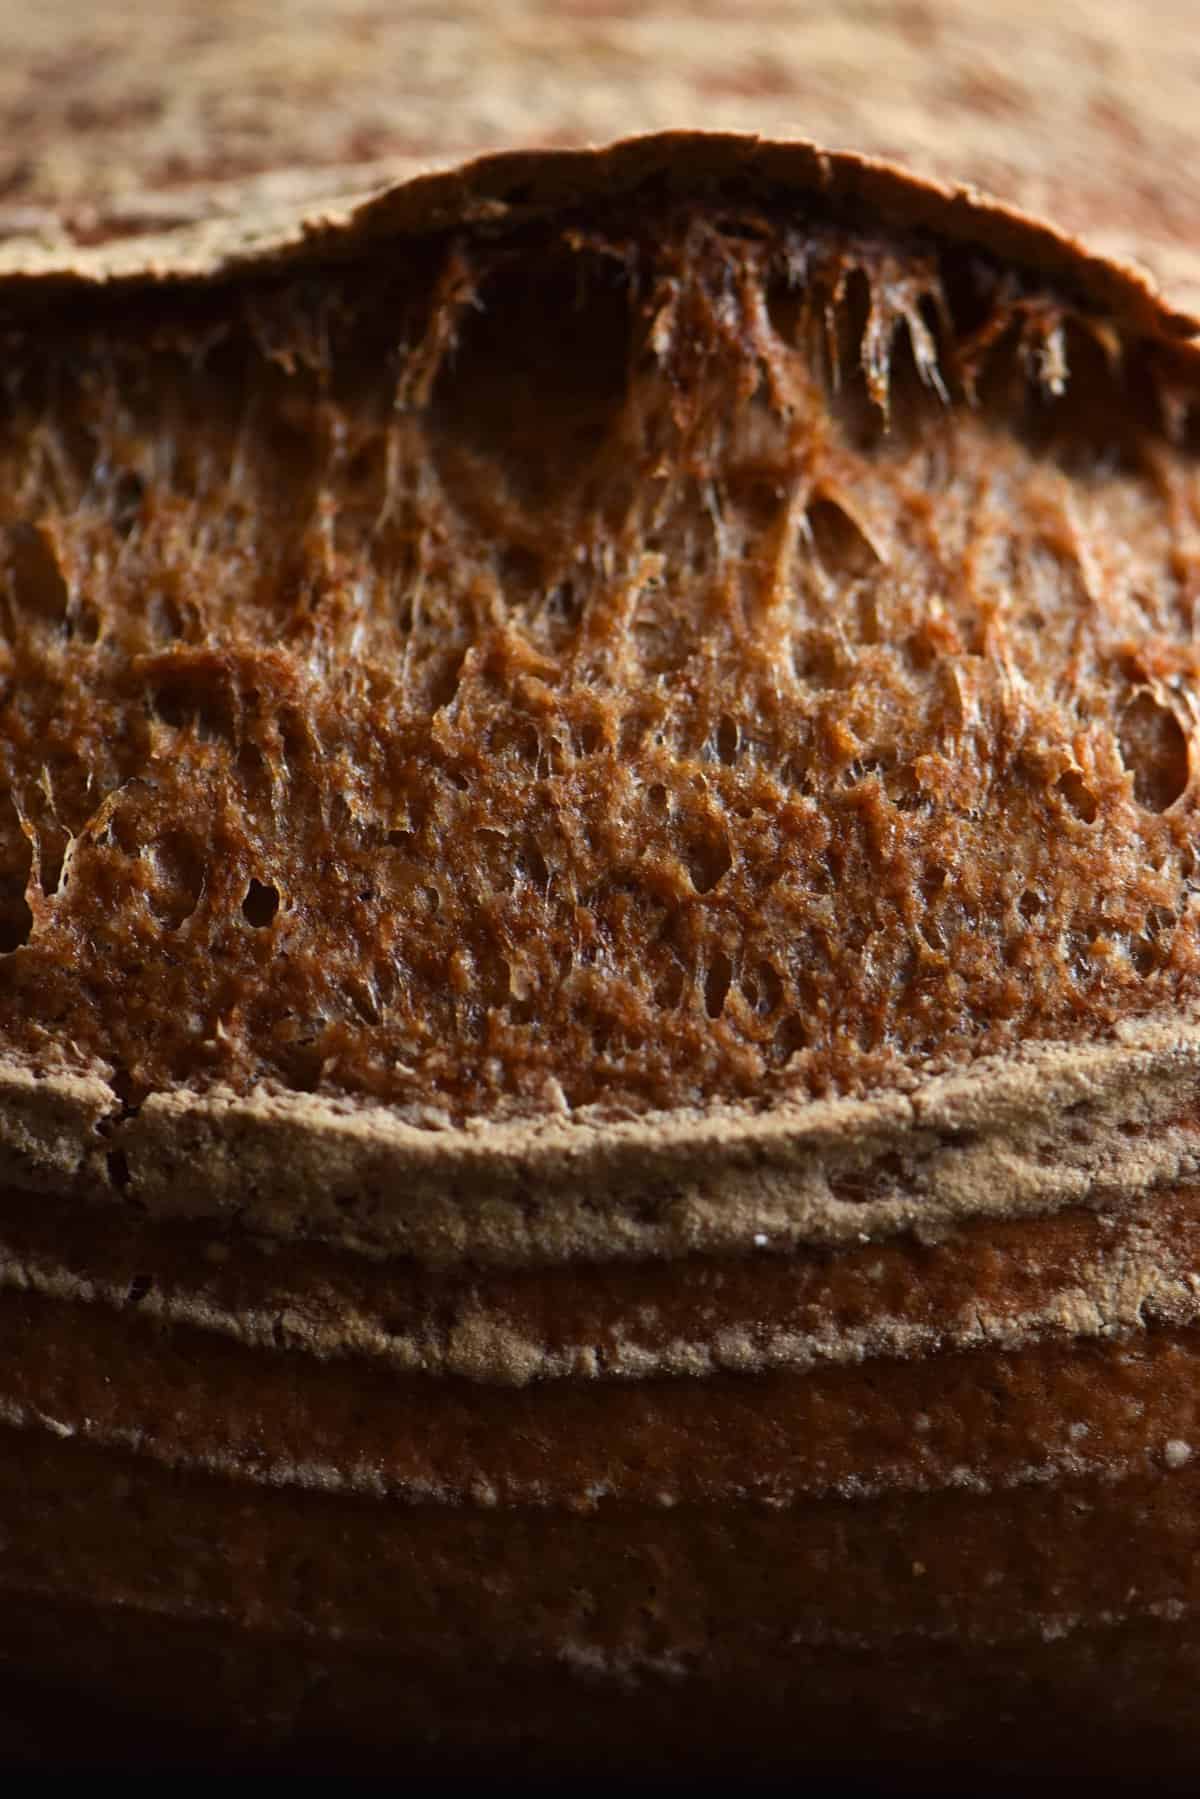
Before we begin – this is quite a dense bread. It’s more of a European, serious style gluten free sourdough bread, and less of a lofty loaf. I didn’t want to use gums or anything weird, and this bread is truly delicious as it is.
Gluten-free sourdough bread recipe notes
Currently, I have no substitution suggestions for the flours. I have tried to make them as easy to find as possible. If you can’t find them in stores, you should be able to buy them online. As I bake with more varieties, I will update this post. Only so much bread I can bake, so thanks for the understanding there.
Different flours have different absorbencies, so if you’re going rogue, you’ll have to consider how much water you add.
In the same vein, I have no substitutions for the psyllium husk. I don’t use the powder (which is more absorbent) I use regular psyllium husk. Currently, I don’t have a suggestion as to substituting between the two, either.
You can make your own quinoa flour using quinoa from the supermarket. Simply blend it in a high powered blender.
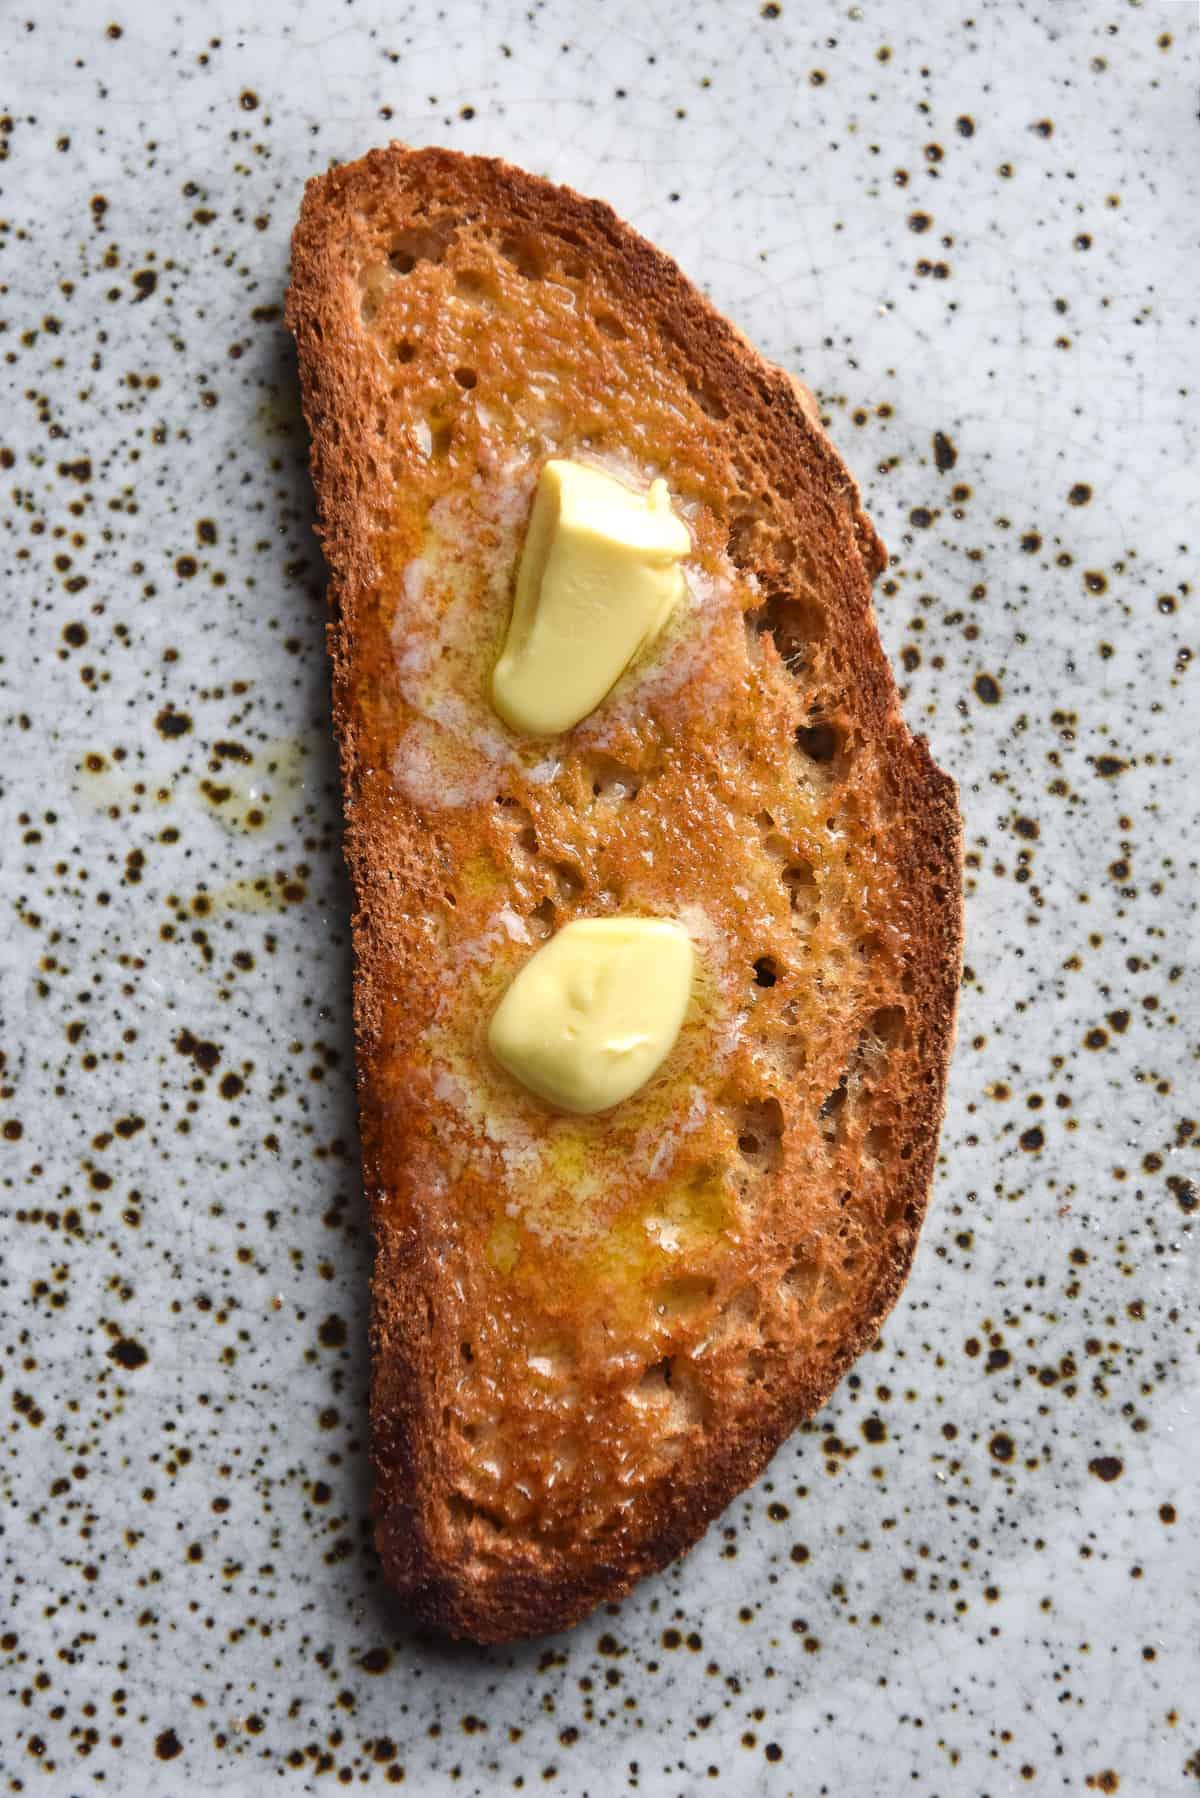
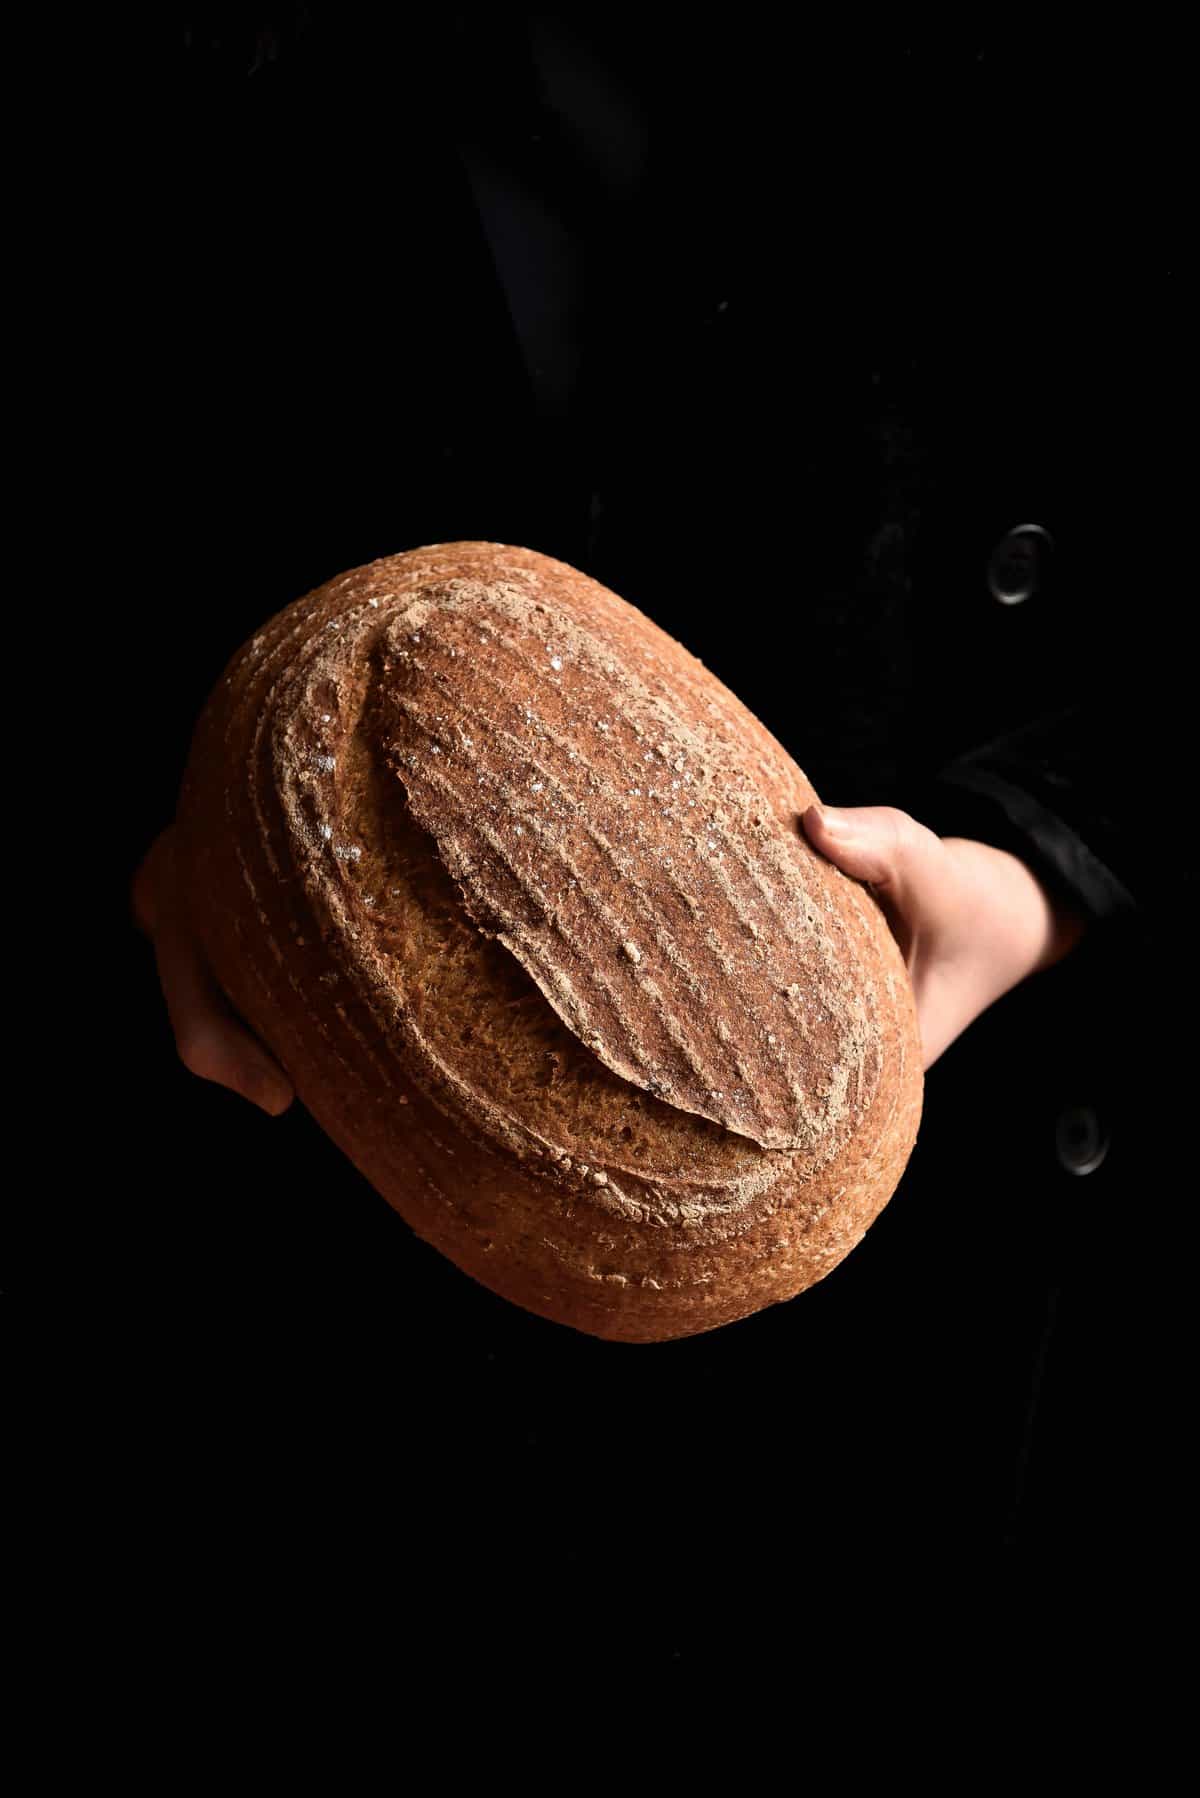
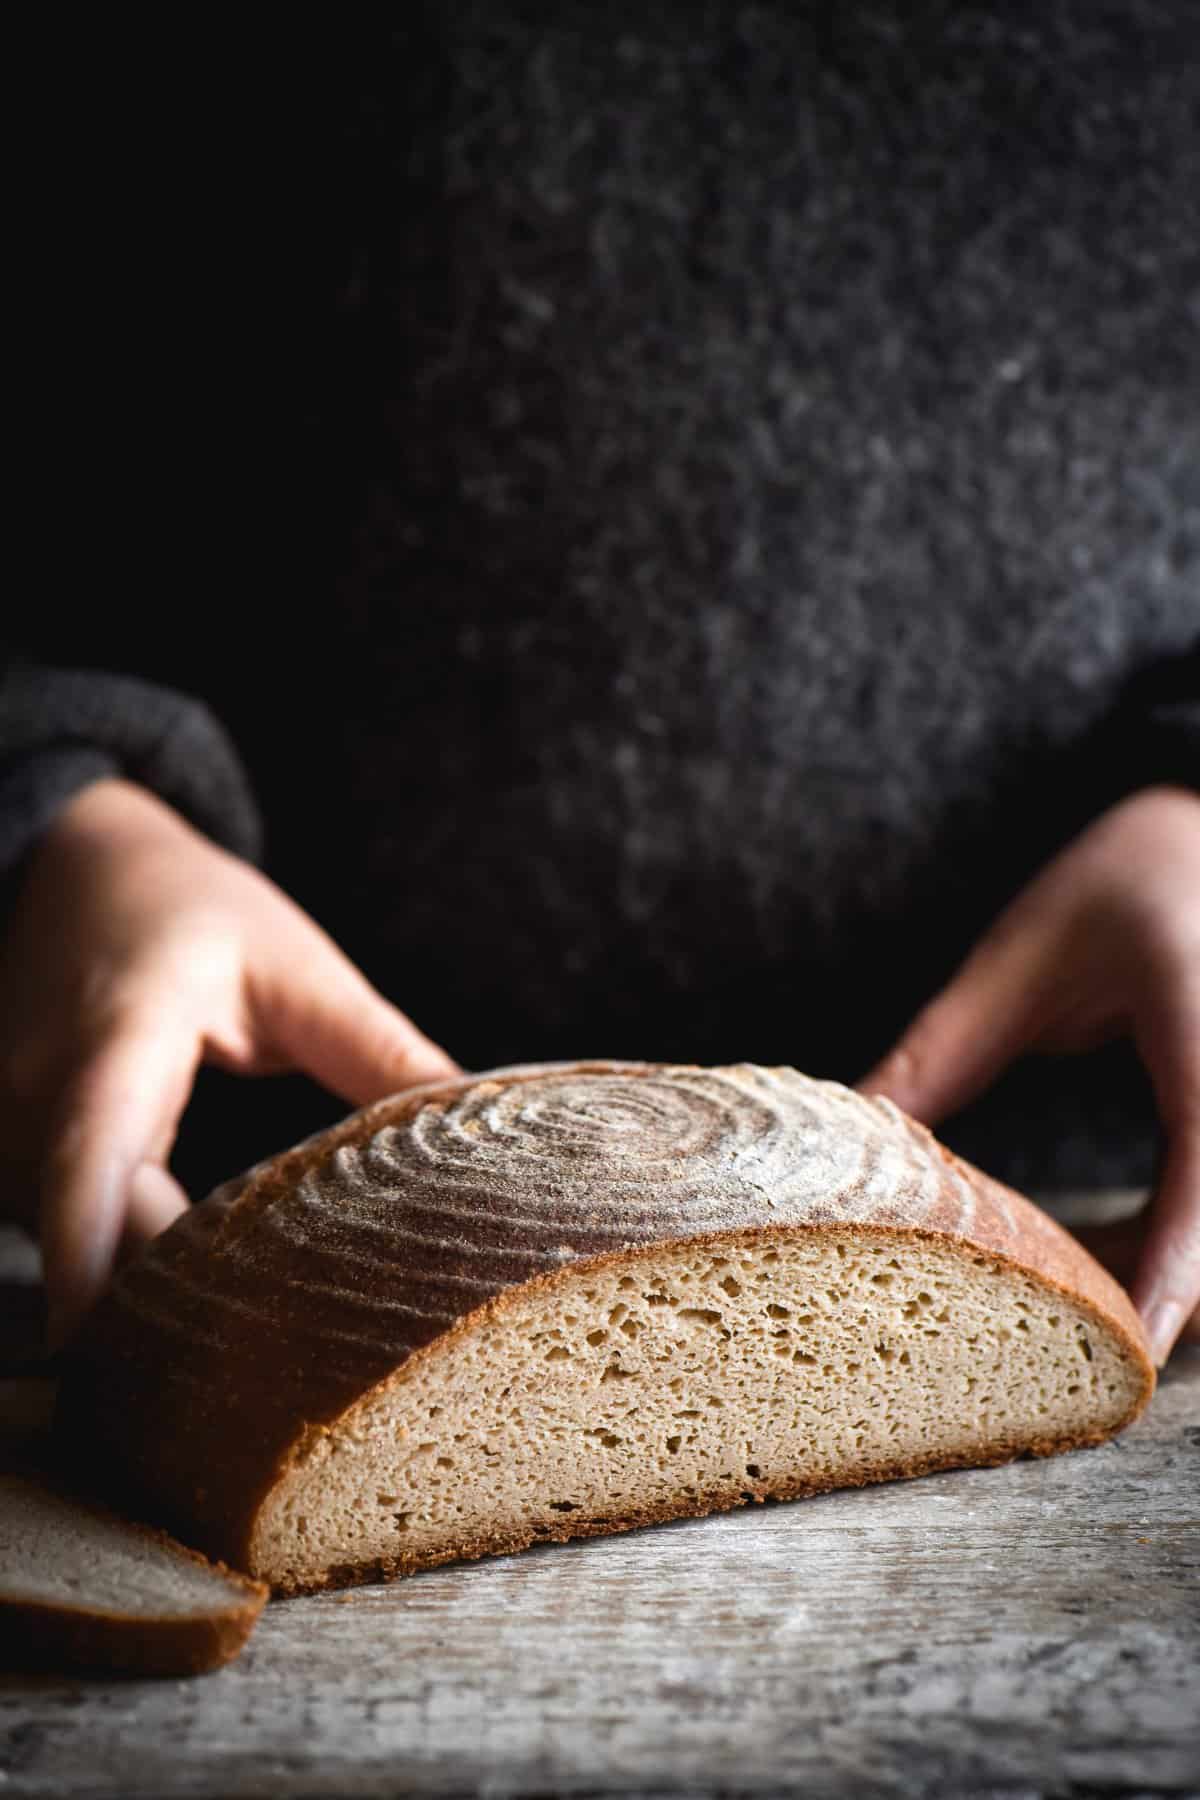
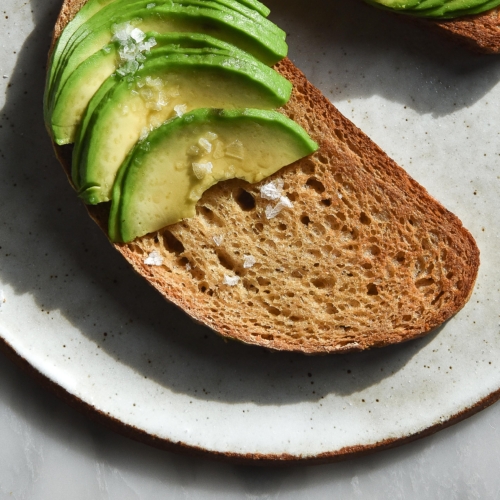
The recipe makes one small-ish loaf of dense, European style bread. This is serious ol’ bread – not some white lofty number. It’s dense and moist and DAMN DELICIOUS.
All the websites I read say that a dutch oven is really truly necessary for a good loaf of bread. This is because it traps the heat completely and keeps it stable, much like a professional bread oven. Regular ovens are, apparently, quite terrible at maintaining a consistent heat.
That said, I did a year worth of tests with a cast iron skillet and some tin foil. So it’s possible to do without, your bread just might not be QUITE as good. Still v good, though.
A note on gluten free sourdough bread making in general
I’ve been tinkering with this recipe for over a year now so while I’m not an expert, I do have some things to say. First and foremost – sourdough is not something you make once and discard the recipe when it doesn’t work. There are SO MANY factors that determine the success of each individual loaf. So, a little bit of truth: if you end up with an average loaf, it’s something you did (or didn’t do.) Sorry bout it. It’s your own job to hone in your own sourdough, so if you’re not in for the long haul, I wouldn’t bother starting.
You can’t rush the process of sourdough making. The starter is ready when it’s ready, as is the loaf itself. Don’t be so rigid in sticking to a recipe that you end up with a failure. You need to use your intuition, and that’s something I can’t help with. Take the time to learn by doing and you’ll end up with the gluten-free sourdough bread of your dreams, I promise.
Gluten free sourdough bread making glossary
pre-ferment = a mixture of starter, water and flour. This sometimes goes by other names, but I wanted to keep it simple and obvious.
Banneton = bread making basket. You can use a round based bowl instead if you don’t have one.
Proofing = the act of allowing of your bread to rise enough that it’s ready to bake.
Lame – a sharp blade to score your loaf. People have told me you can also use a razor blade or sharp box cutter.
Oven spring = liftoff in the oven. Good oven spring means your dough has risen nicely. Generally the first 10-15 minutes in the oven are crucial to oven spring.
Sourdough starter resources
First and foremost, you’ll need a lovely, healthy gluten free sourdough bread starter. Here is my extensive how-to guide, and here are some links I found handy when creating my first starter.
I find the best way to learn is by doing. However, here are some handy resources for making your own starter.
- A good video on the general gist of making a starter. There’s no mentions of discard but if you’re a visual learner, this might help.
- There is a sourdough website which is basically a chat forum of all things sourdough. If you have ever googled something sourdough related, chances are you ended up there.
- Not gluten free, but The Perfect Loaf has a great sourdough guide, and is an insane sourdough baker and specialist. I am a crazed Instagram fan.
- This post is what got me into gluten free sourdough making all those years ago. Major props where they are due.
Other things you will need for your gluten free sourdough
- A selection of gluten free flours at your disposal, and a basic understanding of which flour does what. Please have a read of my gluten free flour guide if you’re new to the gluten free life/having an overloaded flour pantry.
- Some decent kitchen scales. If you’ve gotten this far into gluten free baking, I’m assuming you have some scales at home. Gluten free is a fickle beast, and even small deviations in flours can yield very undesirable results. Scales aren’t super expensive and they’re worth every penny.
- Potentially, a banneton (bread proofing basket) and a lame (very sharp instrument to score the bread.) Note that neither are compulsory – you can use a bowl for proofing and a sharp knife for scoring.
- Some sort of dutch oven for baking the loaf. This is necessary to create the same sort of environment as a profesh oven – high, consistent heat which results in ‘oven spring’ aka lift. Check that it’s suitable for high oven temperatures (or you might lose the handle of the lid). Worst comes to worst, you can use a cast iron skillet, a foil tent and a tray of water in the bottom of the oven to create steam.
Gluten free sourdough bread tips and tricks
Patience is key. It sucks but it’s true. You need to be patient in waiting for your starter, then in making the pre-ferment, and again in proofing. Oh also, it’s best to cut a loaf when cool (to avoid gumminess) so there’s that too.
Manage your expectations, and know that it won’t be as beautifully air pockety and soft as a regular, wheat based loaf.
As with pasta recipes, there isn’t really such thing as a sourdough recipe. That is, you’ll need to use a bit of intuition. Is your dough really dry? Add a bit of water. Is it less of a dough and more of a soup? Might have to add a bit of flour. There are so many variables – starter, the degree to which your flour is milled, etc. Use this recipe as a guide, and make the bread your own.
WEIGH YOUR INGREDIENTS, water included.
Variables that can impact your gluten free sourdough bread
On basically every gluten free sourdough post I’ve seen, there are a hoard of angry people asking why their loaf didn’t work. A) don’t do this to me pls and B) you’ll never get a 100% accurate answer from a stranger (me) unless you deviated so enormously from the instructions that it couldn’t be anything else. So, with all this in mind, let’s chat through things that could alter your loaf.
- Your sourdough starter. Is it thick, is it thin, is it even bubbly? Different gluten free flours absorb water differently, so a starter with rice flour could look dramatically different to one with quinoa flour. Personally I like to add water using my intuition – I want the starter to be on the thicker side, but still pourable. Think porridge or yoghurt consistency. Just as the thickness could impact your loaf, so too could the weather. Starters thrive in warmer climates, and loaves rise quicker and higher as a result.
- Your flours. Different brands mill their flours to different degrees, and no two batches are the same. Your choice of flours will also impact the loaf. Buckwheat is thirstier than quinoa, for example.
- Your psyllium husk. I use plain ol’ psyllium husk, but there is also such a thing is psyllium husk powder. It absorbs a lot more water than the regular variety.
- Your oven temperature. Is it accurate? Did you preheat it for long enough?
- Whether you watched each element of your bread carefully. This is particularly important in the proofing stage – overproofed dough is a cause of many bread ills. See the proofing section for more.
- Whether or not you have a dutch oven at your disposal. I’m learning that you really need your loaf to be covered for optimal oven spring (lift and rise in the oven.) You can try to simulate this with a tray of water at the bottom of the oven (for steam) but ideally a dutch oven is best.
- How you measure things. Scales are best, but with aforementioned variables, some adjustments might need to be made.
- Finally, although there are plenty more, your water. I have found here in Melbourne that the water seems to be fine for sourdough use. However, additives to tap water can hinder the growth of a sourdough culture. Consider buying a water filter if you’ve had no luck getting your starter or sourdough going.
The process of making gluten free sourdough bread
As you’re probably aware, sourdough making is not a quick process. Getting your starter going can take up to 12 days in a cold climate, so this is a marathon. A carb laden marathon (my preferred sort.)
Step one: make your starter
If you’ve gotten this far without a starter, please stop and read the starter post here. Note that you can play around with the flours that work best for you.
Step two: make the preferment
There are fancy names for these actions in regular sourdough making. I’m not going to use them because I don’t think I have a full grasp on them yet. They also differ a little in instruction between glutenous and gluten free preparations.
To make the pre-ferment, combine the starter, flour and water. I like to do this step the night before baking bread. It can be done the morning of, but I actually find the bread has more air pockets if the process begins the night before.
Whatever you choose to do, the pre-ferment needs to be made using starter that is well fed and in a ‘rise.’ Basically, a couple of hours after feeding a starter it rises and bubbles up before collapsing again. You need to use the starter at the peak of it’s rise. There’s no exact science and it’s a somewhat forgiving process. My suggestion is to feed it, run some errands or do some work and then check back. The timing depends on the strength of your starter and the climate in your kitchen. Starters and sourdoughs like a bit of heat (not too much!) so they’re generally quicker in warmer climates.
If you’re doing it in the morning, it needs to sit until bubbly for at least 3 hours. The top should look like a bowl of warm milk does after you’ve added packet yeast and left it sit – fluffy and bubbly, but not excessively so. Try to do this in a glass or plastic bowl as opposed to metal.
TLDR:
- Create your starter and feed it until it’s active and bubbly
- Feed your active starter a few hours ahead of it’s maiden voyage (so it’s on a ‘rise’)
- Create your pre-ferment with active starter, rice flour and water
Step three: make your gluten free sourdough bread
Good morning or happy lunchtime! Time to create your loaf. You’ll be combining the psyllium husk with water and honey/sugar to create a gel. You’ll need to let this mixture sit for 5-10 minutes to allow it to gel up sufficiently. While you’re waiting, you’ll be mixing up your flours in a large mixing bowl. Next up, you’ll combine the pre-ferment with the psyllium husk, and then combine this with the flours. Mix mix mix! There should be no dry spots.
As mentioned, you will need to use your intuition. If the loaf is way too dry, add a splash of water, but wait until you’ve incorporated ALL the flour before making any rash moves. Again, as mentioned, every single flour is different, so this will likely change every time you make a loaf. It’s a process of discovery and intuition, so trust your gut. Even a bad loaf is a good loaf by gluten-free sourdough bread standards.
If the dough is very wet, be honest with yourself – did you accurately weigh the flours? Follow the instructions? Use an active starter? Same goes if the dough is exceedingly dry.
The dough should feel kind of moist but overall like a dough should feel. It shouldn’t be wet like a regular gluten free dough – you should be able to handle it and shape it. It should feel light and kind of jelly-ish.
Shaping your gluten free sourdough
Now, let’s talk shaping! There’s not a crazy amount to it here because we’re not stretching gluten or doing anything fancy. This King Arthur video gives you a decent idea of the basics – you want to try and make sure the seam is on the bottom of the loaf and sealed up as much as possible. The seam will open up when baking so it’s preferable not to have one (especially not on the top of the loaf.)
To do this yourself, dump your dough onto a lightly floured bench. Lightly flouring is unusual for gluten free baked goods but this dough isn’t all that sticky. Only using minimal flour means you won’t add extra to the inner crevices of the bread, which can be unpleasant when eating it.
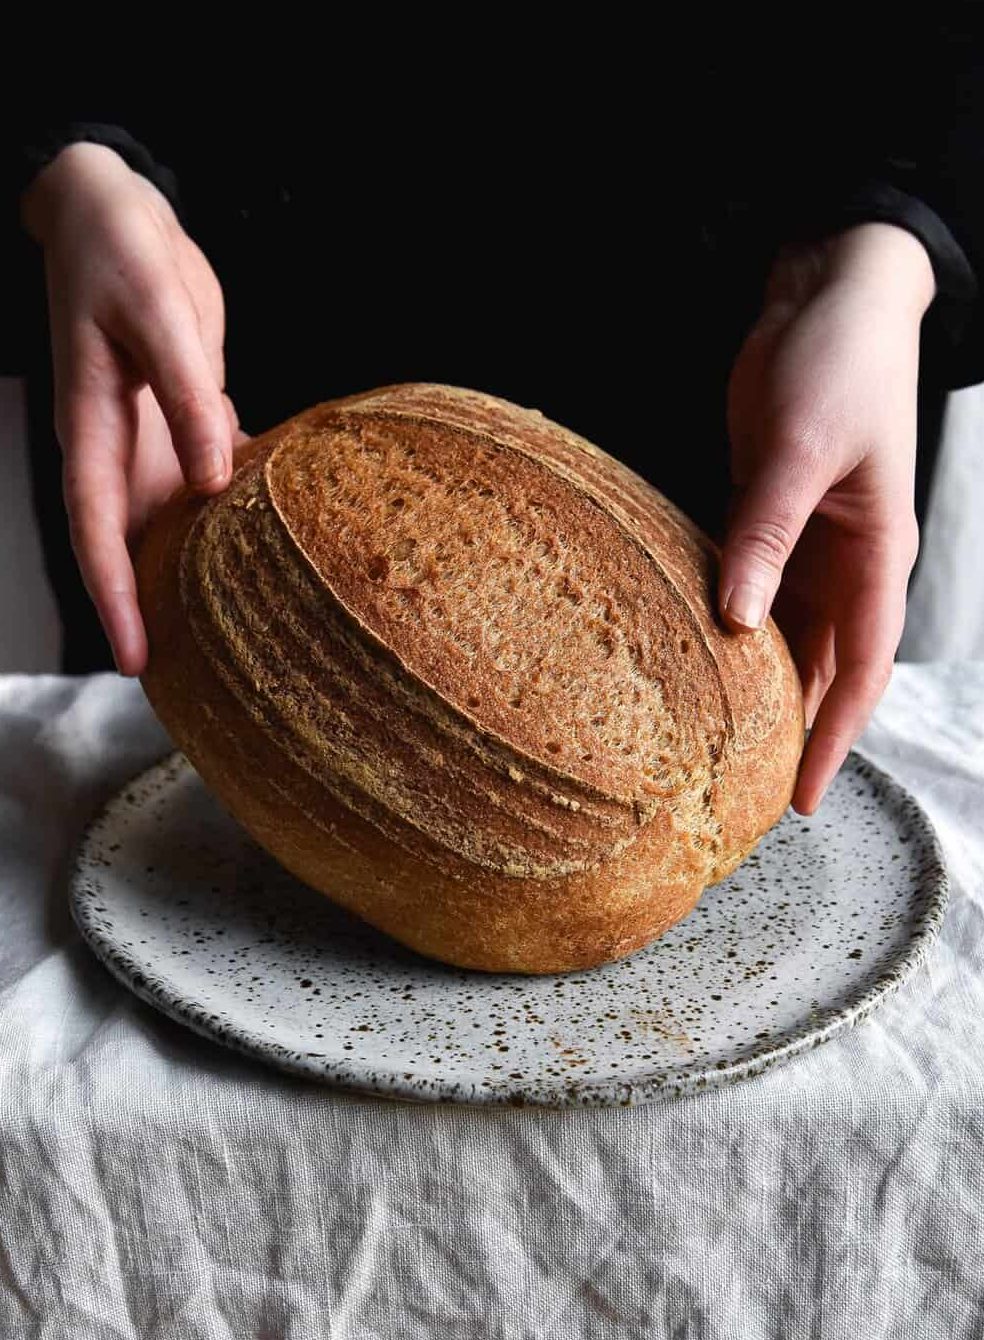
Loaf or boule?
So, time for your bread options! I’m sure there are more, but I’ve only made these. So, you can either make a gluten-free sourdough bread boule or a loaf. A boule is a round loaf, essentially. A loaf is a loaf. Thank me later.
To create a boule, you have a few options. Firstly, you can buy a round banneton. I found one at a local bakery and it cost me about $30 Australian. It’s a bit of a bougie bakery so I expect you could probably find a cheaper one, but I don’t mind paying more for small biz. If, however, a banneton is out of the question, you could also use a bowl lined with a tea towel. Ideally it will have a round bottom (not a flattened one) and be made of either glass or plastic.
Sprinkle a little flour into your banneton or bowl, and then place your loaf, seam-side up (aka the shit bits on the bottom so nobody will see them.) Cover the bowl very thoroughly. I like to use a jumbo ziploc bag. The dough needs a moist environment to rise without getting dry.
Personally, I am obsessed with putting my covered dough in the oven with JUST THE LIGHT ON. NOT THE OVEN, JUST THE LIGHT. It’s a draft free environment with a bit of heat, which is exactly what your dough needs to rise. If you don’t have that option, some people have written online that they use electric blankets, dog electric beds (who knew?) or hot water bottles (not too close or too hot!)
In summer, you likely won’t need a heat source, particularly if your kitchen is warm. Note that you can put your dough in a sunny spot, but it needs to be draft free and not crazy insane heat.
Step four: proofing your gluten free sourdough
This is the bit where you leave the dough to do it’s thing. The Spruce Eats has a good definition of proofing. Note that (as previously mentioned) gluten-free sourdough bread differs from regular. Most obviously if you’re clicking that link, gluten-free requires only one proof – also known as bulk fermentation. In laymen’s terms, it just needs to rise once.
There is such a thing as under-proofing and over-proofing. I don’t have a full grasp on these yet, I don’t think. However, Cooks lllustrated says that if you gently poke the dough and it springs back completely, it needs to be proofed longer. If you poke it and it springs back slowly (leaving a lil indent) then it’s ready to be baked. This article is also very helpful in determining when your bread is correctly proofed.
Apparently, if in doubt, it’s better to slightly under-proof your dough as opposed to over-proofing it. An over-proofed loaf can result in a big air pocket at the top of the loaf and a dense, gum like bread underneath. Learning what works best is an art (that I don’t think I have fully mastered). It also depends heavily on your kitchen ambience and all the other variables mentioned above that went into your loaf to begin with.
Step five: baking your gluten free sourdough bread
Alright! Your dough is shaped and proofed, so it’s time to bake. Firstly, you’ll need to preheat the oven to a whopping 250C or 500F. You need to preheat your baking vessel of choice (hopefully a dutch oven, but an oven proof skillet or baking stone will suffice.) Everything needs to be bloody hot, so make sure you have your wits about you and protective gear on your hands.
Lots of people online preheat their ovens for an hour ahead of time. This is because a hot, consistent heat is necessary to create oven spring, which is liftoff in the oven. Oven spring is best observed in loaves made in a dutch oven, because they keep heat consistent and trap steam.
If you don’t have a dutch oven, apparently baking stones are helpful. And if you don’t have a baking stone, you can use a cast iron skillet as a base and AT WORST a very well constructed til foil tent on top of your bread. It will help to put a tray of water in the bottom of your oven to create steam for lift. If you want a lift boost in your dutch oven, you can pop a couple of ice cubes in with your loaf.
Baking your loaf covered first results in spring and lift with a bit of colour. If you baked it uncovered the entire time, it would likely burn quite significantly. So, each does have a purpose. I bake my loaves for 40-50 minutes covered, before uncovering and cooking for an additional 30-50. This is longer than a regular loaf, but we’ve added a lot more water and our loaves are at risk of being gummy.

How to tell when your loaf is cooked
It should be a lovely golden brown and if you knock on it (as you would a door) it should sound hollow. Even if the crust is very dark, it should smell caramelised as opposed to burnt. You should also just be able to smell the aroma of baked bread. Sometimes I think we forget that smell is a very helpful tool.
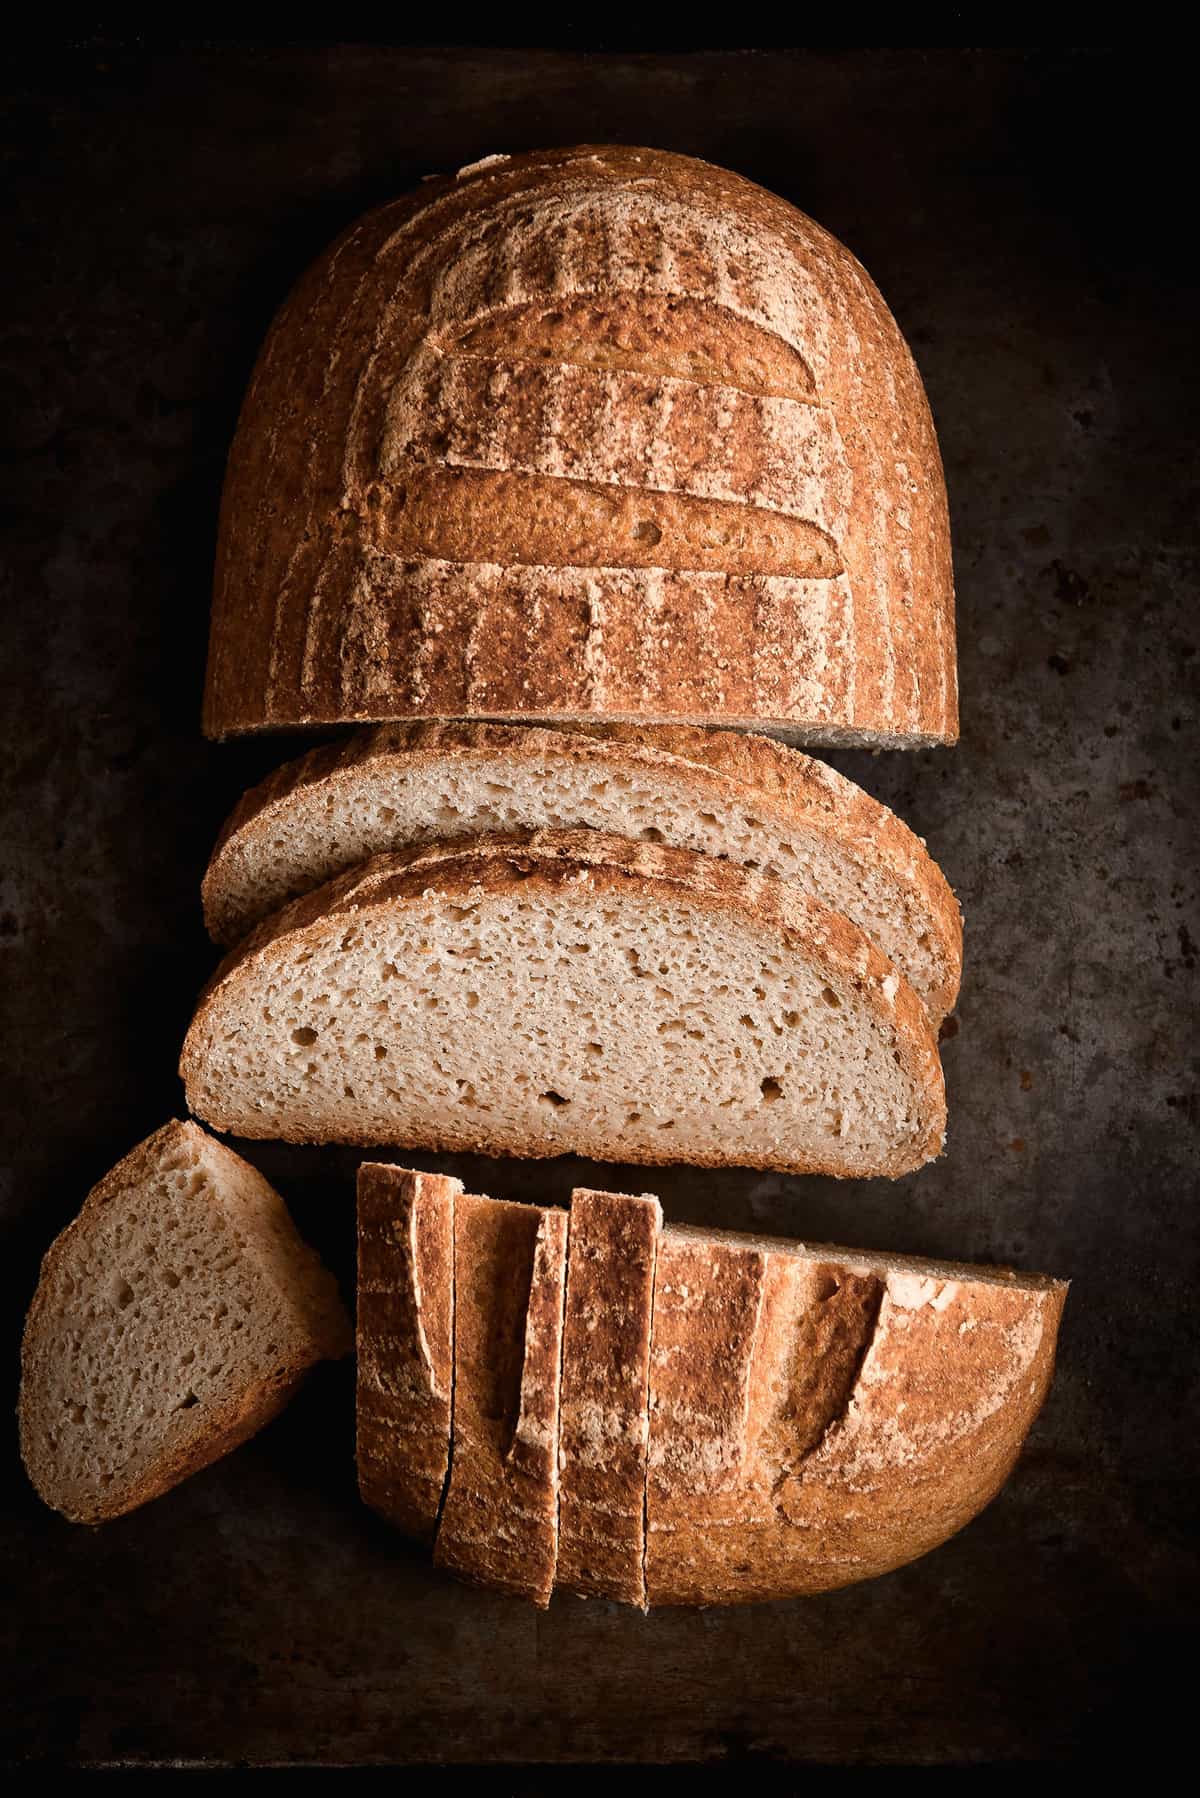
You should absolutely leave your loaf to cool completely before cutting. I know this is hard, but the steam is still working it’s way through the loaf while hot. Cut it too soon and you’ll compress all those air bubbles you worked hard to create. The interior will be a gummy, sticky mess. I think this issue is particularly pronounced with gluten free loaves, so just don’t do it.
Troubleshooting your gluten free sourdough bread
My loaf is very wet as I’m shaping it?
There are a few reasons this could have happened. Firstly, did you weigh all your ingredients very precisely? Secondly, is your starter pourable, as opposed to spoonable? An ideal starter is thick like a paste – you could either spoon it or sluggishly pour it. It should be FULL of bubbles that pop as you decant it. If your starter is runny and not super active, this is adding liquid but not gas to the loaf. As mentioned below, starters hit their baking peak a month after you first begin them, so be patient.
Next issue is whether you left your psyllium husk to gel for a sufficient amount of time. The psyllium husk is responsible for holding all the liquid in the dough. If you’ve gotten to the mixing stage and the dough looks like it will be too wet to handle, leave it in the bowl for 10 minutes. Some doughs are tricky to handle (higher hydration = more open crumb, to an extent) it shouldn’t be so wet that it’s like cake batter.
If the 10 minute wait fails and you really can’t lightly flour it on and get it into the bench, add 10g more starch (potato or tapioca) and try again. Don’t add too much flour or you’ll end up with a dry loaf.
It is worth noting that flour absorbency varies from bag to bag, country to country. If your loaf is very wet, it might be that flour in your country (or your brand of choice) is markedly different to mine. I can’t test every bag of flour that was ever made! If wet loaves keep happening to you, add less water to compensate.
The loaf didn’t get much height?
Potential issue 1: your starter might not have been active enough. Apparently, you probably won’t hit peak strength (and thus peak bread) from your starter until about a month in. It needs time to become stronger and more mature. Don’t we all.
Issue 2: Sometimes bannetons are quite shallow and large. While this is probably fine for glutenous bread, it means that your gluten free loaf will more likely spread out. To counteract this, either use a deep bottomed banneton (or bowl) or slow proof your bread in the fridge overnight. To do this, simply follow the method for using your preferment on the same day, and make the loaf after 3 hours. Place the loaf in banneton and cover with cling film/a plastic bag. Leave it in the fridge for up to 24 hours. Not only does this help develop flavour, the bread will also stand taller, even as it proofs at room temperature.
Another potential issue? The fermentation process all takes a lot longer in a cold environment, so that’s something to keep in mind for next time. A 2-3 hour timeline is thrown out the window in a very cold kitchen. Baking a loaf before it has fully proofed means that it won’t have the strength and air pockets to hold itself up.
On that note: the first 10 minutes in the oven is crucial for growth and height. So, was your oven hot enough? Did you preheat your Dutch Oven thoroughly?
The loaf was gummy?
Did you weigh your ingredients precisely? Water and starter included? Did you cut the loaf before it had cooled? Gluten-free sourdough bread can be a little more moist and dense than the normal variety, but it shouldn’t be gummy. Another thing to consider for next time is taking the lid off the sourdough a little earlier than you did last time. Lastly, did you cook the loaf for long enough?
This issue can also be traced back to a new or sluggish starter. The bubbles in the starter are what will allow the bread to expand. Without expansion, you have a flat, gummy loaf.
The loaf innards were detached from the top crust, leaving a big air pocket and a dense bread?
This is a classic sign of over proofing, also known as a flying crust. Next time, proof the loaf for less time or in the fridge. If you are consistently having this issue, I recommend dropping back on the amount of starter added to your loaves.
The loaf was dry?
Unless you didn’t weigh your ingredients, I find this one unlikely. Sourdough is a wetter bread than regular, and gluten free needs even more water again. Every bag of flour you’ve ever used has been slightly different. It’s the nature of the beast. If you followed the recipe to the T and your loaf was still dry, consider adding a smidge more water next time (if you’re using the same bags of flours.) It still makes good croutons or toast.
One other thing to note: did you use psyllium husk POWDER? It is much more absorbent, so that could explain it. I don’t use the powder in any of my bread recipes, I’m happy with the original.
The crust was too dark for me?
Cook it on a slightly lower temperature next time! Because we have heated the dutch oven thoroughly, it’s going to be pretty hot in the oven. Sometimes you’ll find that it was a little too hot for the colour of crust you’d like to achieve. Keep in mind that a super hot oven is integral to a good oven spring, so the preheating is undoubtedly necessary.
Gluten-free sourdough bread Q and A
- I don’t have the flours you specified. Can I use XYZ? I developed this recipe with these flours for a few reasons. Firstly, I tried to use a healthy mix of wholegrain varieties and starchy basics (looking at you, rice flour and tapioca.) Secondly, I wanted to use flours that are readily available, as much as possible. I know sorghum is niche, but it works amazingly well in bread. Quinoa flour can be ground from whole quinoa in a food processor. At the moment, I don’t have suggestions as to potential substitutes. I will update the post as I trial different combinations of flours.
- Where can I buy sorghum flour? I buy mine at the supermarket or bulk food store. You can also order it online.
- Can I substitute psyllium husk for psyllium husk powder? I haven’t tried it – I prefer to stick with what I know. If you try it, let me know, but note that they have quite different absorbencies (the powder is much more absorbent).
- Can I use tapioca flour as opposed to starch or vice versa? I use these pretty interchangeably I have to say. I’m sure there are subtle differences but I haven’t really noticed them in my baking. I haven’t used cassava flour before so I can’t say if that’s different, but I’d say arrowroot might be a clean swap.
- Can I use brown rice flour instead of white? I haven’t tried this, although I’d say it would be OK. I’d recommend making the bread with a view to adding a few extra tablespoons of water as necessary. Brown rice flour can be a thirsty gal.
Handy links
- This article from Serious Eats is seriously helpful. That said, disregard anything to do with gluten.
- This website, True Sourdough, has a lot of handy articles for when you’re getting into sourdough mode.
- The Perfect Loaf is an amazing site full of regular sourdough recipes that I’ve already linked up top. Although not all the steps apply, it’s still a great resource for learning about bread making.
- This Youtube vid of Chad from Tartine bakery running through how he makes sourdough is a great visual learning tool.
My other gluten free sourdough recipes
- This ‘white bread’ gluten free sourdough
- 100% buckwheat sourdough loaf from my buckwheat e-book
- A seeded gluten free sourdough
- Toasted quinoa flour sourdough
- Gluten free sourdough pizza bases
- Sourdough discard crackers
- Some sourdough discard pancakes
- Sourdough brownie cookies
- A delicious gluten free sourdough banana bread
- Sourdough hot cross buns
- And, of course, sourdough brownies
Gluten free sourdough bread
Equipment
- Large glass or plastic mixing bowls
- Boule shaped Banneton (bread shaping basket) or a bowl with a clean tea towel
- Lame (scoring blade) or sharp knife
- Dutch oven or cast iron skillet and tin foil
- Ice cubes, optional
Ingredients
For the pre-ferment:
- 125-150 g (1/2 cup)* active sourdough starter (see notes above and here) Use 150g for a more sour loaf (I use 150g)
- 60 g (1/2 cup)* white rice flour
- 150 g (3/4 cup)* water
For the loaf:
- 20 g (just over 1/4 cup)* psyllium husk, not psyllium husk powder
- 250-275 g (1 1/4 cups)* water
- 1/2 tablespoon honey or sugar
- 1 1/2 teaspoons sea salt
- 55 g (1/2 cup)* quinoa flour
- 100 g (1 cup)* sorghum flour
- 75 g (3/4 cup)* tapioca flour
- 60 g (1/2 cup* white rice flour
Instructions
To make the pre-ferment:
- Firstly, ensure you’re using a starter that has been fed a few hours before. It should be on the rise and have a domed top when you measure it into the bowl. To fit this around a normal work schedule, I’d suggest feeding your starter at 5.30pm, and then waiting until bedtime (or the peak of your starter) to make the pre-ferment.
- Once the starter is ready to go, mix it with the water and then add the flour. Stir until combined and cover with cling film or a wrap. I hate recommending cling film but it does do a good job here.
- Leave this in a reasonably warm, draft free place overnight. I use my oven with just the light, not the heat turned on.
To make the loaf:
- In a medium sized mixing bowl, combine the psyllium husk, water, honey and salt. Whisk to combine, and then leave for 5-10 minutes to thicken into a gel.
- While you’re waiting, combine the flours in a large glass or plastic mixing bowl.
- Once the psyllium gel has thickened, mix the pre-ferment into it and whisk to combine. Add this wet mixture to the flours and use a spoon to combine the mixture as much as possible. Once it’s almost mixed, use your hands to squelch the dough around, picking up dry bits of flour as you go. If you’ve weighed everything diligently there shouldn’t be a need for extra water, but you can add 1-2 tablespoons if it’s truly truly necessary. You should be able to pick up the dough and shape it.
- Once the dough is completely mixed through and formed into a rough ball, tip it onto a very lightly (white rice) floured bench. Use your hands (and the Youtube links above) to close any seams as much as possible. Make sure the side with no seams is the top of your loaf.
- When the dough is shaped, lightly flour your banneton or bowl with white rice flour. Place the nice side of the dough (aka the side with no seams that you’ve chosen as the top of the loaf) down into the banneton. The base of the loaf (with all the seams) should be facing upwards now.
- Cover the loaf with a lightly oiled showercap or the cling you used for the pre-ferment. Place the loaf in a warm, draft free place (again, I use my oven with just the light on) for 2-3 hours, or until it’s a little jiggly and a finger poke springs back halfway.
To bake the loaf:
- Half an hour or so before baking the loaf, place your dutch oven in the oven get the heat up to 250C or 500F. Making sure the dutch oven is very hot is integral to getting oven spring.
- When the oven and loaf are both ready, take a long piece of baking paper and lay it on the bench. It needs to be long enough that you can lower the loaf into the dutch oven without burning your arms. In my experience, dropping the loaf into the dutch oven results in a flat and gummy loaf.
- Invert the loaf onto the centre of the baking paper, leaving the edges for lowering handles. Use a lame (sharp scoring blade) or a sharp knife to make a reasonably deep incision in the loaf. Google ‘bread scoring’ for some pattern ideas, or just keep it simple.
- Get all your oven gear ready to work quickly for this next step. Carefully and quickly remove the super hot dutch oven from the oven. Shut the oven door while you work. Take the lid off and quickly lower in the bread. If you’re using an ice cube for extra oven spring, add it now. Pop the lid back on and quickly return the dutch oven to the oven. Turn the oven down to 200-220c.
- Bake the loaf with the lid on for 40-50 minutes. If you prefer a less caramelised (aka dark) crust, leave the lid on a little longer. Once the time is up, remove the lid and continue to bake your loaf for another 40 or so minutes, or until the crust sounds hollow when you knock on it and is deeply caramelised brown in colour.
- Once cooked, remove the loaf from the oven and baking paper and place it on a cooling rack. Allow to cool completely (3-4 hours AT LEAST) before slicing into it, as you can compress all the air in the loaf and end up with extremely gummy bread.
- You can store the loaf in a bag or freeze it in slices.
Notes
- My cup measurements use Australian cups. I suggest you use the gram measurements for accuracy, particularly if you don’t use Australian cups.
this is seriously the most amazingggg post about gf bread I have ever seen! It is so full of great information! Well done and keep up the great work!!
Agreed! Amazing recipe. Thank you.
Ah, it makes me so happy to see a GF recipe. Well done! I’m looking forward to trying this with my started over the weekend. I was curious what role the psyllium husk plays in the bread? I’m not too familiar with the ingredient and curious. Out of curiosity, did you try other ingredients and found this to be irreplaceable?
Hi Kelly! Psyllium husk acts as the gluten in this bread – it holds it together and gives it structure so the bread can rise upwards during baking without collapsing on itself. I experimented with a combination of psyllium husk and flaxseed but found psyllium a little better and more practical. You could potentially try using flaxseed or meal/chia seed or meal, but their absorbency level is probably very different. I also find psyllium a lot more tolerable in terms of FODMAPs, which is why it’s my binder of choice 🙂
Is this the same psyllium as in the fiber powder you would use for bowel movements? Not to be too graphic, but trying to make sure I get the correct item.
Hi Natalie! Haha yes, sometimes it can be sold marketed as that. Just make sure you get an unflavoured one and not a powdered version. Psyllium husk and and psyllium husk powder have very different absorbencies. I use psyllium husk for all my breads and it’s generally (in Australia at least) the more common of the two in supermarkets 🙂
I’m so excited to try this recipe, my starter is 2 days old and I’ve noticed some bubbles – yay! I noticed that you mention this recipe makes a small loaf, what size banneton would you recommend? Or could you tell me what size yours is? Thanks so much <3
Hey Hannah! My banneton is around 7-8cm in height and 21cm in diameter. It’s a decent ‘middle ground’ size and works for smallish- larger loaves. I’d love a smaller, deeper one to get some height on my loaves but I reckon this is a good intermediary size to aim for 🙂
I’m so happy with how my loaf turned out. I want to try subbing some flours next time, and adding seeds or spices. If I add seeds I should soak them first?
It worked! I used Quinoa and Sorghum for the starter. Amazing result. All the details were so helpful and bread tastes so yum! no more store-bought gf bread for us!
250 celcius is 482 Fahrenheit, not 400F. I just put my bread in after only heating my Dutch oven to 400F. Hope it still turns out.?
Sorry Kristi! We don’t use F here in Australia so I just go by what Google says the conversion is and I obviously made a typo. Your loaf should be fine – sometimes I cook my loaves at that temperature for a blonder crust. Thanks for letting me know and I will amend the copy!
This bread is UNREAL!! I had to stop eating my regular sourdough last year and was disappointed with my other gf recipes. This is as good as any wheat sourdough I’ve had esp toasted. Thank you so much for this recipe!!!
I’m making this bread right now (it’s sitting in the oven proofing)…it seemed pretty wet/sticky when I was trying to shape it. I followed the weight measurements carefully. It definitely didn’t look like a smooth typical sourdough round. Is that okay/normal?
Hi K! A few questions: did you sub in any flours for different ones? (this includes brown rice for white, potato flour for starch, etc). Did you weigh the water as well? Was your sourdough starter very watery? It can sometimes be a little sticky and need a light dusting of flour, but he top of the loaf should look like a relatively smooth boule prior to proofing. It might be fine as more water (up to a certain point) gives dough good oven spring but generally speaking it’s not an offensively wet dough. Keep me updated with how it went!
It turned out pretty good! The shape ended up just fine. I was delighted. It’s a little bit gummy/sticky inside, but maybe I didn’t bake it long enough or have the lid off long enough (since I wanted a crust on the less dark side). I did weigh the water and use the same flours…perhaps my starter was too watery. Thank you for the great, thorough recipe!
Great to hear! The weights of gluten free flours vary from brand to brand, bag to bag etc, which might account for stickiness too. If you want a blonder crust next, try preheating the oven on a slightly lower temperature, and then use piece of foil to cover the top for the second half of baking, whole still baking the loaf for the whole 1 hour 30+. It gets super tempting to pull it out when you think it’s the perfect colour (I’ve done it) but the loaf contains a lot of water so it really needs the oven time.
I have also read that it can help to take the loaf out of the dutch oven for the second half of baking so that the bottom stays lighter than it would in the hot dutch oven. So glad you enjoyed it! Can you tell from this essay that I’m in too deep with my obsession? haha
I’ll definitely give those suggestions a try. Can’t wait. Thank you sooo much. I had a piece toasted for breakfast this morning and it was honestly delicious.
This is fantastic, and I cannot express how grateful I am for the detailed directions, and your overall approach and style of writing. I am posting from the States to say it worked beautifully! Under COVID, I have had to substitute flours a bit, both in the starter and the loaf. Used oat flour a couple feedings and used brown rice flour instead of white. Second loaf this week is in the oven right now!
This is fantastic, and I cannot express how grateful I am for the detailed directions, and your overall approach and style of writing. I am posting from the States to say it worked beautifully! Under COVID, I have had to substitute flours a bit, both in the starter and the loaf. Used oat flour a couple feedings and used brown rice flour instead of white. Second loaf this week is in the oven right now!
As a side note….oats aren’t considered gluten free here in Australia. They contain a very similar protein to gluten, Which might explain why you got great results with the oat flour…
This is a great recipe, easy to follow and delicious bread, even my gluten eating partner kept going back for more.
Just curious if there’s a particular Dutch oven you’d recommend for baking. Thanks ?
Hey! Loving all of your recipes – literally trying everything out thanks so much! I really can’t seem to see the quantities you would use for a feed (pre pre-ferment) for starter x flour x water – are you able to clarify this please? Secondly, after using 150g of the starter for the
Preferment, do I need to feed the starter again before putting it back into the fridge for 1 week later? Thanks so much ☺️
Hi Katia, I still don’t understand what you mean by a pre pre-ferment. I think you’re getting confused with the process. The instructions for a starter feed are in the sourdough starter recipe, and the instructions for a preferment are in the sourdough bread post 🙂
Hi – I also have the same question as Katia. When you feed your starter a few hours before the pre-ferment you feed With 25g quinoa flour, 25g sorghum flour and 50-75g water – how much starter are you feeding?
I’m really looking forward to trying this recipe!
Hi Rebecca, I’m sorry but I don’t quite understand the question. You need to feed the starter 50g flour prior to using it. Then once it’s bubbly, you create a preferment in a new bowl using starter that has been fed, along with flour and water. Is that what you mean?
Hi again – how many grams of starter are you feeding – that is ? grams starter + 50 grams flour + 50-70 grams water. Does that make sense? I already have an active starter.
? thanks so much
Hi Rebecca, I’m still not understanding I’m sorry. you can’t feed starter to starter – if you have an active starter that you have fed with flour and water, you move onto making the preferment. Preferment is a mix of active starter, flour and water. It’s like feeding an offshoot of your starter again that you’ll use to bake the bread.
Not sure I understand this but do you mean how much of your starter do you feed to make the preferment? Cause you feed your whole jar/container of starter the 25g quinoa 25g sorghum etc.. then after 3-4 hours when it’s at the peak of the rise you take 120-150g of the starter to make the preferment. ?
Sorry for the confusion – I want to know how much starter you have in your jar (approximately) before you feed it? I already have a GF starter that I’ve been working with for awhile so haven’t needed to follow your instructions to make a starter and want to make sure my starter is a similar consistency etc so will take some of my starter and feed it per your instructions but not sure how much starter you’re working with – I’m assuming it’s around 50-70g (as you’re feeding it 50g flour???) Thanks for persevering with my question ?
No that’s OK! I’m sorry it took me so long to figure out your question haha. It depends – If I plan to bake two loaves that day it will be a little bigger than if I have no baking plans. Generally it’s a maximum of two cups and average of 1 -1/2 cups in size. Any more than that and I’ll discard/bake a loaf. You’re right in assuming that a big starter needs more food, but 50g morning and night is enough to sustain a starter of 1-2 cup size. That said, if it looks watery, weak or smells acidic, I will feed it a little extra.
The ideal consistency of a starter for this bread is thick without being claggy on top, like a paste. It should be filled with bubbles. There’s a new video on the starter recipe page that shows the consistency of my starter before it goes into a preferment. Does this answer your question?
Yayyyy – we got there. Thank you!
I’ve got a loaf in the oven which I started earlier (with 70g my existing starter that I fed with 50g flour + 70g water) then used 150g of that to make the pre-ferment. The loaf looks great just waiting for it to finish cooking. I’m looking forward to trying your GF ‘white bread’ sourdough next.
Thanks for the great recipe.
One last thing because I think this might be where you were potentially getting confused – you don’t have to weigh out 70g of your starter to feed it, THEN make a preferment. That’s essentially making two rounds of preferments. You just need to feed your starter (however many grams it weighs) and wait until it’s ripe before using it in the preferment. Does that make sense? Just treat the starter like an ingredient that needs to be well fed before it can be used 🙂
? thanks
Amazing! I baked the sourdough last night and my god it’s amazing. My only advice to people attempting to make this is follow the instructions to a T! My dough seemed incredibly dry and I was tempted to add more water but Im glad I didn’t. The loaf proofed well still and the bread was so moist and tasty! I’m making a second loaf today (I have two jars of starter going) and I’m super excited. Love your recipes!
Is it normal for the preferment to be quite runny? I left it in the oven overnight with just the light on and in the morning the water seemed to have separated and gathered at the top. So there were no bubbles since the surface was covered in water… So I’m thinking I have to do the preferment again but would be good to know what would cause the water to separate. Thank you!
Hi Anna, is your starter quite new? Newer starters often lack the strength of a more mature starter which can sometimes cause a lack of activity. Sometimes I find if I stir it up and then put back in a warm place, it eventually bubbles up. If you haven’t thrown it out yet, you could also add a tablespoon of extra flour for food, or a 1/4 teaspoon ginger powder, which is a yeast enhancer.
Next time you could try using a wholegrain in the preferment (sorghum instead of rice) – starters love whole grains. You could then either swap the rice flour quantity into the loaf itself, or try using all sorghum and lowering the overall water content just a little bit. Using a whole grain in a preferment does make the loaf more ‘sour’ so only give this a crack if you like a sour sourdough 🙂
Thanks so much for the reply! And one more question – how much does it rise when proofing? My starter looked great, followed the recipe all good. When I was mixing the flour to make the dough, it felt kind of dry. I added another table spoon of water but I don’t think the mixture was homogenous, it looked more like scone dough – lots of doughy bits with flour in between which I had to press together to form a ball. So the surface of the dough wasn’t smooth as it is when using gluten flour. I’ve been proofing it in a warm spot but doesn’t seem to have visibly risen… Is this normal? 🙂
Hi Anna, did you really get in there and squelch the dough through your hands? I have never had an issue with dryness in this recipe – more often the opposite. It’s got a lot of liquid in it, so even accounting for flour variations it’s hard to imagine why it would be dry. Sometimes it can take a while to totally combine the mixture, but it should be smooth once you do. Also, before when you said that your preferment didn’t have bubbles – did you make a new one or push on with that one? The dough should visibly rise, maybe not as much as regular bread but it should still be rising.
It’s a little tricky to diagnose but these would be my suggestions:
1) you’ve accidentally added too much flour or not enough water somewhere along the line
2) your starter was too dry to begin with, which hinders fermentation from the outset. A starter should look like a thick paste with bubbles. If your starter isn’t healthy, the bread will never rise, so starter health and consistency is critical.
3) you didn’t quite mix the dough for long enough. It might start off scone-like but with enough mixing (I suggest using your hands) it will become a smooth dough ball.
4) if you’re in winter or in a cold house, both your starter and your loaf require more heat to ferment than you might think. I read somewhere that 23-30C is optimal. If you can, try proofing the loaf in the oven with just the light on. If you can’t and you are in a cold kitchen, fermentation can take a lot longer than the specified time.
Hope that helps!
Hi Anna, one more thing I just thought of re the dryness issue: double check that you’re using psyllium husk instead of psyllium husk powder. I don’t know if you’re Australian but I noticed the Coles brand says ‘psyllium husk’ when it’s actually the powder version. Powdered psyllium is much more absorbent than the regular husk, which could account for a dry loaf!
OMG, I made it and it’s freakin’ delicious! I made a new preferment, didn’t go ahead with the first one. I don’t think the loaf as a whole rose much but it’s definitely got a lot of small air pockets inside and even a few bigger ones. I’ll see if rises more in future but even as it is, it’s so so good! Thank you for researching, testing and sharing with us. Honestly, it’s amazing. And for patiently answering questions! x
Wondering two things: first how warm is you oven with just the lightbulb on—mine is about 93 degrees Fahrenheit. Second, what are your thoughts on using a mixer (Cusiniart, Ninja or Kitchenaid) with the dough hook instead of mixing by hand?
Hi Jenny! My oven doesn’t give me a temperature with the light on, but generally in Australia it is somewhere between 23-30 degree Celsius. I’m not sure what that is in Fahrenheit but Google will tell you. In terms of using a mixer, I wanted to make the recipe as accessible as possible so I haven’t one for any of my trials. You can certainly give it a try and I imagine there would be no issue, but I haven’t done it before 🙂
I stuck my “instatemp” oven thermometer in my over to see how warm it was. I cheated! 😉 Oh also—can the mixed dough sit overnight in the refrigerator and then brood and bake the next day?
Brood! LOL. Proof……
Haha I love your work! Yes it definitely can – even up to 24 hours (maybe beyond, but I haven’t tried that yet). I haven’t quite mastered proofing the loaf after a long refrigeration and so far I’ve found it results in a tighter crumb (ie less air bubbles) but it is definitely possible and supposedly aids in flavour development 🙂
First round out of the oven. Looks amazing. Am keeping myself in check and won’t slice it until tomorrow morning California time! It’s gorgeous—I wish I could post a photo……
Yes! Amazing news Jenny! I commend your patience – keep me updated when you slice it 🙂
Could you please tell me where to find white rice flour? Is there a particular brand? I have only been able to find Bob’s Red Mill Brown Rice Flour. I found all the other ingredients for the sourdough bread. I am currently baking my first loaf and I am very excited to see how it turns out!
Hi Claudine! I can only tell you from my experience in Australia – I’m not sure where you live? I buy white rice flour at bulk/health food stores or in the health food aisle of the supermarket (both Coles and Woolworths). You should be able to substitute brown rice flour too though – just add a tablespoon or two extra water (it’s thirstier than white rice flour). Good luck!
I’m in love! Haven’t had quality bread in years.
Question, how long are you kneading dough? Am I looking for the dough to stretch before proofing? Also what consistency should the pre ferment be?
Thanks!
Hi Rachel, I’m so glad to hear that! As far as my research and experience suggests, no kneeding necessary. Because there’s no gluten necessary, there’s no point. Same goes with stretching the dough (which builds strength by developing the gluten network) – not necessary. The consistency of the preferment will depend a little on your starter (which ideally is a thick paste in consistency with lots of bubbles, it should feel light when you spoon it). That said, the preferment for this recipe should hopefully have domed a little on top by the time you use it. It’s runnier than starter but should still have enough strength to dome. It’s autumn in Australia so I put mine in the oven with just the light on if it’s looking watery and within an hour or two it perks right up 🙂
SUPER HELPFUL!! My preferment I think was a little to watery, will make some adjustment. Thanks so much for getting back to me and for all the wonderful information. I’m excited to perfect my loaf and share it with family and friends.
Hi George, This looks like an amazing recipe and the detail will be so helpful. Do you have any examples of how the starter, pre-ferment and then the dough should look before baking? I’ve tried other sourdough recipes which haven’t worked so just want to make sure I am doing the right thing so I can restart if anything goes wrong.. Also is a dutch oven the same as a slow cooker? I have one of these but it doesn’t specifically tell me the temp so perhaps a le cruset casserole dish in the oven is better? Thanks so much 🙂 xx
Hi Sophie, I don’t have any procedural images but I will take some at some point. You definitely cannot use a slow cooker for this recipe – Le Creuset make dutch ovens, although other brands do too. Check out Google for some examples of what one looks like. Whatever you put in the oven, make sure it’s oven proof and high heat safe so you don’t ruin it. Good luck!
Thank you so much for getting back to me. I am just trying to get my starter right. It seems to have gone a bit watery and lost its bubbles. Hopefully will be ready soon. Thanks again!
We’ve made this bread twice now and loved it! Even my kids who aren’t gluten free loved it. I really appreciate your blog writing style. This is the first blog I’ve read where I finally went “aha! now I get it…” and everything i needed to know was right there. For the second loaf I switched out the quinoa and used teff- so good!
One question: I follow your baking instructions exactly, but the bottom of my loaf always burns. The rest is cooked perfectly. Any thoughts on why it burns in the dutch oven? I cook it covered the entire time as I prefer the crust a bit softer, so I don’t think putting it directly on the rack in the oven will help.
Hi Sarah! Thank you for your lovely comment, I always love to hear people are enjoying my recipes 🙂 As for the burnt bottom, you have a few options. Firstly, investing in a really good quality dutch oven will help with even heat distribution. That’s not an option for a lot of people right now though (me included, I use an old busted up dutch oven) so my other suggestions are to lower the heat after the first 15 minutes to around 200-220c. Once the lid comes off, you can lower it again to 180c. Thirdly, you can take the loaf out and put it on the racks along with a little oven tray of hot water. The steam will keep the crust soft and the bottom won’t darken as much it would in the dutch oven. Hope that helps!
Thanks- I’ll try lowering the temperature and see if it helps. 🙂
Hey Sarah! I’ve been playing around with this recipe for about 2-3 weeks now and made dozens on loaves. Tonight I actually popped a round metal cooling rack into the bottom of my Dutch oven and that really helped keep the bottom off my loaf from darkening too much it actually didn’t brown enough so I had to take my loaf out of the Dutch oven to brown it more 🙂 maybe something you could try!
This if the most AMAZING gluten free bread I have ever tasted (I currently have my 8th loaf baking in the oven). It is especially good toasted and topped with Georgia’s low FODMAP zucchini hummus and dukkah. Thank you for such a wonderful recipe – I am a big fan!
Hello! Thank you for this beautiful and detailed recipe and lovely imagery..love the way you explain everything so well! I have been trying to make a gf sourdough look in ages and have had miserable loaves ..this one was nearly there! Need your help on some aspects of the bake please! The preferment-in hot climates do you suggest leaving it on the the kitchen counter overnight or in the fridge? I did it in the morning as I wasn’t sure what I should do and did it in the day-it was foamy and bubbly but the load itself didn’t have any or very few holes..my starter rose but didn’t have the breast yeasty smell -just sour..the dough after 3 hrs also rose about 30% is that what I should expect..the bread and loaf smelt and tastes quite sour..possibly use less starter next time? Otherwise it bakers beautifully with a lovely crust..Any tips or suggestions to get a better rise and taste? Thank you!
Hi Meghna, how hot are we talking? I guess it depends on the temperature, the heat in your kitchen, that sort of thing. In an Australian summer I have never put my starter/preferment in the fridge, but all climates are different. Perhaps you could try refrigerating it and then letting it sit on the counter for half an hour or so before using.
In terms of the air holes in the bread, I think it’s more to do with your starter than the heat. I think you need to drop back the feeds to 2 per day.
As I mentioned in my other comment, I’m thinking the sourness might be a combination of an underperforming starter and the heat. You could try proofing your loaf on the bench for an hour or two, climate dependent, before putting it in the fridge to cold ferment for a couple of hours. Let it sit at room temp for 30 minutes while you preheat the oven and then go ahead.
Using less starter is another avenue to try in a hot climate. I would suggest working on your starter itself first before trying this. I don’t think it’s strong enough yet to sustain a loaf. Everything I have read suggests that you won’t get a great loaf until your starter is about a month old, so that’s something to consider too.
Good luck and keep me posted!
Hello! I agree it’s mostly the starter but I was impatient and wanted to make the bread! Ha! That saying we are enjoying the loaf and it wasn’t a disaster but definitely needs work..going to keep at it and keep you updated..I was reading your response about the preferment to another person’s comment..so it needs to dome? And is it supposed to be a bit on the thicker side? My preferment was watery and had spots of frothy bubbles but definitely didn’t dome..it should also rise? The starter was in an active phase and I kept the preferment for three hours..
Hi Meghna, sometimes I find a watery preferment just needs more time to bubble up, but it might also be that your starter is not strong enough as we discussed. It basically all comes down to the starter – you can’t progress and expect great results with an underperforming starter.
There’s no strict ‘this must happen’ rules because we’re all in different climates and temperatures – you’ll need to figure out what works for you and that will change as the seasons progress. But wherever you are, the starter needs to be healthy and subsequently the preferment should have clear activity. Also please note that the recipe instructs to leave the preferment overnight (this builds strength and flavour) so three hours is likely not long enough, even in a warm climate.
Hi! You did mention in your notes in the blog that you can start the preferment in the morning and leave it for 3 hrs..hence I followed the same..with hot climate proofing works differently for sure, as I have spent a lot of time and research on whole wheat sourdoughs…anyway thanks for the input.,sourdough required a lot of trial and error and gluten free is another world of its own.,.i am sure I will figure it out with time..thank you for your recipe
Wow…I have made so many loaves of GF bread over the years, and this recipe is by far the best. Instructions are detailed and easy to follow. I measured everything with a weigh scale and it worked out just like in the photo. Thank you!
Thank you for your lovely comment Lisa. I’m so glad you’re enjoying it!
Hi I have started over Covid to learn to make sour dough and have it spot on ,now my daughter has to be gluten free, so i am about to try your recipe, question is spelt gluten free ? Thankyou
Hi Jaquie, spelt is low gluten but not gluten free, so if your daughter needs to be 100% gluten free she can’t have spelt flour
I’ve had really good results with this recipe. I have tried two other recipes previously and this has been the best one.
I depart from the recipe in a few areas mostly due to what I have at home:
Brown Rice Starter
Brown Rice Flour for White Rice Flour 1:1
Sunflower Seed Flour for Quinoa Flour 1:1 (I used quinoa with the first one but found the taste more prominent than I wanted).
I have needed the 1-2 tbsp of extra water during the mixing. I think my starter is on the absorptive side.
Thank you! Have you ever tried to make a gfdf bagel with sourdough starter? That’s something I’m interested in trying.
Hi Zaret, that’s great to hear! Fair enough, some people don’t love quinoa flour. You can try toasting it to mellow the flavour – it takes on a subtle nuttiness that I love. I am working on some bagels at the moment but they’ll take a little while to perfect. I’ll keep you posted!
Your gluten free sourdough recipe is wonderful. I used brown rice flour, sorghum and tapioca . However, I am diabetic and after even a small amount of bread, my blood sugar level shoots up. What do you think would happen if I put more sorghum in, plus some more quinoa plus some amaranth? Or any other suggestions re low glycaemic flours?
Hi Dawn! You could definitely experiment with subbing in more of those flours and see how it effects your blood sugar. I don’t have much knowledge on flours and blood sugar so I can’t say if the subs would have a positive impact. I’m currently trying to develop a seed based sourdough which will hopefully be of use to you – I’ll keep you posted 🙂
With a bit of research I have found that the sorghum flour is high GI and therefore not good for diabetics. I had been thinking it was the rice flour but that seems less likely. I will continue to explore.
I was so excited about this and followed the directions exactly.. my starter was risen and bubbly, yet my loaf seemingly didn’t rise? I’ve just taken it out of the oven and it’s extremely dense/rock hard. Hopefully it still tastes good. What do you think went wrong?
Hi Esther, a few things: how old is your starter? Young starters generally don’t mature enough to produce great bread until they are about a month old. Secondly, is your kitchen cold/are you in winter right now? There’s no exact timing for your proofing a loaf and if you’re in a cold climate it will take a lot longer.
You can’t rely on times specified in recipes, you really need to judge the proofing for yourself because every loaf/climate is different. It should have tangibly risen and if you poke it, the loaf should feel airy. I’m working on a sourdough pizza recipe at the moment and it’s proofing for around 12 hours on the bench, if that gives you any indication of how long a proof can go in winter.
So yeah my guess is the starter wasn’t strong enough to hold a loaf, or you didn’t leave it to proof for long enough 🙂
Ah, hopefully that’s it.. it’s only 8 days old 🙂 can I still leave it in the refrigerator from now and feed weekly, or should I feed daily all month? It’s very warm/muggy for me, so climate likely isn’t the issue? It definitely didn’t feel airy. I’ll give it more than 3 hours next time. Excited to try again (and it does still taste miles better than store bought) Thanks!
What type of dutch oven is used for these breads, as I don’t have one, but do have a terracotta oven would that do? if not what else can be used.
Hi Jessie, there’s a section in the post about what you can use if you don’t have a dutch oven. I don’t know much about terracotta but I’m unsure if it would be suitable because of the high heat used
Wow, wow, wow! This is an amazing recipe. I’ve just made it for the first time and it is seriously the best gluten-free bread I’ve had in years (and as a German bread is an important thing for me!). The preferment didn’t work for me so after a couple of unsuccessful attempts (which just went back into the starter pot so no waste), I decided to experiment, skipped that stage and used 250 gr active starter with about 90gr of water and followed the rest of the recipe as described. I guess it’s about getting a feel for the dough and working out when it’s just wet enough. I’m looking forward to trying if I can replicate it. 🙂 thank you
Hello! I really want to try this with psyllium husk powder. Any suggestions? Would this make a gel still but using more powder you think? Thats all I have on hand at the moment. Thank you! 🙂
Wow! Thanks Georgia for the clear and concise instructions and helpful links. I was nervous as I never baked bread before. I followed your instructions to a T and everything turned out well! I have bern baking this and your whit bread version.
My question is why does this require a 2 to 3 hour proofing while the other white bread one had an overnight proofing in the fridge followed by 2 to 3 hours in the oven with light on?
I did notice the white bread expanded more
Could it be due to the proofing in the fridge?
Hi Careena, thanks for your message! Glad to hear the sourdough is working for you.
Firstly, I wanted to give people another option in terms of proofing their bread. An overnight proof is often more convenient to a 9-5 schedule (before 2020, at least) than a day proof.
Secondly, the white bread proofs a lot faster. I suspect this is because the starch is an easily digestible carbohydrate for the sourdough starter, meaning it expands at a much faster rate. As a result, this loaf can overproof far more quickly than the original – particularly in a warm climate or kitchen. Refrigerated proofing is much slower, so it kind of acts like a safety net for the white loaf, lessening the chances of it overproofing.
You can use either proofing method for either loaf, but if you want to proof the white bread at room temperature I recommend watching it very carefully. It’s also helpful having some proofing experience under your belt so you can judge when it’s ready 🙂
Thank you so much for this recipe! I’ve been making it at least once a week since about May and have had only one ‘bad’ (still better than shop-bought gf) loaf having experimented with many flours and temperatures. I make 1.5 X the mixture which yields a great-sized loaf for sandwiches. Our favourite flour blend is to substitute the same weight in sorghum for 50% brown rice, 50% buckwheat (we tried sorghum but it’s quite high GI and we prefer the buckwheat flavour and texture). I use brown rice flour for the starter and the pre-ferment. Thanks again.
Just want to say I so so so SOOOO appreciate all of this! For years I’ve watched friends bake beautiful loaves from their carefully tended starters and never thought it was an option for little-old-Celiac me. Back in June, a friend gifted me a seed of her brown rice flour starter. I began making pizza dough to get confident. Your breadth of information helped me immensely in gathering the bravery to try sourdough loaves. I’m so glad I did! I will admit I’ve used your recipe as a foundation and made my own adaptation based on my equipment and favorite flour blends, but I could not have done it without such a comprehensive guide to go from. Many, many thanks!
This was a fantastic recipe. Thank you so much for all your experimentation and writing it up here. I’ve baked your loaf twice and it turned out beautifully both times. Even the kids were lining up to eat it! One thing – I find quinoa to be very bitter, so I tried replacing the 55 grams of quinoa flour with 40 grams of buckwheat flour and an extra 5 grams of sorghum and 10 grams of white rice flours. This third version also worked a treat and didn’t have the bitterness from the quinoa. Thanks again!
This is the greatest gluten-free sourdough recipe I’ve tried. I’ve made it many times now, following the instructions exactly as written, and it is perfect. I’ve also made some adjustments along the way to make a delicious fig-walnut-seed bread. I’ll use 100% brown rice flour, and use 65 grams cassava flour, 10g tapioca starch instead of the 75 g tapioca starch. I then add a dash of cinnamon, a handful of dried figs, a handful of chopped walnuts, and a handful of seeds (chia, flax, pumpkin, sunflower, etc). It always turns out perfect. Thank you so much for this amazing recipe!!!!!
I am unbelievably grateful to you for this recipe, seriously girl. I love to cook but baking has never come as easily to me- and I really really missed sourdough bread after learning I had an intolerance 10 years ago. The instructions are written out beautifully and with so much care and thought. After a few not-so-good loaves from other sites, I came upon this one and have made 5 loaves already, each one better than the last! The only substitution I make is millet flour instead of quinoa and I also add a splash of ACV and 1/4 tsp ginger powder based on your other recipe. Fav variations have been a cheddar jalapeño version and a really delicious rosemary loaf that came out of the oven today. If you’re feeling intimidated about making gf sourdough for the first time, follow this recipe to a T. I’m so glad that I did! Thank you again for the gift of this recipe! (It won’t let me rate for some reason but would give 6 stars if possible!)
Can we substitute the rice flour ?
Hi Raphaela, you could try substituting the rice flour with sorghum flour or perhaps millet. I haven’t tried it for this particular recipe so let me know you go!
Thank you. I didn’t see this so tried millet flour. Have my first loaf in the oven. Looks good so far.
Hi, what is the purpose of tapioca flour? My wife is alergic to tapioca.
Hi Kumar, the tapioca flour assists with a bit of binding, but because it’s a starch it also lightens the loaf and allows it to proof a little higher. I haven’t tried a substitution for it in this recipe, but you could experiment with glutinous rice flour, potato starch, cornstarch or ideally a combination of two of them. Let me know how it goes if you try it!
Hi George! I love this recipe — thanks so much for sharing it. Way better than any other GF sourdough recipe and I love the dense nature of the bread… Curious if you have any tips for bringing out the “sour” taste a bit more? I saw your suggestion above for using sorghum flour in the preferment, so I’ll try that. But thought I’d see if you had any other tips to share. Again, thanks so much!
Hi Sara, I’m so glad to hear you enjoy it! In terms of making it more sour, a long cold ferment (overnight – 18 hours) in the fridge can really make a difference. The cool temperature allows the loaf to ferment more slowly and thus develops the flavour. You can make it as usual and pop it in the fridge in your banneton, covered. If it fits your schedule better, you could also make the preferment in the morning, mix up the loaf at night and then cold ferment it before baking mid afternoon the next day. Let me know how it goes!
OK! I will try all of this tomorrow (I’m in California so will report back Sunday morning my time!) One other quick question: in your earlier post you suggest cutting back on the water content a little bit if I use sorghum flour. In order to maximize “sourness” I was thinking to use sorghum instead of white rice in pre-ferment and the main recipe too. Since the recipe only calls for water in the pre-ferment, any suggestions on how much I should reduce the water content if I intend to substitute sorghum flour for white rice flour in both places? and, lf course, if you think that’s too much sorghum by all means let me know. thanks!
Hi Georgia… My load turned out great — and definitely more sour, which was awesome. I subbed sorghum for the white rice flour in the preferment and the loaf itself, and lowered the water qty by 25g in the main loaf. 18 hours in the refrigerator, then pulled it out and brought to room temp and then baked. It was great! I would still love a bit more sour but this load was already quite a bit of progress. If you think of anything else to do, let me know. Otherwise, BIG THANK YOU!
Made this recently but subbed in buckwheat flour instead of the sorghum. It worked amazingly and tasted so good, especially If you like the nutty flavour of buckwheat (YUM). Great texture too. Thanks so much for the recipe!
What should the pre ferment look like after sitting with the light on in the oven all night? I am ready to bake today but the pre ferment didn’t look like it changed much overnight. The starter was at its peak too!
Thank you!
Hi Evie, how old is your starter? Sometimes even if they look ready they’re still too fresh to bake with. I say just because you mentioned it was only a few days old in your first comment.
As for the preferment: ideally it should have a ‘crust’ on top which appears as though some bubbles have developed and popped. It might not have grown larger but it should smell sour and when you pour it out it should have some bubbly activity underneath the surface.
If your starter is young it might not have these characteristics. Starters can take up to a month to build significant strength. The climate/temperature you’re baking in has a significant impact on this as the cultures thrive in heat
Thank you for your help! I waited a few days and baked a loaf yesterday, it was delicious! I was nervous that it wouldn’t rise but it got perfect height and is super tasty! This is so exciting as a celiac.
Thanks again!
Thanks so much for this recipe Georgia!!! Have had some absolutely amazing results so far. I’ve been using buckwheat flour instead of sorghum (with a buckwheat/white rice starter) which has worked amazingly well. Highly recommend If you’re a fan of the delicious nutty buckwheat flavour. Great texture and that true sour sourdough flavour too.
Sooo delicious! My first attempt was so good! The bread was moist, not too dense and super tasty. Thank you!
So glad to hear that Katie! 🙂
Hi! Loving this recipe! The bread is super delicious! Just wanted to ask if making a loaf as opposed to a boule, do you take the loaf out of the pan and bake in the dutch oven? I’m afraid it will loose shape if I do that. Or do I bake in the loaf pan? Thanks for your help!
Hi Jessica! I would suggest keeping it in the loaf pan for a loaf. Maybe lower the heat to a 200C/400F when you put the loaf in if you’re not putting the loaf pan in a dutch oven.
I’d also suggest baking the loaf in a steamy oven to emulate the environment in a dutch oven. There’s a section on doing that in my other sourdough bread recipe – https://georgeats.com/gluten-free/gluten-free-white-bread-sourdough-fodmap-friendly-vegan/
It’s right down the bottom just before the recipe card 🙂 Happy baking!
Thanks so much for your gluten free bread recipe and detailed instructions. I have been making and baking a loaf weekly fo over 6 months. The recipient of this wonderful gift loves it!
So happy to hear that you’re enjoying it Lance!
Hi George! I have made this recipe a handful of times and I’m really really enjoying it. Thank you! I have 2 questions for you. I hope you haven’t answered them yet, I tried to read the comments but there are soooo many (you popular). Okay first question- if I want a larger boule, can I just increase the ingredients keeping the same ratios and baking time? Second, any suggestions on add ins? Wanting to make a chocolate/choco chip loaf amongst many other exciting ideas in my brain. With the Chocolate, I’m unsure how to adjust the ingredients with added sweetener and cocoa powder. Thank you so much for all the beautiful work you put into this!
I meant to say increasing baking time!
Hi Laura! If you’d like a larger boule, I recommend having a look at my white bread sourdough recipe. This will give you an idea of the ratios and quantities you’ll need for a larger loaf. I wouldn’t go too much higher than that recipe- there’s a certain point at which the bread will no longer be able to hold itself up and bake within a decent amount of time (speaking from experience!)
As for mix ins, I have only made savoury additions (olives, rosemary etc) so I can’t really suggest how best to add in cocoa powder. I did do a very quick google and the one recipe I found, they counted the cocoa in the flour quantity (so, dropping back 50-100g of the flour and replacing it with cocoa might be a place to start. It might be worth googling other people’s gluten containing recipes and taking inspiration from that. Just remember that sugar is food for the yeast, so if you’re adding sweetener you’ll need to watch for over proofing. I would probably recommend fermenting a sweet loaf in the fridge to control for fast fermentation.
To that end, I would also suggest dropping the starches back (tapioca, potato starch etc) if you use a significant amount of sugar. Because the starter feeds on the starches in the same way it would sugar, it will be at high risk of overproofing.
Good luck and let me know how you go!
You’re amazing- such great advice. I didn’t even factor in the sugar as food. THANK YOU! I’ll let you know if I succeed!
Sorry George one other question- no rush to respond, only if you get arouns to it! Do you find that the same rules for the “poke test” apply with gluten free dough? I’m having a very hard time telling when my bread is proofed.
Hi Laura! The poke test does work, but (as with regular sourdough) it’s not foolproof, only an indication. Honestly I’ve found that proofing is trial and error – I still stuff it up and I’ve made hundreds of loaves now haha. It is hugely dependent on the heat in your kitchen, the strength of the starter, etc.
So yes you can you use the poke test as a guide but I’ve found the best way to get better at reading a proof is to practice. Boring but true 🙂
Would a 2 quart dutch oven be a sufficient size? The loaf is delicious, and the crust is perfect, but my loafs are spreading more than I would like in my 5 quart dutch oven. Thanks so much for the amazing recipe ???
Hi Katie! So glad you’re enjoying it. If you find your loaf spreads too much, I would recommend either fermenting it overnight in the fridge (when the loaf is cooked straight from the fridge it holds it’s shape much better) or baking it in a loaf pan. There are instructions for baking in a loaf pan just above my white bread sourdough recipe – https://georgeats.com/gluten-free/gluten-free-white-bread-sourdough-fodmap-friendly-vegan/
I haven’t tried baking it in a smaller dutch oven. I don’t see why it wouldn’t work, but I think the above two options would be a simpler fix. Let me know how you go!
I have just made my first gluten free sourdough loaf thanks to your recipe. I’m almost squealing with delight. Ive wanted to make sourdough for so long and being celiac. Thank you so much.
I make a lot of (regular) sourdough bread and I was super skeptical that this could work at all but my brother is celiac so I thought I’d give it a go. The ingredient list kind of put me off at first but everything was easy to find – sorghum was available at the Indian shop near my house. I am so impressed and really loved it! It does have a bit of a tomato paste je-ne-sais-quoi (maybe grassiness from the quinoa? In any case it is not offensive) but I really like the umami flavour and I’ve shared the recipe with my other gluten-free friends. 10/10
Wow this recipe is great and despite the inability to get sorghum flour in my area I have used alternatives such as buckwheat and extra quinoa flour to make up the 100 g of sorghum and we love it, it has certainly helped my eternally hungry partner who eats practically all day long!! He now eats your bread great toasted with olive oil and dukkah especially. Thank you
I’m so glad you enjoy it Merryn! Sorghum can be tricky to find can’t it – it’s great to know the alternatives work a treat too 🙂
Hi! First I want to say- you’re awesome! I am so excited to try your sourdough recipes! I have a severe wheat and gluten allergy and I desperately miss bread. I’ve been studying your recipes (and printed out nearly all of them!) and I started my sourdough starter about a week ago with quinoa flour, sorghum flour, and a gf dehydrated starter culture, and it looked awesome, but I think the pizza dough overfermented over night and my pre-ferment for the boule might’ve gotten too hot under my oven light. Is there any way to rescue them? I hate food waste (especially in these times!) and I wanted to try to salvage them if possible. I live in Florida, so I guess, even though it’s fall and the nights are chilly, it must’ve been too much humidity still. Anyway, I’m not giving up! Please let me know if there’s anything I can do to save my stuff!
Help please ?
I have made this recipe many times and I’m always really precise when it comes to weighing it out, I’ve tried as much as possible to catch my starter when it’s definitely at its peak, same with the levain as well but for some reason (I’ve even tried the slow proof in the fridge) I still end up with a gummy loaf!
I’m in the UK so I wondered if there is a possibility the air is damper than Australia so that might affect it?! Have you ever come across something like that?! Racking my brains for what on earth it could be!
If there is any chance you could post a photo of what your levain looks like when you use it that would be so helpful, then I might know whether I’m just destined to have perpetually gummy loafs ??♀️
I really love this recipe it tastes great and is so simple!
Thank you!!!
Hi Samantha! There are honestly so many variables that can impact a loaf. The climate you proof it in, definitely, but also down to the micro climate (your kitchen, the space you set it in) the water where you are, the flour brands, your starter, etc etc.
In this instance my guess would be it is less about the levain and more about the flours you’re using. I saw a really interesting post where someone compared two absorption quality of Bobs Red Mill sorghum vs a sorghum bought at an Indian grocer, and found the second variety was so much more thirsty than Bobs Red Mill. Which is all to say, my advice would first be to cut down on the amount of liquid you’re using to see if it’s just the fact that your flour is less absorbent than the one I use.
Does your bread still have an open crumb, or is it flat and gummy? If the latter is the case, that’s also an indicator that you’re overproofing. Sometimes loaves don’t need to grow much visibly in size to be well proofed
Ohhh this is very useful thank you! I have changed my sorghum flour to one from an Indian grocer and it has been different. I think I maybe over proofing from what you’ve said so I’m going to try that next time! Thank you so much!
Thanks for posting this. I decided I would crack it once and for all. I’m pretty happy with the first attempt, I think it need a little longer proofing to get more height. So difficult to hold your nerve! I bought a Dutch oven and my god it was worth every penny. Yes
I found my loaf was gummy too, it’s got nice air pockets, tastes amazing but feels slightly too moist…I did wait until 4 hours to cut it. Is it normal to stick to the knife? Would it be better to cut it the next day?
Hi Maria! There are so many variables in gluten free baking, one of which is the absorbency of flours (which even varies from bag to bag). My advice if your loaf is gummy is to drop back the water content by 20g or so and see if that makes a difference. Generally speaking I find a bit of sticking to the knife is just part of gluten free baking. That said, leaving it overnight to cut into the next day definitely helps, as the crumb has had lots of time to set and dry a little. Let me know how you go with your next loaf!
I started with your more conservative water amount, but the dough was very stiff, so I added enough to make it softer but still mouldable (so it would keep its shape). I know with spelt if you make it too stiff it won’t rise properly. I think I’ll try cutting it the next day. I have ordered bread from a GF artisan baker and his loaves were slightly gummy too, I think it might be the nature of Psyllium verses gluten.
Hi Georgia. I would like to try the recipe to make baguettes what would be your advise regarding the cooking time ratio? And also what should be the process as I don’t have a Dutch that I could use for the baguettes.
I usually buy sprouted sorghum, rice, and quinoa flours. Do you think that will be OK in this recipe or should I stick with regular unsprouted flours?
Hello! I don’t have much experience with sprouted flours because they’re harder to get and I didn’t want to make things too tricky for people. I daresay you could try using them – a quick google suggests you might need to add a little extra water to compensate. How much, I’m not sure – you already have more experience with sprouted flour than me! Let me know how it goes if you try it 🙂
Hi there! Quick question for you. I love this recipe but struggling with proofing in the fridge (which is best for my schedule). I’m a 12 hour period my bread is not expanding at all. It’s staying dense and when baked the crumb is very small. Do you have any thoughts or tips? Is my fridge too cold? I can get proofing right argh! Thanks for your help 🙂
Hi Laura! Are you currently in a wintery climate? Is your starter new? Sometimes I find it helpful to leave the loaf on the bench for an hour or two to kickstart the fermentation before transferring it to the fridge. That way there is already some action and the fridge is just working to slow it down.
Your fridge might be too cold or your starter too new to have strength for fermenting in the cold. I’d suggest trialling a stint on the bench if it fits in your schedule (even an hour in the oven with just the light on). That said, it’s all a balancing act and you might need to watch it in the fridge to ensure it doesn’t subsequently overproof.
You could also try using my white bread sourdough recipe which has a higher proportion of starch – starch is easy food for the cultures and the loaf tends to ferment and proof a lot more easily/quickly. If you do try that I would suggest putting the loaf straight into the fridge without any bench proof.
Honestly proofing is such an art, I still get it wrong all the time. I just take solace in the fact that anything I make already tastes better than the crap at the supermarket haha. Let me know how you get on!
Thank you so much Georgia! I’ll try putting it on the bench for the next loaf!
Thank you so so much for this recipe!! I have tried to make gluten free bread without xanthan gum so many times and have never gotten it to work. (Xanthan makes me more unwell than gluten and it’s so bad for gut health anyway.) I made my first loaf today and it’s spot on. My husband also had a crack using my starter for normal sourdough a couple of days ago and that also worked well for him. Excited to try the white bread version!
I’m so glad you enjoyed it Kate! Really interesting to know the starter works for regular bread too, thank you for letting me know 🙂
Hi there,
Just discovered your website. I am gotten regular sourdough pretty much down pat in the last 12 months, but am now venturing into GF territory for my husband. I am curious where you purchase sorghum flour from? I am down on the surf coast and can’t find it online at Woolies, Coles or the local whole foods place. Any suggestions?
Hi Kerry! I generally buy sorghum from health food stores. It’s a little harder to get which is super annoying because it’s so good. Luckily a bulk food store near me has started stocking it but before that I was buying Bob’s Red Mill brand from various little health food stores. I hope you can get your hands on some, it really is great stuff!
Hi Giorgia! Never made sourdough bread before, and facing such an endless and confusing world of internet recipes, I went with yours and my first bread turned out pretty amazing! I went with my intuition more than following exact steps (I’m so bad ad it, and I had to change the flours because I didn’t had sorghum nor quinoa) so I wasn’t totally confident it would work, but it did! I live in Scotland and had to turn on the heating in the house and leave the starter in the oven with the light on for AGES but it was worth it! (I actually ate 1/4 of the loaf while writing this comment lol) thanks so much for your recipe! 🙂
Hi Julia, that’s so great to hear! Love that you went with your intuition, that’s what sourdough is all about. I also fully support you eating the loaf in one sitting haha
Hi! Is it possible to use just active starter without making the preferment? If so, how many grams of starter would you need? I’m just getting into GF sourdough, so just a wondering question!
It’s definitely possible and there recipes out there but I couldn’t say for sure what would work with my recipes as I have never tried skipping it, sorry! I will try to work on a recipe for one without a preferment at some point 🙂
Wish I had found your wonderful informative site before I am certainly going to give this a try. I do make soughdough bread but need to make gluten free for family member.
Hi Georgia
Cant get sorghum anywhere at the moment can I use brown rice flour instead when making the bread.
Hi Vera, you can certainly try using brown rice flour, but you will likely need to add extra water. I can’t say how much for certain, but I’d suggest starting with 50-100g. Maybe have a read through the comments, lots of people have been great at suggesting what they have used. Good luck!
I made this using psyllium husk/seed powder, and it worked well! I just used 15 gr instead of 20, though I think it would have still been okay with the full amount. This was the closest to real bread of any gf bread that I’ve had! Thank you for the recipe and all the details.
I’m so glad you enjoyed it Kara! Great to know about the psyllium husk powder too, thank you 🙂
(I accidentally replied to a previous post, so I’m redoing my comment! Sorry! )
Hi! First I want to say- you’re awesome! I am so excited to try your sourdough recipes! I have a severe wheat and gluten allergy and I desperately miss bread. I’ve been studying your recipes (and printed out nearly all of them!) and I started my sourdough starter about a week ago with quinoa flour, sorghum flour, and a gf dehydrated starter culture, and it looked awesome, but I think the pizza dough overfermented over night and my pre-ferment for the boule might’ve gotten too hot under my oven light. Is there any way to rescue them? I hate food waste (especially in these times!) and I wanted to try to salvage them if possible. I live in Florida, so I guess, even though it’s fall and the nights are chilly, it must’ve been too much humidity still. Anyway, I’m not giving up! Please let me know if there’s anything I can do to save my stuff!
Hi Amanda! You are very kind, thank you 🙂
In terms of pizza dough, it’s the most fuss free of the doughs. You can use it even if you think it has over fermented because it doesn’t need structure like bread. It might taste more sour than intended but unless it smells super alcohol or vinegar like it is fine to eat.
The preferment can simply be fed and reincorporated back into your starter. It is really just a fed portion of starter so there’s no issue there!
I would definitely recommend proofing in the fridge for your next sourdough venture! Loaves are less forgiving than pizza bases so a fridge proof would be a safe bet 🙂
Hi! I am in south america and having a hard time finding sorghum flour. Can i substitute anything else for it in this recipe? What about brown rice flour, will that work? Our local heath food store has all kinds of different gluten free flours, but not sorgum. Please let me know. Thank you for this recipe!
Hi Dolly! You can absolutely try using brown rice flour. I find brown rice flour is the thirstiest one, so you will need to add extra water to compensate. How much depends on yours flours, so I can’t give you an exact amount. My starter is very sluggish at the moment but once it’s back up to scratch I will test a brown rice flour version and add it to the post!
Thank you so much for the reply. I am going to start my starter tomorrow and once it’s ready, I will try out this recipe. I live in the mountains where it’s colder so my starter will probably take a bit longer as you mentioned. Will let you know how it works out. Thanks again for your quick response and these amazing detail-filled posts!
Hi Georgia have just purchased your book, does it have all the above instructions/formation
Hi Georgia, have just purchased your Book. Does it have all the above instructions/information re GF sourdough bread in it as well?
Hi Jenny! So exciting – I hope you enjoy the book. It does have information on sourdough, a little guide and lots of sourdough recipes but it isn’t as in-depth as these posts (there’s only so many pages I could dedicate to sourdough!)
HOW DO I MAKE THE STARTER ??????????????????????????????????????
Hi Lou! My recipe for starter is linked but my new website theme doesn’t make links clear right now (getting it fixed!) but you can also type starter in the search bar and it will come up 🙂
Hi Georgia,
Thank you for this wonderful recipe – from my very first loaf the results have gone way beyond my expectations (based on the awful GF sourdough loaves available from the supermarket, even big brands). I can’t make/get enough of this delicious, healthy bread…
You’ve made it a foolproof process with all of your guidance and information.
I’m amazed at how well this starter behaves, so much better than my wheat starter in pre-GF days. The yeast and bacteria must love these grains.
I’m finding everything I need
from this website (here in the UK, not sure how far they ship)- https://wholefoodearth.com/
Great quality, organic, and if bought in larger quantities the prices are very competitive.
I’m using sorghum in my starter but replacing it with buckwheat in the loaf as I love that flavour too. I’m purchasing whole quinoa and buckwheat, toasting and blitzing them in my repurposed Bodum electric coffee mill with perfect results and the smell when you mill toasted grains is incredible!
I might try some millet in there in future, but no need to play around too much…
I haven’t tried the recipe without using my banneton and Dutch oven, because with them the results are perfect, so I won’t be changing that combination – my only experiments are with the scoring to see how different patterns affect the rise.
Thanks again, you’ve clearly worked very hard so people like me don’t have to…
All the very best
Thank you so much for this recipe and your website in general . I just made this sourdough recipe for the first time and I am so pleased with the results . The loaf was beautiful and tasty . It was just a slight bit tacky to the touch on the inside , perhaps I sliced it too soon ( 3 or so hours later ) or perhaps it needed to cook a wee bit longer . I look forward to baking it again . After recently embracing the decision to go gluten free I had all but given up on bread as so many recipes contain gums and nasty ingredients and it seems all of the prepared gluten free breads are full of gums and/or unhealthy fats. You have given me a way to have healthy delicious gluten free bread . I am Immensely grateful.
Hi. Wondering if you can suggest a substitute for the rice flour. Unfortunately I have an allergy to rice and this recipe looks so delicious and the comments so positive that I would love to find a way to make it.
Hi Susan! I haven’t tested this recipe specifically without rice flour, but I do have a dedicated rice flour free recipe which you can find here: https://georgeats.com/recipes/gluten-free-sourdough-bread-with-toasted-quinoa-flour-vegan-rice-flour-free/ 🙂
I also forgot to add that I also cannot eat oats. I know that a lot of people use oat flour to substitute rice flour, but that won’t work for me.
I don’t work with oat flour because Australian guidelines say oats are not 100% gluten free so you’re all good there 🙂