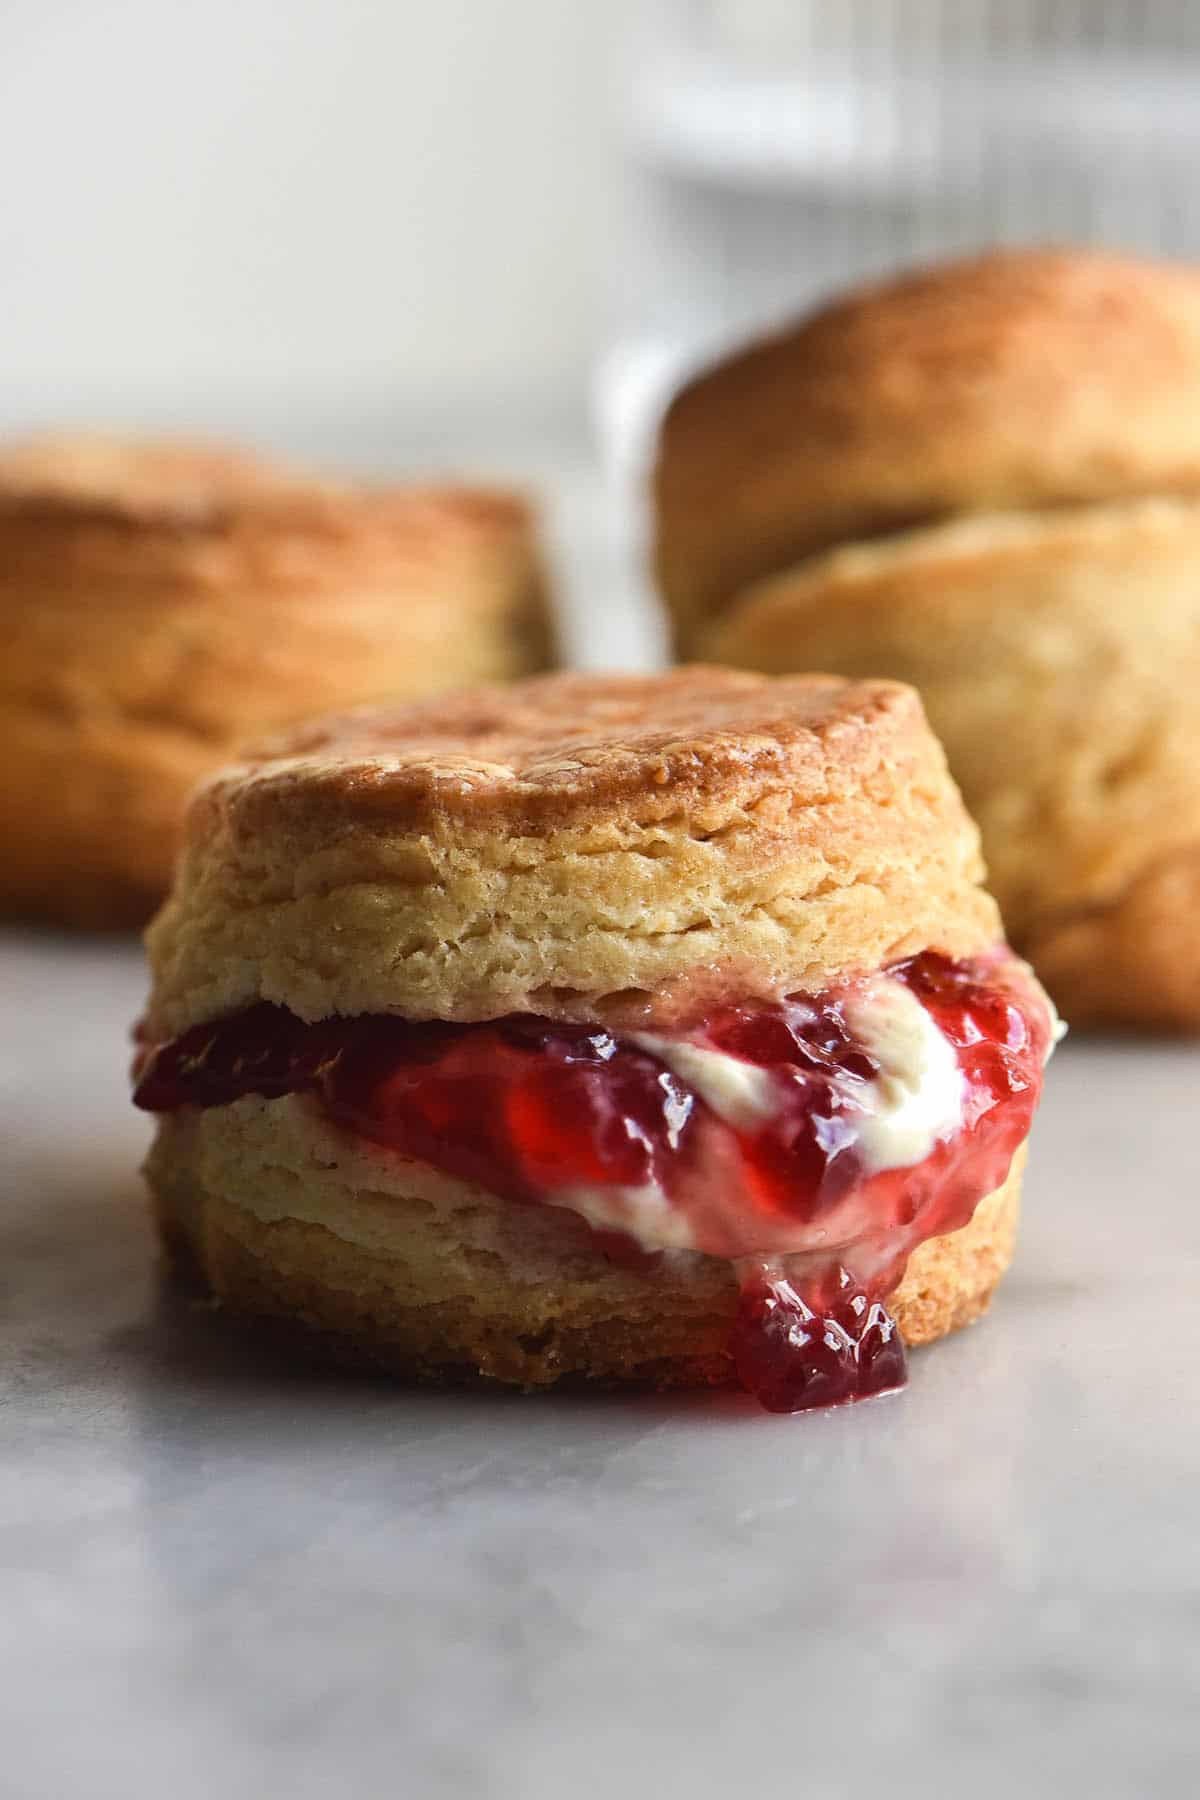
These gluten free scones are the product of years of failed scone testing. Scones, along with cinnamon rolls and croissants, are the gluten free holy grail. Because they are traditionally made with a simple mix of flour and butter, there isn’t much to save you from a dry or crumbly scone.
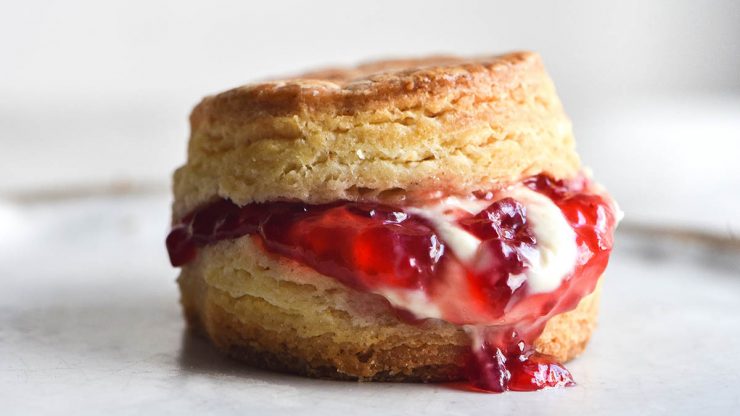
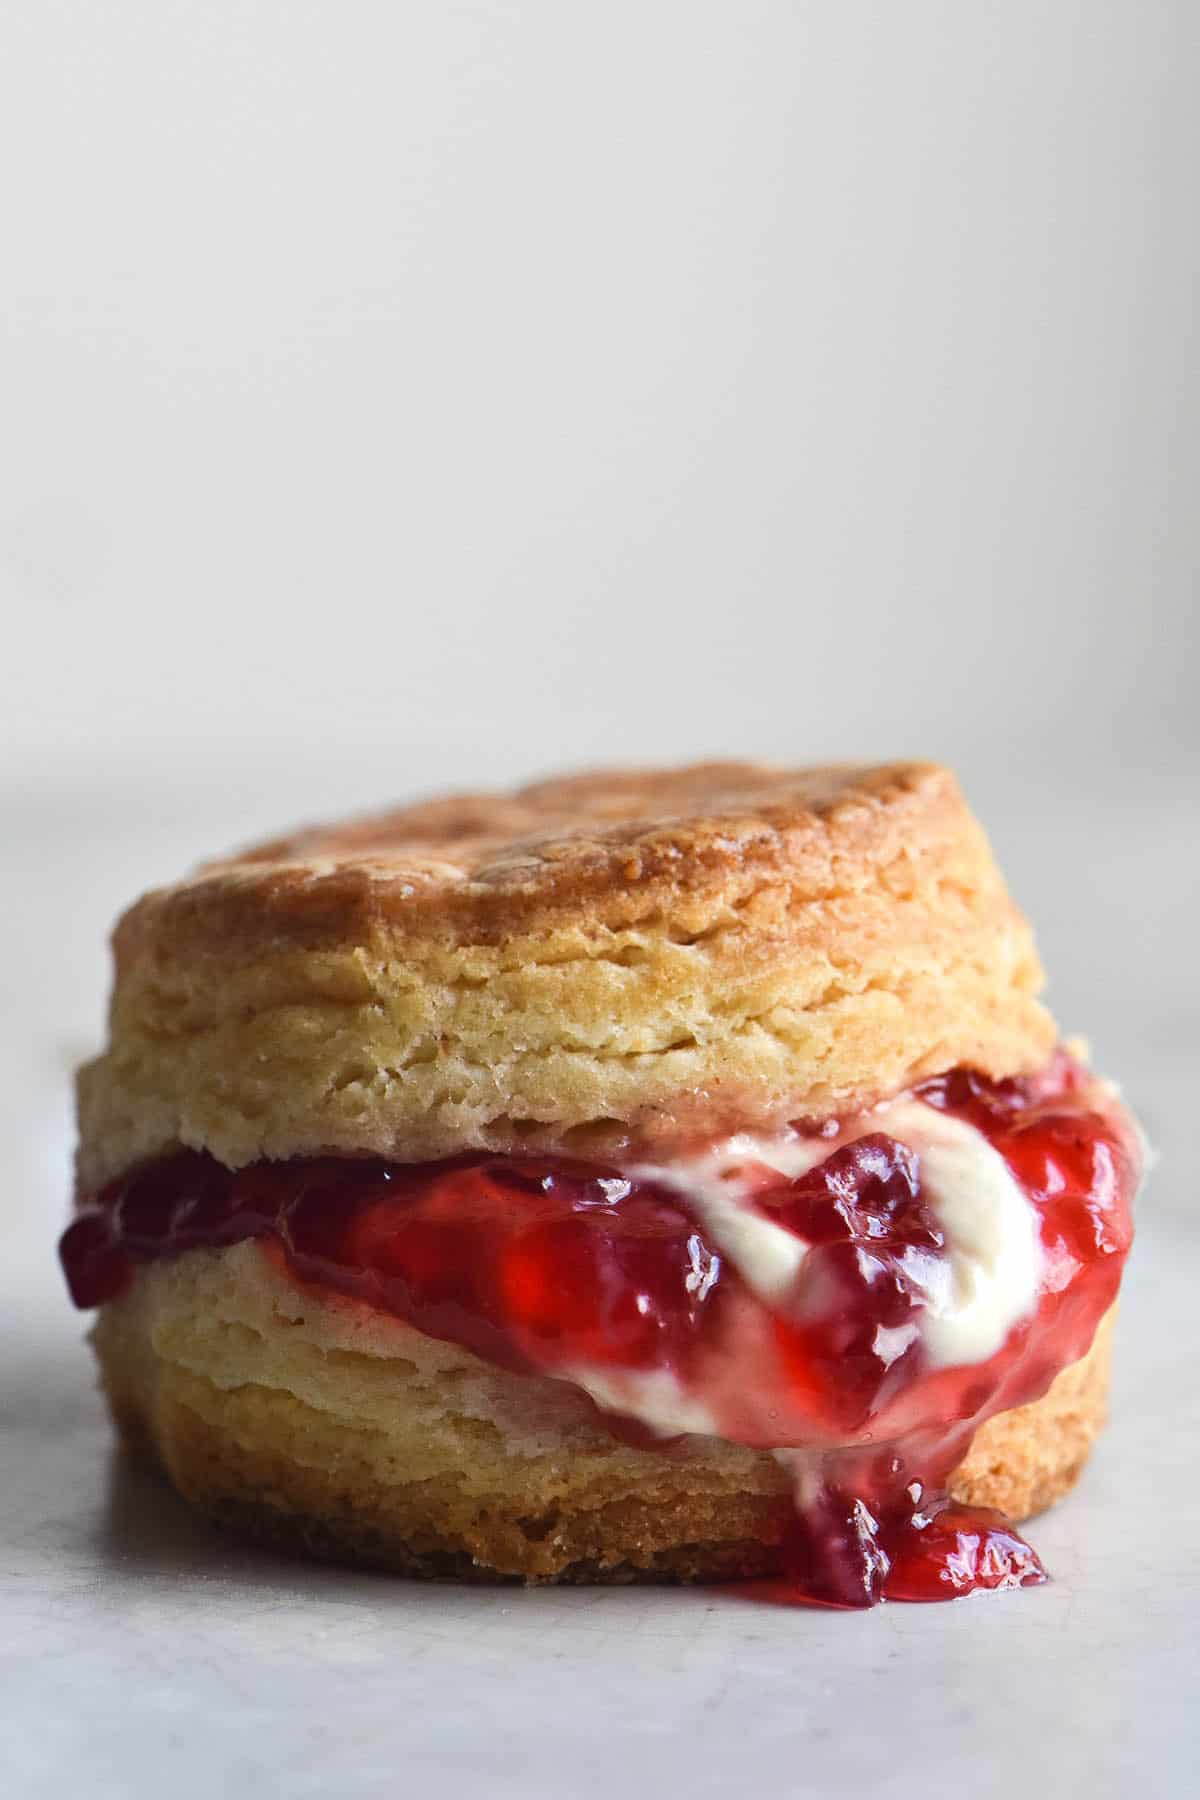
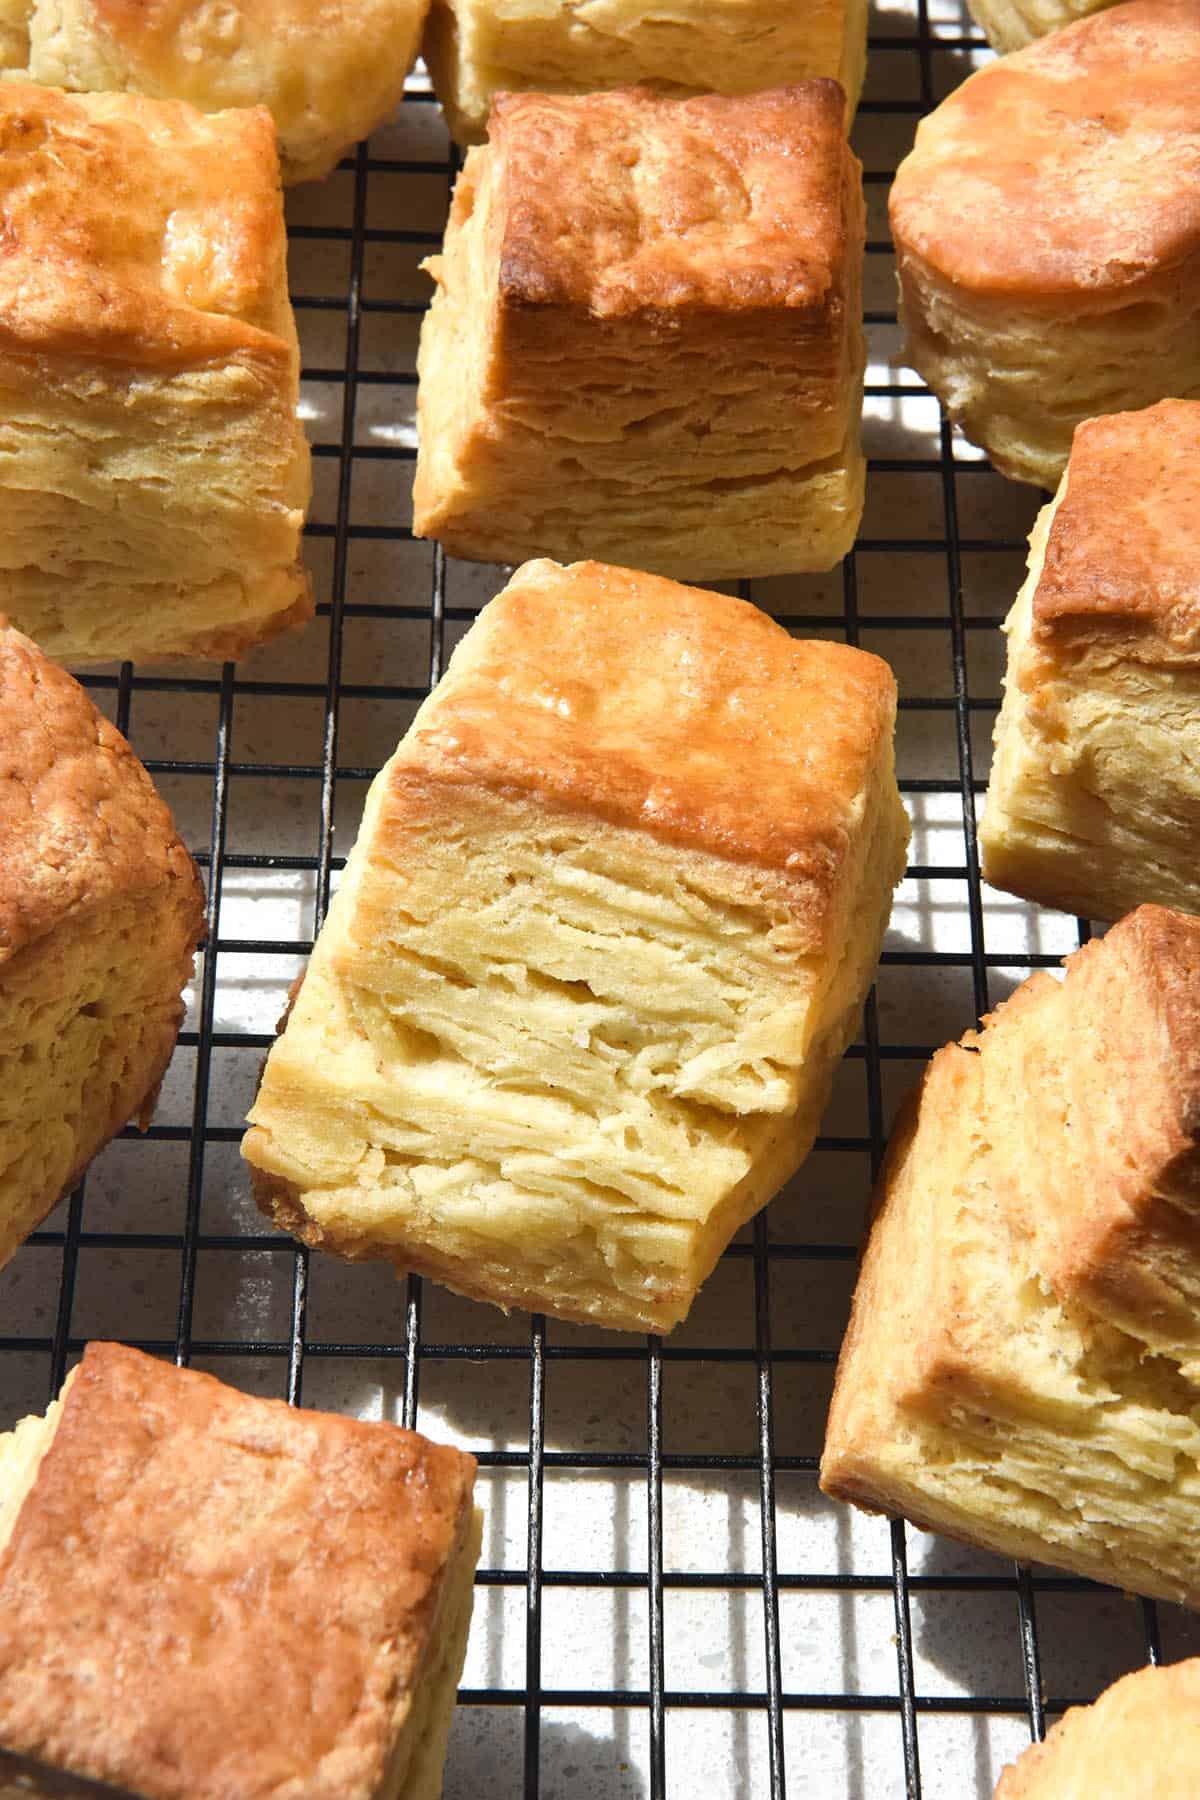
Fear not! These gluten free scones are flaky, buttery, light and not remotely dry. A simple blend of white rice flour and tapioca forms the backbone of the scones. We use xanthan gum and psyllium husk powder for binding, structure and elasticity. Butter and cream work together to create a rich and luxurious end result without eggs.
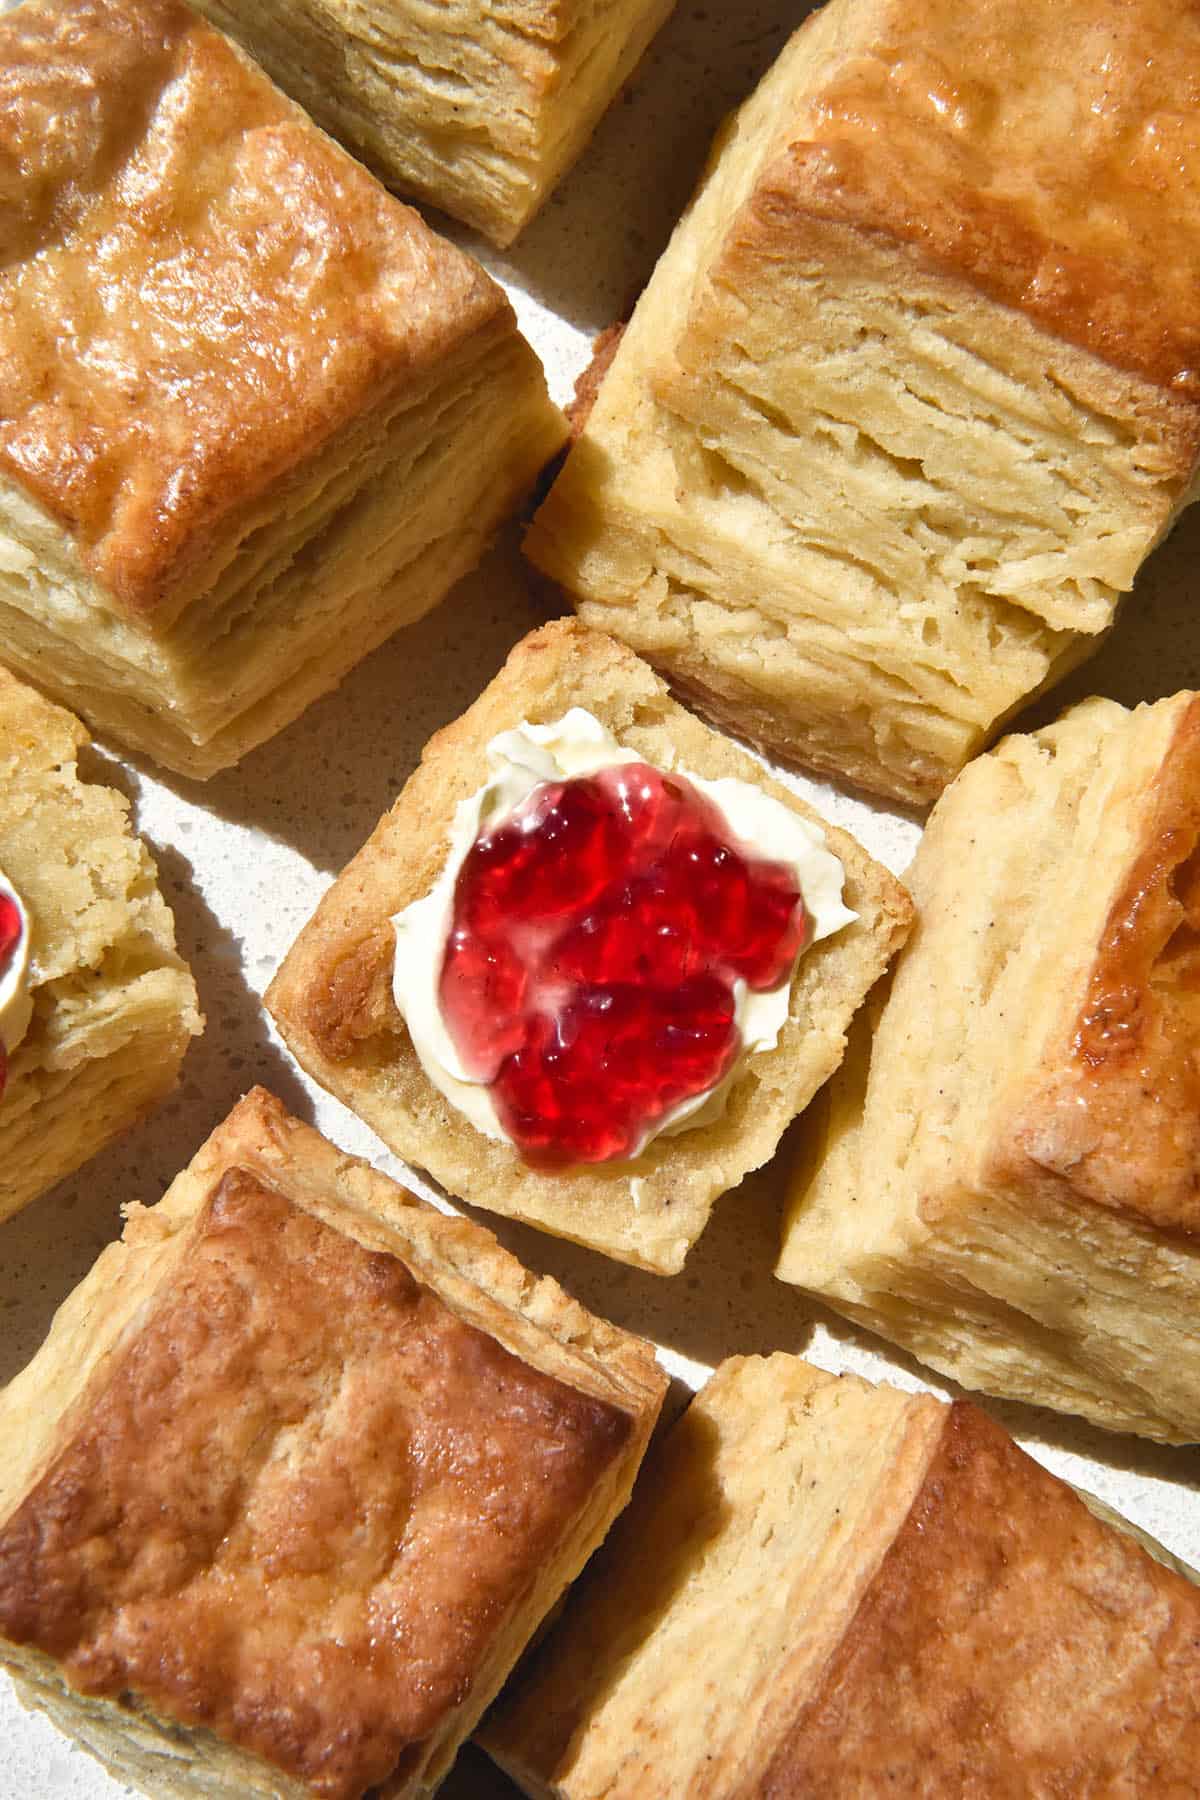
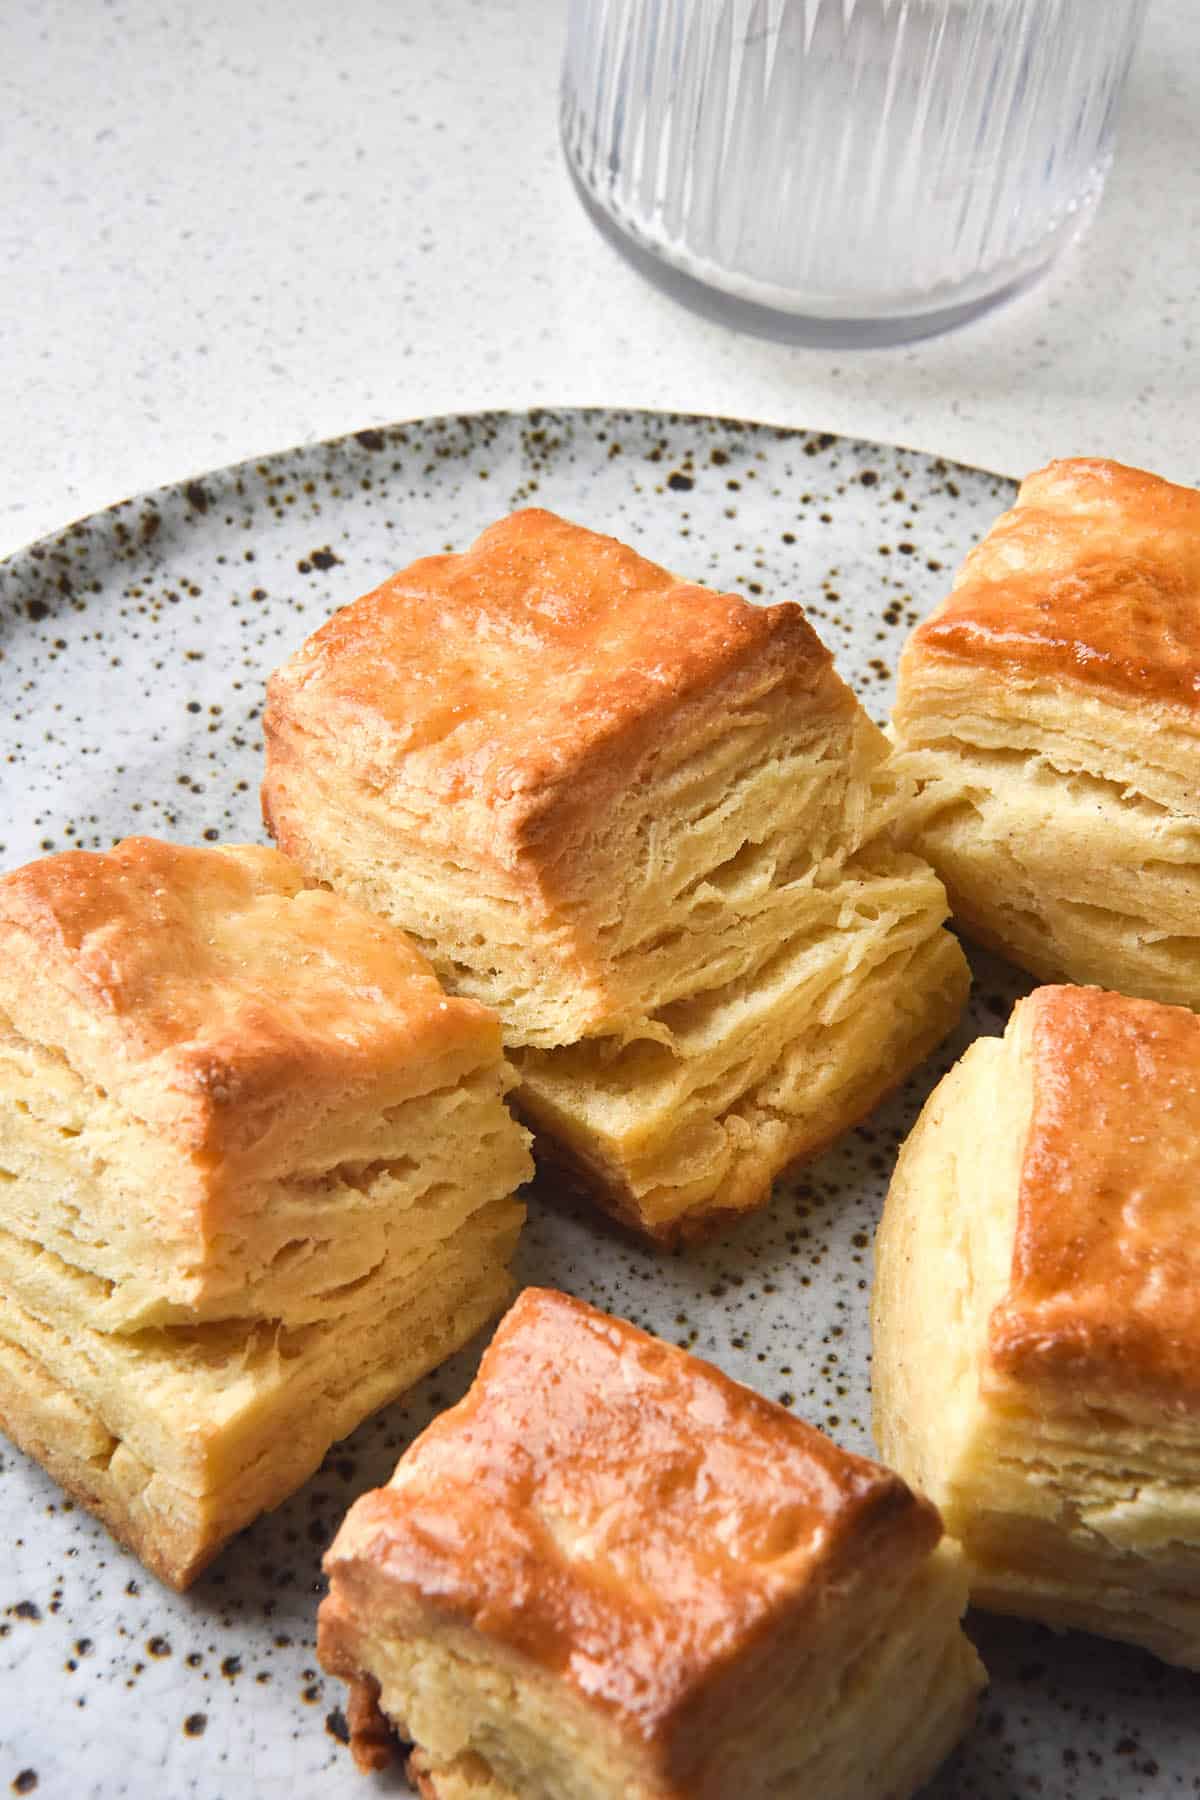
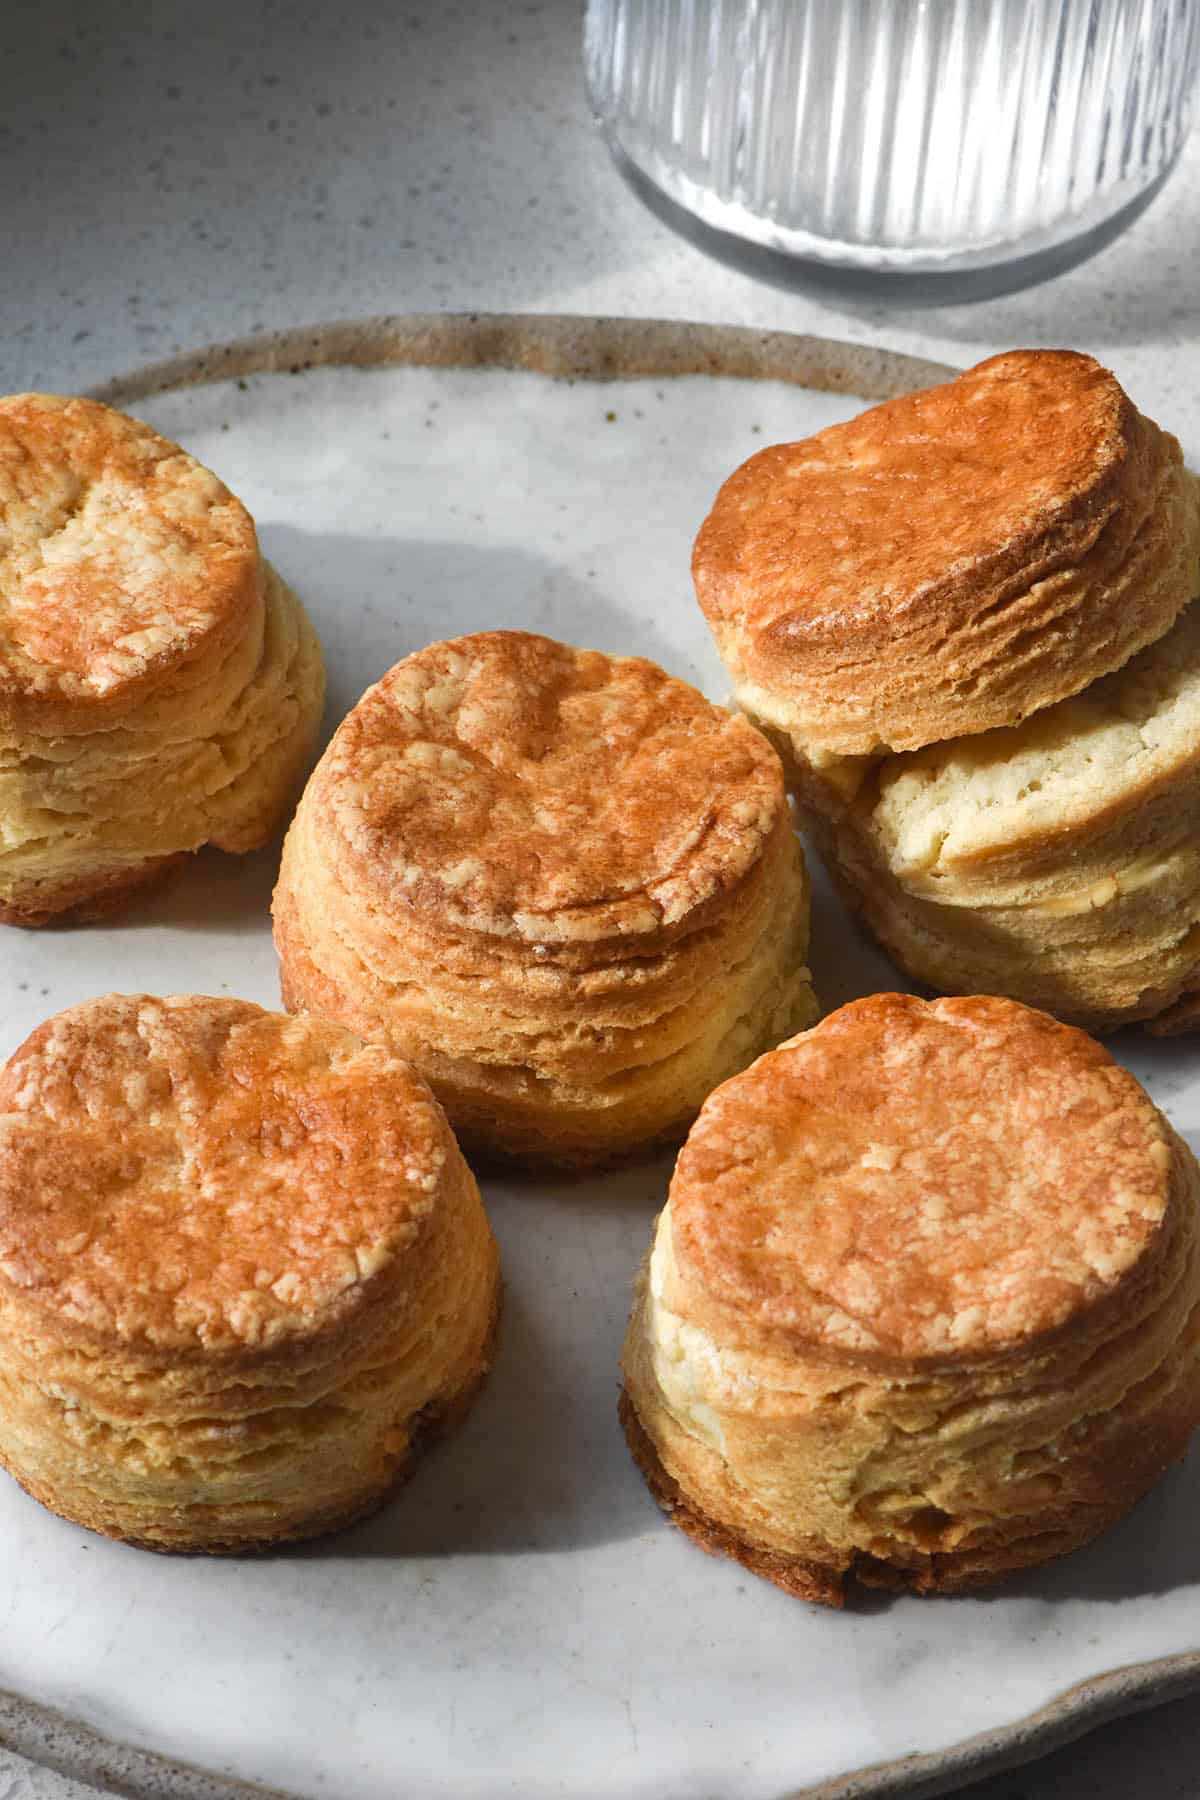
Before we start: I KNOW traditionalists will probably hate the square scones. My take? They are easier to cut, quicker to roll out, don’t leave awkward off cuts and show off the lamination more dramatically. Just saying.
Gluten free scones
- These scones are made with rice flour and tapioca flour in equal parts. I have not tried other flours – this blend works to create a light yet solid scone without any alternative flour flavours. As I test more flours, I will update the post.
- Sugar adds flavour and colour but is also a wet ingredient. I have tested these scones with slightly less sugar (50g) and they worked well. I have not tested them without any sugar.
- I have only tested these scones with dairy butter. There is a vegan, gluten free and xanthan gum free scone recipe in my cookbook, Intolerance Friendly Kitchen.
- Cream, sour cream and yoghurt all work as the dairy option in this scones. You can use a lactose free variety if you need to.
- Both xanthan gum and psyllium husk powder are critical in this recipe. They hold in the liquid and create structure so that the scones rise and hold their shape.
- Weighing the ingredients is the only way to go here. I give cup measurements you can eyeball if you have enough flour before baking. A good gluten free scone is ruined in a heartbeat with cup measurements. It’s annoying, I know, but it’s true. A scale (which doesn’t need to be expensive) is key to success in gluten free baking.
The science of a good gluten free scone
I think it’s important to discuss the science behind a scone so that you are clear on what each ingredient needs to achieve. The most critical ingredient here is the butter, but we will go into each ingredient below.
- The flour blend forms the backbone of scone. Rice flour provides a sturdy base and tapioca flour provides lightness, fluffiness and a bit of elasticity.
- Psyllium husk powder and xanthan gum work together to give the scones structure and absorb moisture so that they are not dry or crumbly. The structure enables the scones to rise, both from the baking powder and the butter.
- The cream (or sour cream or yoghurt) and milk provide moisture and a rich mouthfeel and flavour. You cannot use all milk in gluten free scones because they don’t have enough structure and they need more moisture and fat. Using all milk will result in a flat tray of scones.
- The butter: the most critical ingredient of them all. Butter is laminated into the scone dough to create little pockets of firm butter within the dough. When the dough hits the hot oven, the moisture in the butter evaporates and pushes the dough upwards. Cold butter chunks and good lamination are critical to gluten free scones that rise.
What is xanthan gum and why do I need to add it to gluten free baking?
Xanthan gum is a sugar that is fermented by a certain bacteria, creating a powder that becomes gooey, sticky and binding when mixed with liquids. It is added to gluten free baked goods to provide structure and elasticity.
Most gluten free flours have no stretch or binding capabilities. Exceptions include buckwheat flour and glutinous rice flour. Even these flours, however, do not compare to the binding capability of gluten. Because gluten free flours don’t have this binding ability, ingredients need to be added in to assist.
As often as possible, I try to use psyllium husk powder for binding my gluten free goods. Psyllium husk is a naturally occurring fibre husk that gels up when added to liquids. It’s a great binder for gluten free baked goods because it absorbs a lot of liquid. This helps make gluten free baked goods moist.
That said, I found that these gluten free scones truly do benefit from xanthan gum (in addition to psyllium husk powder). The xanthan gum provides more structure for these scones to expand upwards as they bake, creating flaky scones. I found that the versions I tested without xanthan gum had less structure and were more likely to spread outwards.
Not all gluten free baking requires xanthan gum, but there are exceptional products that demand it. I think gluten free scones are one of those exceptions. They go from good to great with the help of xanthan gum.
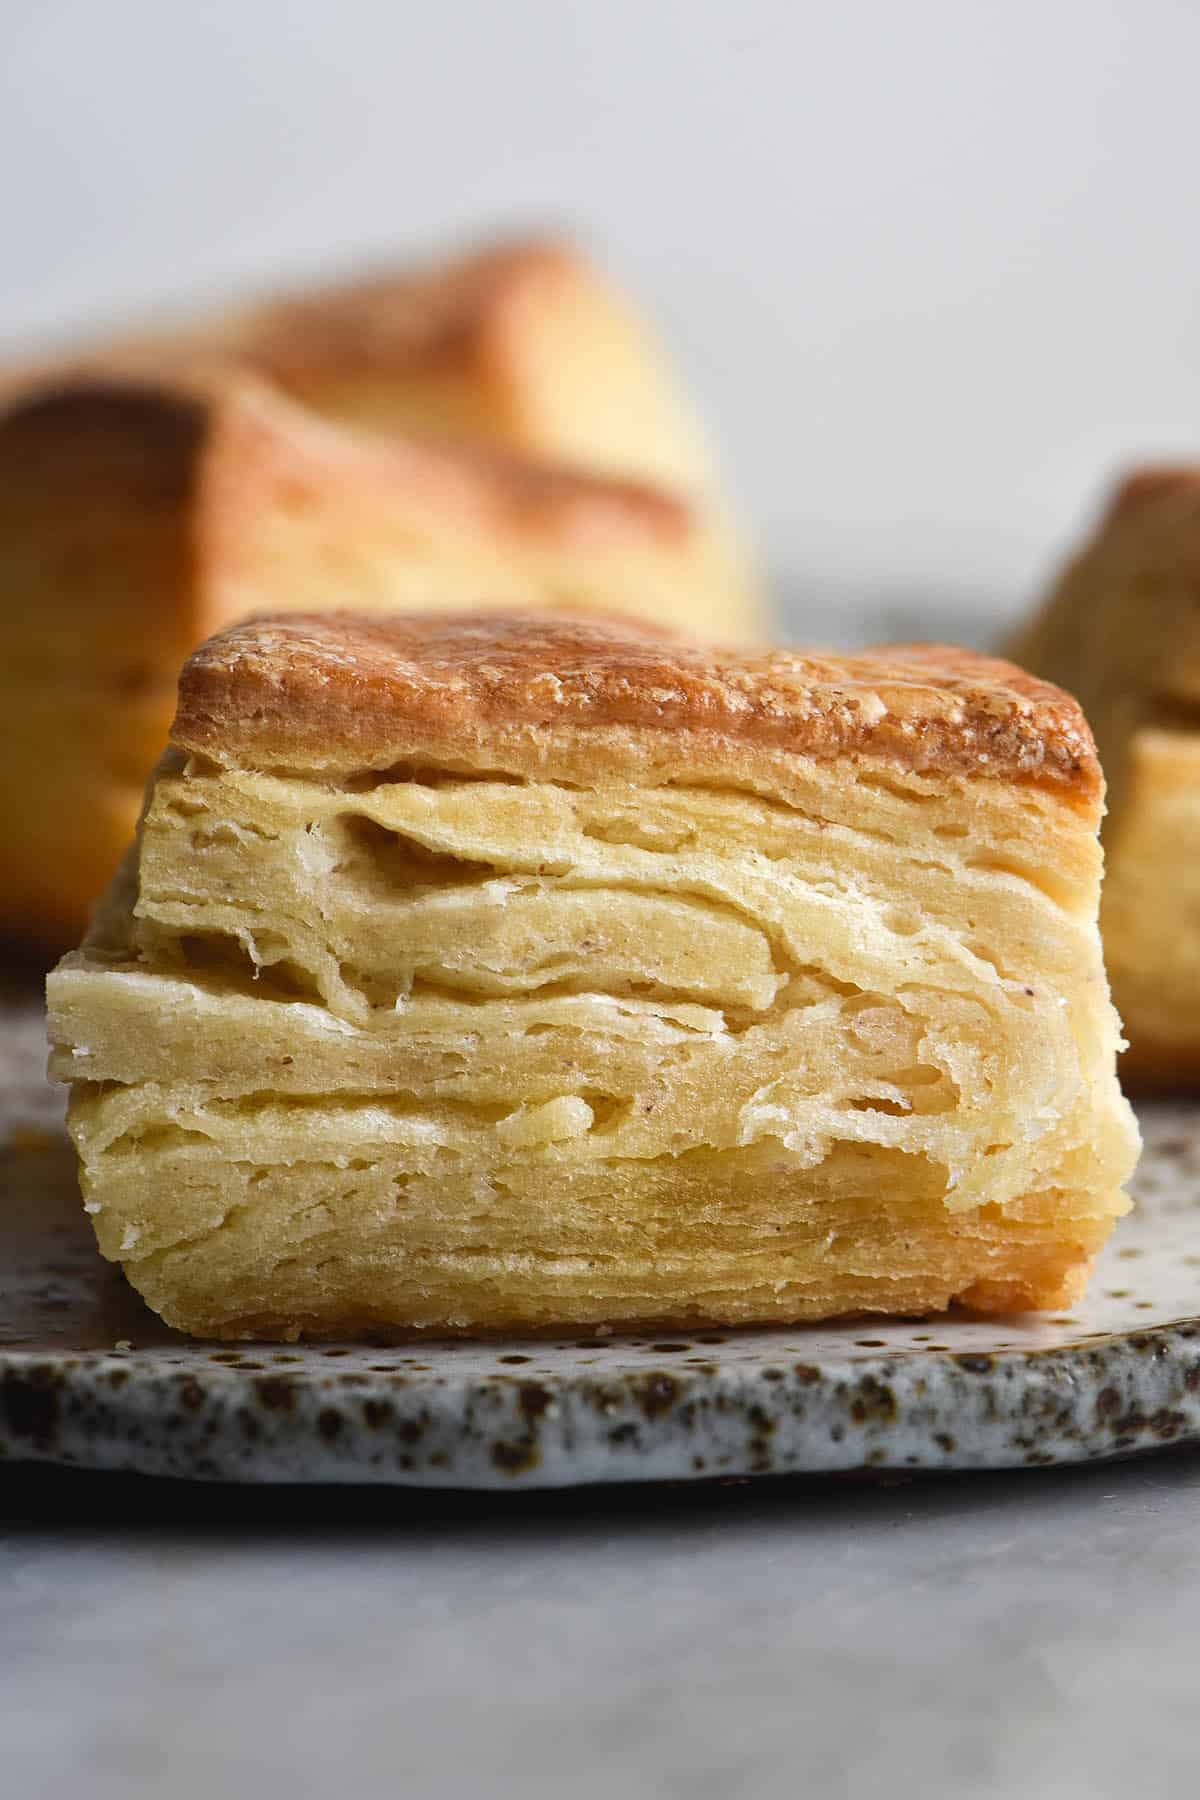
What is lamination?
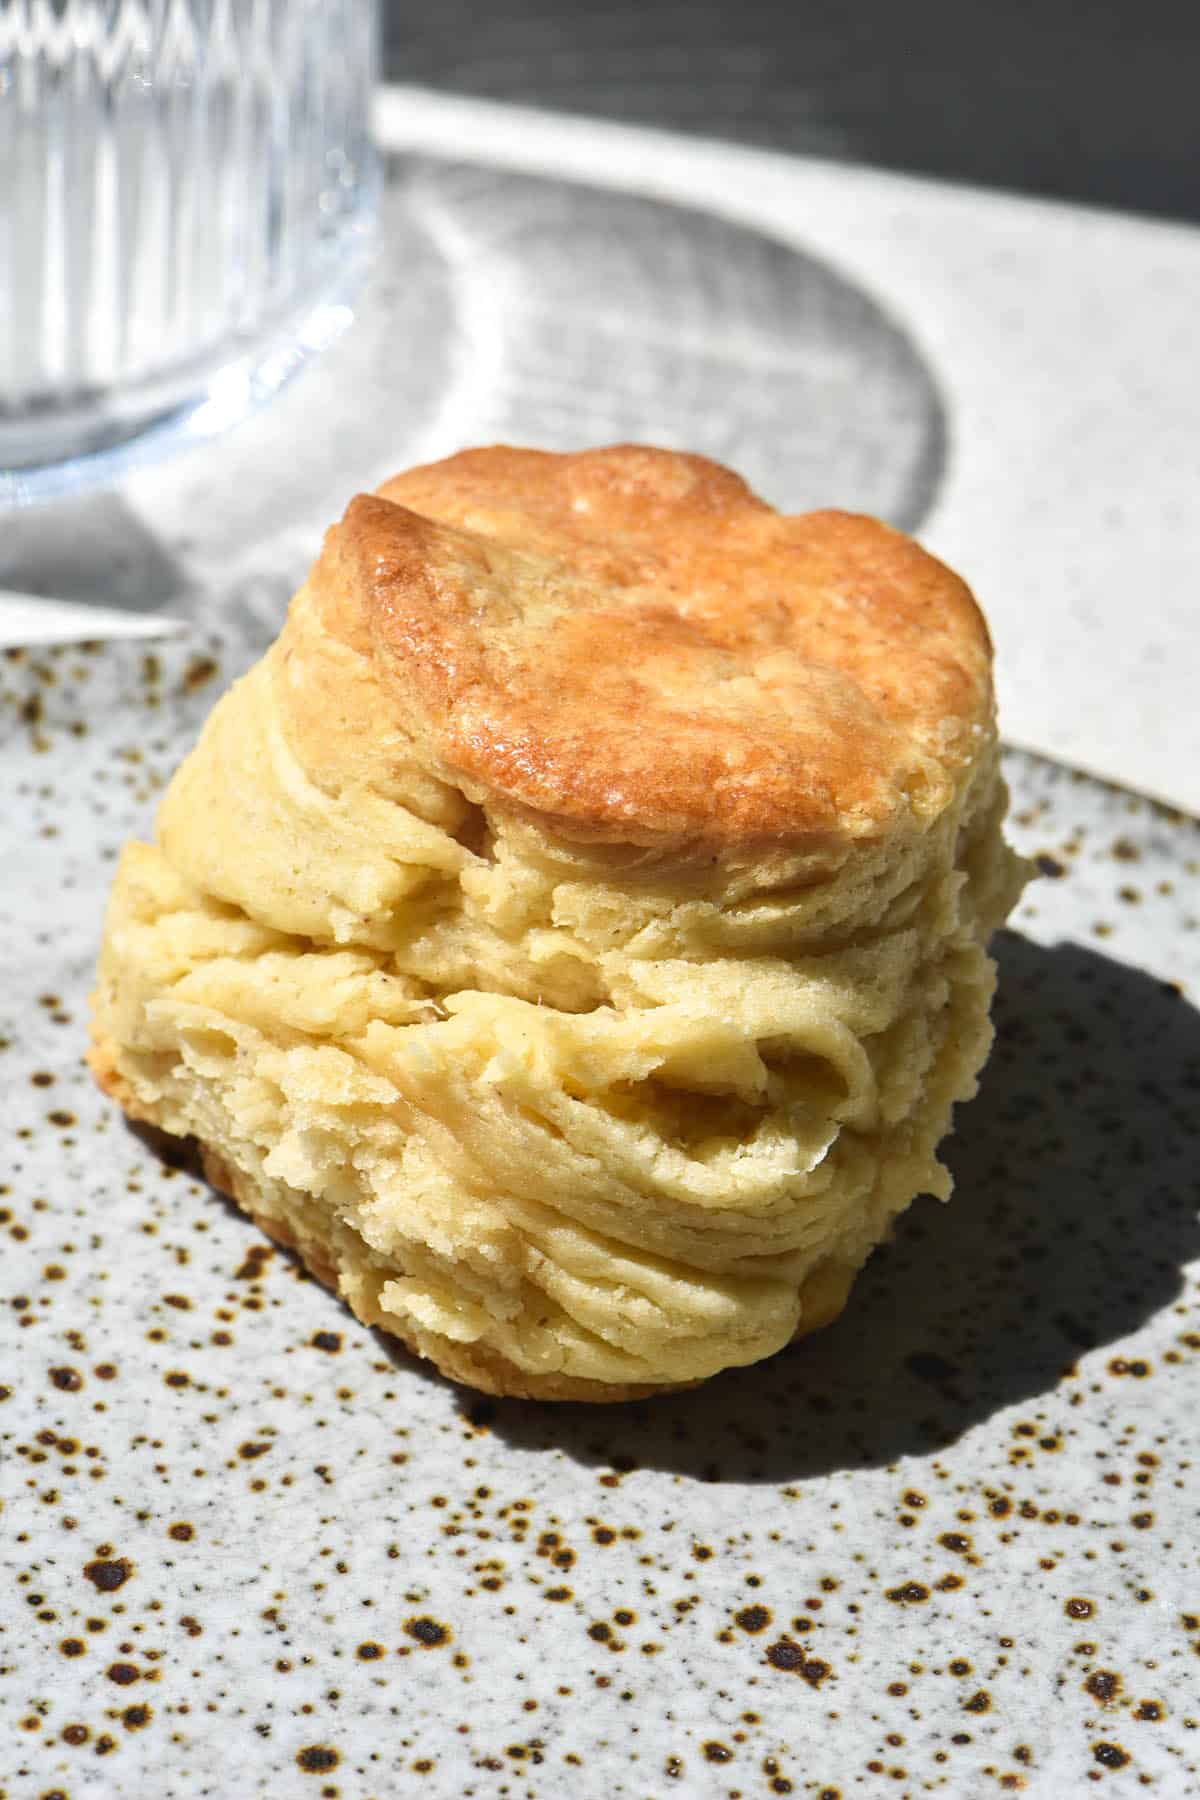
Lamination is a technique whereby butter is rolled into dough to create small pockets and layers of butter. Scones are often casually laminated, but this recipe makes the lamination quite purposeful to ensure you get maximum lift. The word lamination shouldn’t scare you off – it’s quick and simple and makes for incredible scones.
Think of making puff pastry. You roll and fold the butter into the dough, creating hundreds of layers of butter that puff up in the oven. This is what we want to achieve with these scones. I promise it is easier than it sounds!
Another great thing about laminating scone dough is that it is way less technique based than puff pastry. You don’t need to worry about creating even layers of butter in the dough or with keeping even pressure. In fact, practicing on scones is a great way to start before you progress to more complicated lamination.
How to make gluten free scones
Making the scone dough
These scones are made a little differently than traditional scones. I find this makes the process easier and keeps more butter chunks in the scones.
Begin by freezing the butter to make it just cold enough to grate. Next (surprise!) grate the butter, using the large holes on the cheese grater. Return the butter to the freezer in its grated form, spread out across the plate or chopping board it was grated on.
Next mix the dry ingredients together, then add the cream and most of the milk. I generally use a spoon to start and then get my hands in. The dough should be shaggy and look a little dry but feel moist. At this stage, there should be a few bits of dry flour on the bottom of the bowl, but not many.
Now, add the frozen butter, handful by handful. A light touch is used to mix the butter into the dough without dispersing it or warming it too much. This process is repeated until all the butter is incorporated. From there, assess: are there bits of completely dry flour on the bottom of the bowl? If so, add a tablespoon more milk. Is the dough just holding together without any dry spots? If so, perfect! Cover the dough and put it in the fridge for 30 minutes.
Things to note:
- Make sure you use the largest side of your cheese grater. A microplane or the fine side of the grater will not work here.
- The butter needs to stay cold and as in tact as possible to create lift. If you are working in a hot kitchen or the butter starts to melt, put the dough straight into the freezer to chill.
- I have not tried this method with plant based butter.
- There should be lots of visible strands of butter throughout your dough. They should be evenly dispersed.
- If you don’t see any visible bits of butter in the dough, you have rubbed them in too much. This will mean the scones are more likely to be flat and oily. Use a gentle quick touch to ensure the butter stays in tact.
- This dough does not need to look or feel super wet. In fact, your ideal dough here looks a little bit dry. It needs to just hold together when you press it into a rectangle, but it should not be a batter. Dough that is too wet will result in a wet and oily scone.
Laminating the scone dough
The next stage of gluten free scone making is the lamination. To laminate the dough, flour a long piece of baking paper with tapioca flour. Using baking paper here ensures you can pick up the dough without much fuss if it gets stuck. It also means you can easily transport it to the fridge if the butter starts to melt.
Roll out the dough into a rectangle just long enough it can be folded into thirds. Next, fold the top third of the dough down onto the middle third, then the bottom third up over the middle third. This is known is a business letter fold. Repeat this process three times, with a little trick before the last fold.
The dough will most likely break apart during the first two folds – this is to be expected. It will hopefully stay in tact as you fold it on the final turn, but don’t stress too much if it doesn’t. You have still folded lots of little butter chunks into the dough.
Onto our little trick: just before you fold the scone dough for the third and final time, flip over the rolled out rectangle of dough. Dust off the excess flour, then lightly brush the entire rectangle with milk. Gluten free dough doesn’t stick to itself very well and I find that it can result in scones that are disjointed and not attached to each other. The milk helps glue all the layers together so that the scone grow upwards instead of sliding sideways. Next, we can complete the last fold and have a sturdy rectangle of dough.
Now that your gluten free scone dough is laminated, it is time to chill it again before cutting the scones.
Cutting the gluten free scones
Once the scones have thoroughly chilled, it is time to cut them. Lightly flour the bench or a clean piece of baking paper with tapioca flour. Place the chilled slab of dough onto the baking paper, and very gently begin.
Use a floured rolling pin to flatten the top of the dough into a smooth surface. A scone with a rough surface before baking will bust out at odd angles as it rises. This may impact the lift and rise of your scones and they might slide sideways. So, ensure a nice smooth top of your scone. The scone dough should be about 4-7cm tall at this stage. The scones grow in the oven, but not so much that you can start with a tiny scone and expect miracles.
Cut the scones into whatever shape you prefer. If you want to see the beautiful flaky layers, I find a square scone to be best. If you like a circular scone, use a floured cutter to cut straight into the dough in a single movement. Do not twist the cutter, or you might damage all the layers you have worked hard to create.
Repeat this process with the remaining scone dough. Circular scones always end up with awkward little dough scraps that have to be re-rolled. This re-rolled scone will be denser than the rest, as the butter smushes into the dough. This is just the nature of the beast. Try to roll lightly and gently.
Once the scones are cut, place them in the freezer in a 20-24cm cake tin.
Baking the scones
The moment of truth: baking your gluten free scones. First and foremost, ensure your oven is very thoroughly preheated. It helps here to check your oven temperature beforehand, because a LOT of ovens are badly calibrated. The gauge often does not reflect the internal temperature.
Because we are using a hot oven, I recommend placing the cake tin of scones on top of a heavy baking tray. This will help stop the bottom of the scones from burning.
The first 15 minutes of baking your scones is critical. This is the time the butter evaporates and the air from that reaction pushes the scone upwards. Akin to oven spring in bread, this is when your scones do all their growing. If your oven is not hot enough, the butter will melt and seep outwards instead of pushing the scones upwards.
Once the 15-20 minute mark is hit, you can open the oven. Hopefully your scones have grown gloriously in size. There should not too much melted butter swilling out the bases of the scones (a little bit is OK!) If there is an excess, refer to the troubleshooting section.
Tent a piece of aluminium foil over the scones without touching them. Turn the oven down to 180C or 356F and bake for another 10-20 minutes. This will depend on how tall you’ve cut them (shorter, smaller scones will cook more quickly) and how ‘done’ they were after the initial baking time. The scones should be baked through and golden on top without being burnt.
Troubleshooting
Why were my gluten free scones flat?
Once you have established that your baking powder is in date, the answer can only be the butter. Butter is critical to rise and lift in scones, so if yours are flat, there is an issue with butter or lamination or both. Was your butter cold? Did you work quickly and with a light touch? Were there noticeable chunks of butter in the finished dough, or did you rub too much butter in? Did you transfer the dough to the freezer if your butter started to warm? These are all things to consider and improve on next time.
Another consideration is the temperature of your scones as they hit the oven and the temperature of your oven. Cold chunks of butter need to hit a screaming hot oven to create lift. If your oven is just lukewarm, there’s every chance the butter will simply melt instead of pushing upward. Scones with empty pock marks in the sides and a sea of butter at the base of the dish are signs this has happened. Give yourself the best possible chance by freezing the cut scones and thoroughly preheating the oven.

Why did butter seep out of my scones?
Firstly: a little bit of butter seepage can happen. The butter is adding texture, flavour and mouthfeel but also providing lift, so, as with croissants, some of it might seep out. Provided your scones are flaky and layered, this is nothing to worry about.
This problem, and most scone problems, come down to the same familiar answers. Make sure your lamination is right, you are using frozen butter of the appropriate size, and the oven is hot. These are critical aspects of scone making that will set you on the path of flaky and fluffy scones with oomph.
Another thing? Check that you used good quality unsalted butter that was thoroughly chilled before the final bake.
If you have addressed all of these issues and are still having trouble, try reducing the butter content to 125g.
Why did my scones burn? Why were my scones undercooked in the middle?
This, unsurprisingly, comes down to oven temperature. If you are consistently getting burnt or undercooked results, it’s time to check your oven temperature with a thermometer. You can buy them online and they don’t cost much. Knowing what temperature your oven is really at when it says 200C/400F is such helpful information for all your baking pursuits. It empowers you with the knowledge to turn the oven up or down as necessary.
If you take the scones out of the oven and find the centres are doughy, return them to the oven at 180C/356F for 10 minutes. Easy fix.
Why did my scones topple over?
First and foremost: these are gluten free scones without eggs. You can expect them to have a bit of Leaning Tower of Pisa aesthetic. It’s cute, it’s kitschy, it’s expected. That said, These gluten free scones are precariously perched for a few reasons. Firstly, the lamination means that the scones are destined to push upwards. Secondly, unlike gluten containing scones, they have less inherent structure. Thirdly, unlike many gluten free scone recipes, they don’t contain eggs to provide some structure.
There are a few things you can do to prevent them toppling over in the future. I would caution against adding extra xanthan gum – I have tried it and I find it numbs the taste of the scone. They taste less rich and buttery and discernibly less sweet.
The first thing is to ensure the scones are flat when you have cut them. Often when cutting from a rectangle of dough, the edges of the dough are thinner than the centre. So, when you cut the scone out, it exists on a bit of a slope. Make sure you gently press the scone down with the palm of your hand so that it sits evenly.
The second thing is to ensure that the scones are baked in a snug container. This helps direct each scone upward instead of outwards. Plus, if the tin is packed, there is nowhere for the scones to topple sideways.
Why were my scones dense?
This can happen for a few reasons, but in my experience the primary one is adding too much liquid. Scones that have too much liquid tend to expel the butter and have wet, oily innards. They look good from the outside, but don’t taste buttery and delicious when you open one up.
Really be critical when you add the liquid. Don’t just splash it in because the recipe specifies a certain amount – your flour is probably different to mine.
Your ideal dough before adding the butter is 90% moistened and 10% dry bits of flour. It might look dry, but it should feel reasonably hydrated when you rub your hands through it. It should still be a chunky dough at this stage – a homogenous bread like dough means you have already added too much liquid.
After adding the butter, the dough should just come together in a rectangle. It should take you a bit of effort to keep it together, but not too much. It shouldn’t feel overly wet. If you’re a little worried that it’s a bit too dry, the dough is probably perfect.
Can I refrigerate my scone dough overnight?
Yes, you can refrigerate this scone dough overnight. I recommend cutting the scones and then freezing them in the container you intend to bake in. The next morning, preheat your oven and you are ready to bake.
This method actually helps your gluten free scones achieve height and flakiness. It might also help if you are experiencing issues with butter seeping out of the dough. This is because the butter has been absolutely thoroughly chilled before baking, which means it should push the dough upwards as the liquid content of the butter evaporates.

Other gluten free baked treats
- Gluten free blueberry muffins
- A vegan version of the gluten free blueberry muffins
- Gluten free brownie cookies, flourless brownie cookies or vegan brownie cookies
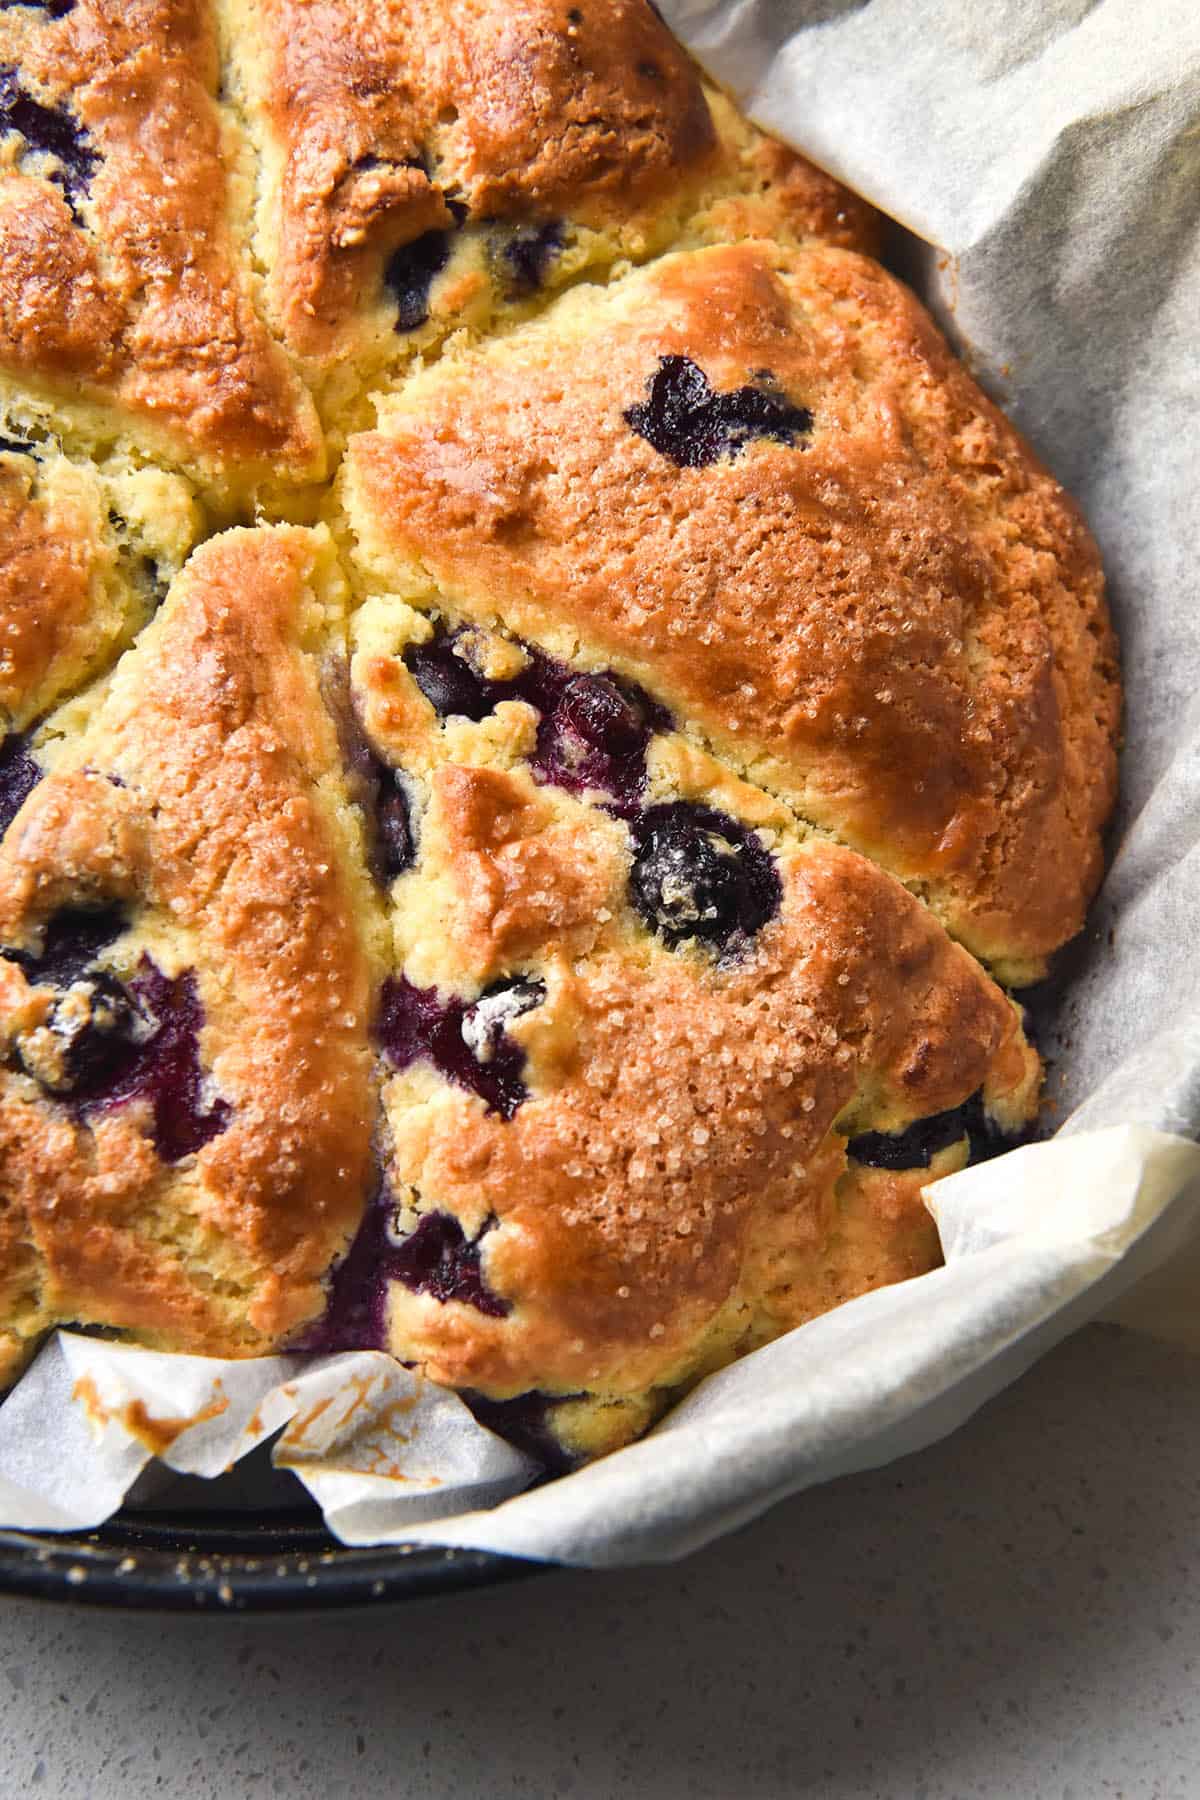
- These blueberry scones that are made without xanthan gum or eggs
- Grain free brownies
Gluten free scones
Ingredients
For the scones:
- 125-150 g unsalted butter cold (see notes)
- 160g (1 cup)* fine white rice flour
- 160g (1 1/4 cup + 1/2 tablespoon)* tapioca flour
- 75 g caster sugar
- 10 g psyllium husk powder
- 15g (3 teaspoons)* baking powder
- 3/4 teaspoon xanthan gum
- 1/4 – 1/2 teaspoon fine salt
- 150-200 g full cream sour cream or thick yoghurt (see notes)
- 60ml+ (1/4 cup+)* milk of choice, only if absolutely necessary
For the ‘egg’ wash:
- 10ml (1/2 tablespoon)* (10ml) milk of choice
- 5ml (1 teaspoon) maple syrup
Instructions
To make the dough:
- Begin by freezing the butter for 10 minutes to make it easier to grate.
- Combine all the dry ingredients in a large mixing bowl.
- Grate the butter on the largest hole size of your grater. Gently spread it out and return it to the freezer for 10-20 minutes. Freeze for 10 in winter or a cold kitchen and 20 in summer or in a hot kitchen.
- When the butter is ready, add the cream to the flour mix and stir to combine. The dough should be shaggy with some wet spots and some dry spots. If necessary, add 1 tablespoon of milk at a time to achieve a dough that is about 90% moistened and 10% small dry spots. A wet dough creates a dense and oily scone, so it's critically important not to add too much liquid.
- A handful at a time, incorporate the butter into the dough. Use a light touch and try to evenly disperse the butter chunks throughout the dough without breaking them down too much. Repeat until you have incorporated all the butter. The dough should just come together in a rectangle when you press it. You should be wondering if it might just need an extra tablespoon of milk. As soon as it comes together – hands off the milk. If you are really unable to get it to stick to itself, add a tablespoon of milk at a time until it just comes together. Cover and place the dough into the fridge for 30 minutes.
To laminate the dough:
- Flour a piece of baking paper with tapioca flour. Set down the rectangle of dough and flour the top lightly. Use a rolling pin to roll the dough out into a long rectangle that is roughly 30cm long and 15-20cm wide.
- Take the top third of the dough, pick it up and fold it back onto the middle of the dough. Dust it off for excess flour. Now, take the bottom third of the dough and fold it up onto the middle of the dough. Press it down gently to secure. This is called a business letter fold.
- Pick up the dough and flour the baking paper. Turn the dough so that the skinny side of the rectangle faces upwards. Roll the dough out again, dust it off, and fold it up in the same way as above.
- For our final fold, we’re doing something a bit different. Roll the dough out and flip it over. The underside will be lumpy and bumpy – that’s fine. Dust off the excess flour, then use 1-2 teaspoons of milk to moisten the dough just very lightly. This will help our laminated scones hold together. Fold the dough in a business letter fold as you did previously, then place it back into the bowl, covered, and into the fridge for 15-20 minutes. Preheat the oven to 200c or 400F.
To cut the scones:
- Remove the dough from the fridge and place it on a floured piece of baking paper. Use a rolling pin to roll the dough out to a rectangle about 7cm tall. The scones don’t grow too much in the oven, so you need the dough to be tall now for a tall scone.
- Use a cutter or a sharp, non-serrated knife to cut the scones into 6-7 large scones. Place the scones into a 24cm cake tin and into the freezer for 10-20 minutes, weather dependent.
To bake the scones:
- Retrieve the scones from the freezer and place them on a heavy baking tray. This will stop the bottoms of the scones from burning. Ensure your oven has had plenty of time to preheat and is nice and hot.
- Lightly brush the scones with the ‘egg’ wash, and place into the oven for 15-20 minutes. Check on the scones – if the tops are getting dark, it’s time to cover them. Very gently tent a piece of baking paper over the scones without touching them. Turn the oven down to 180C/356F and bake for 10-20 more minutes or until the scones are cooked through.
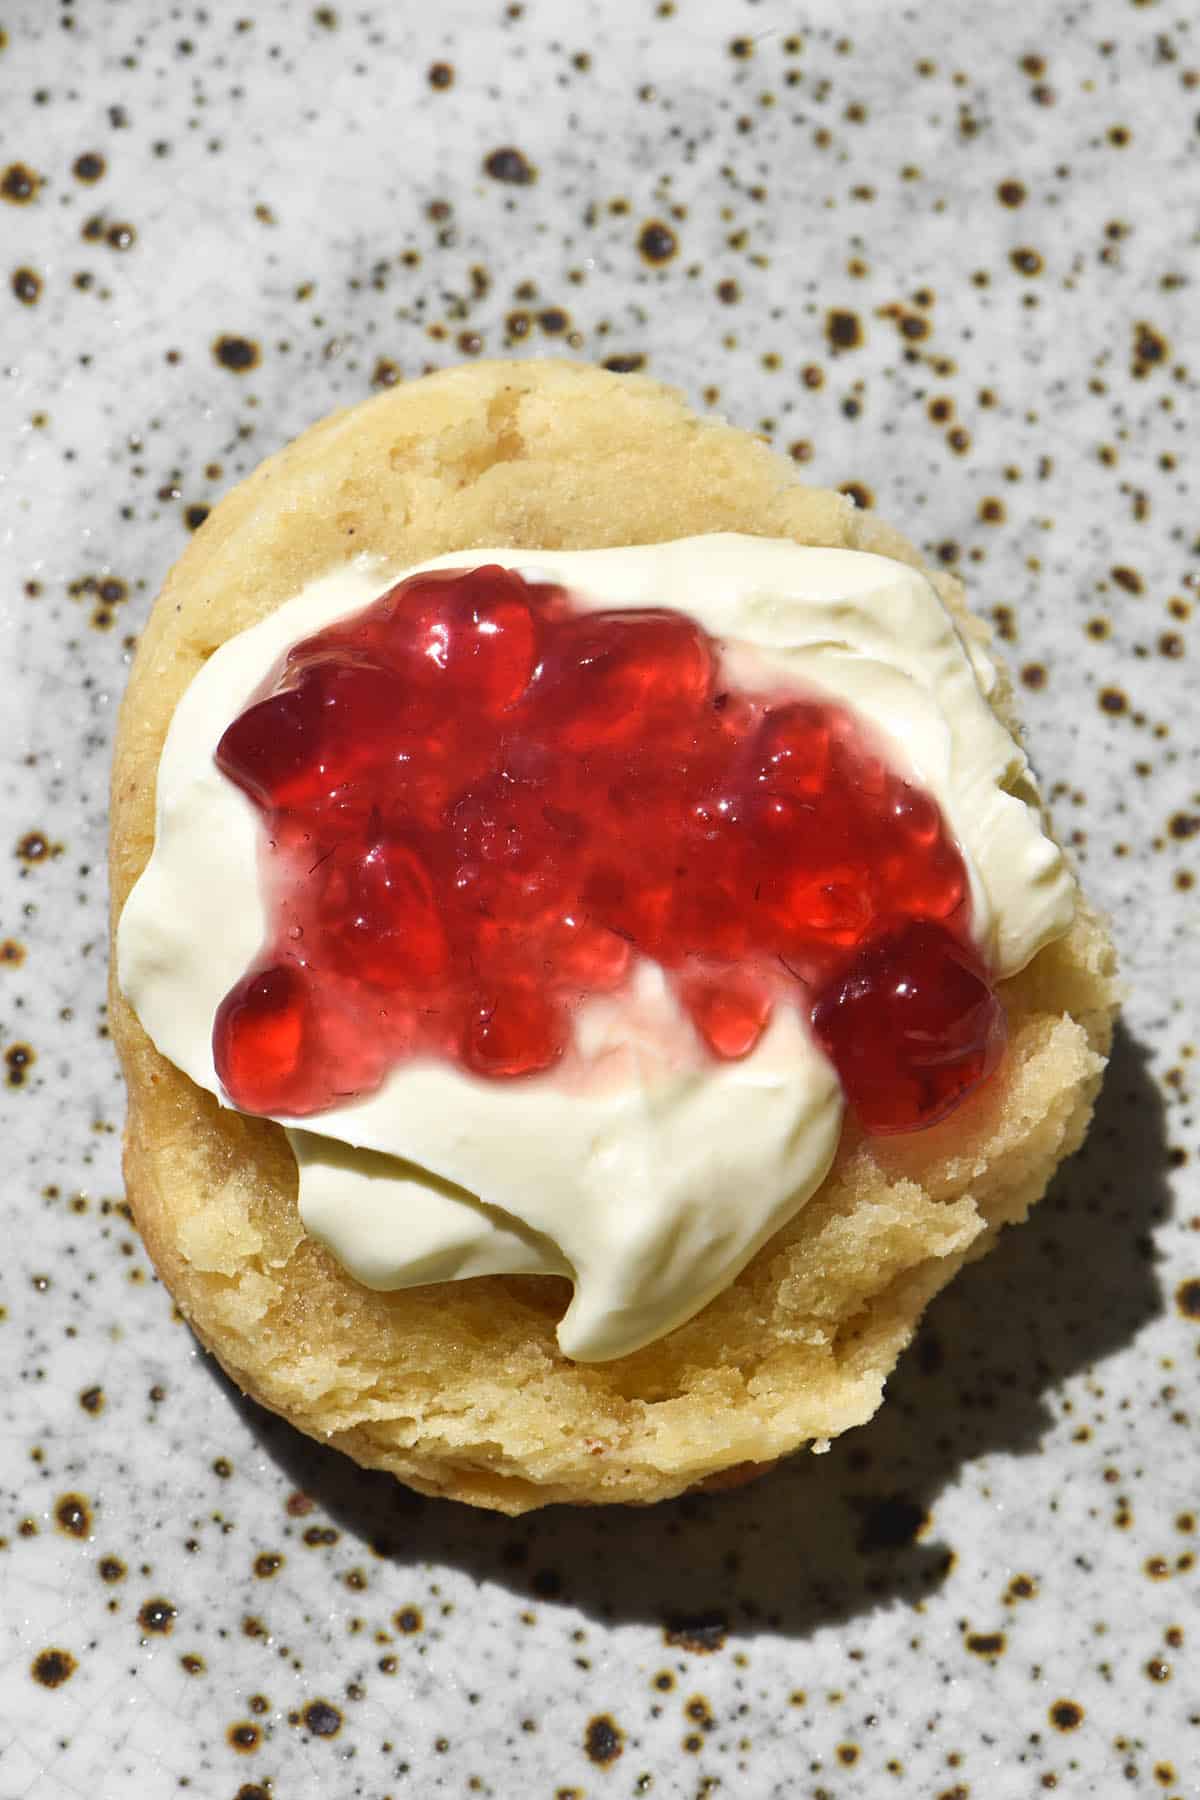
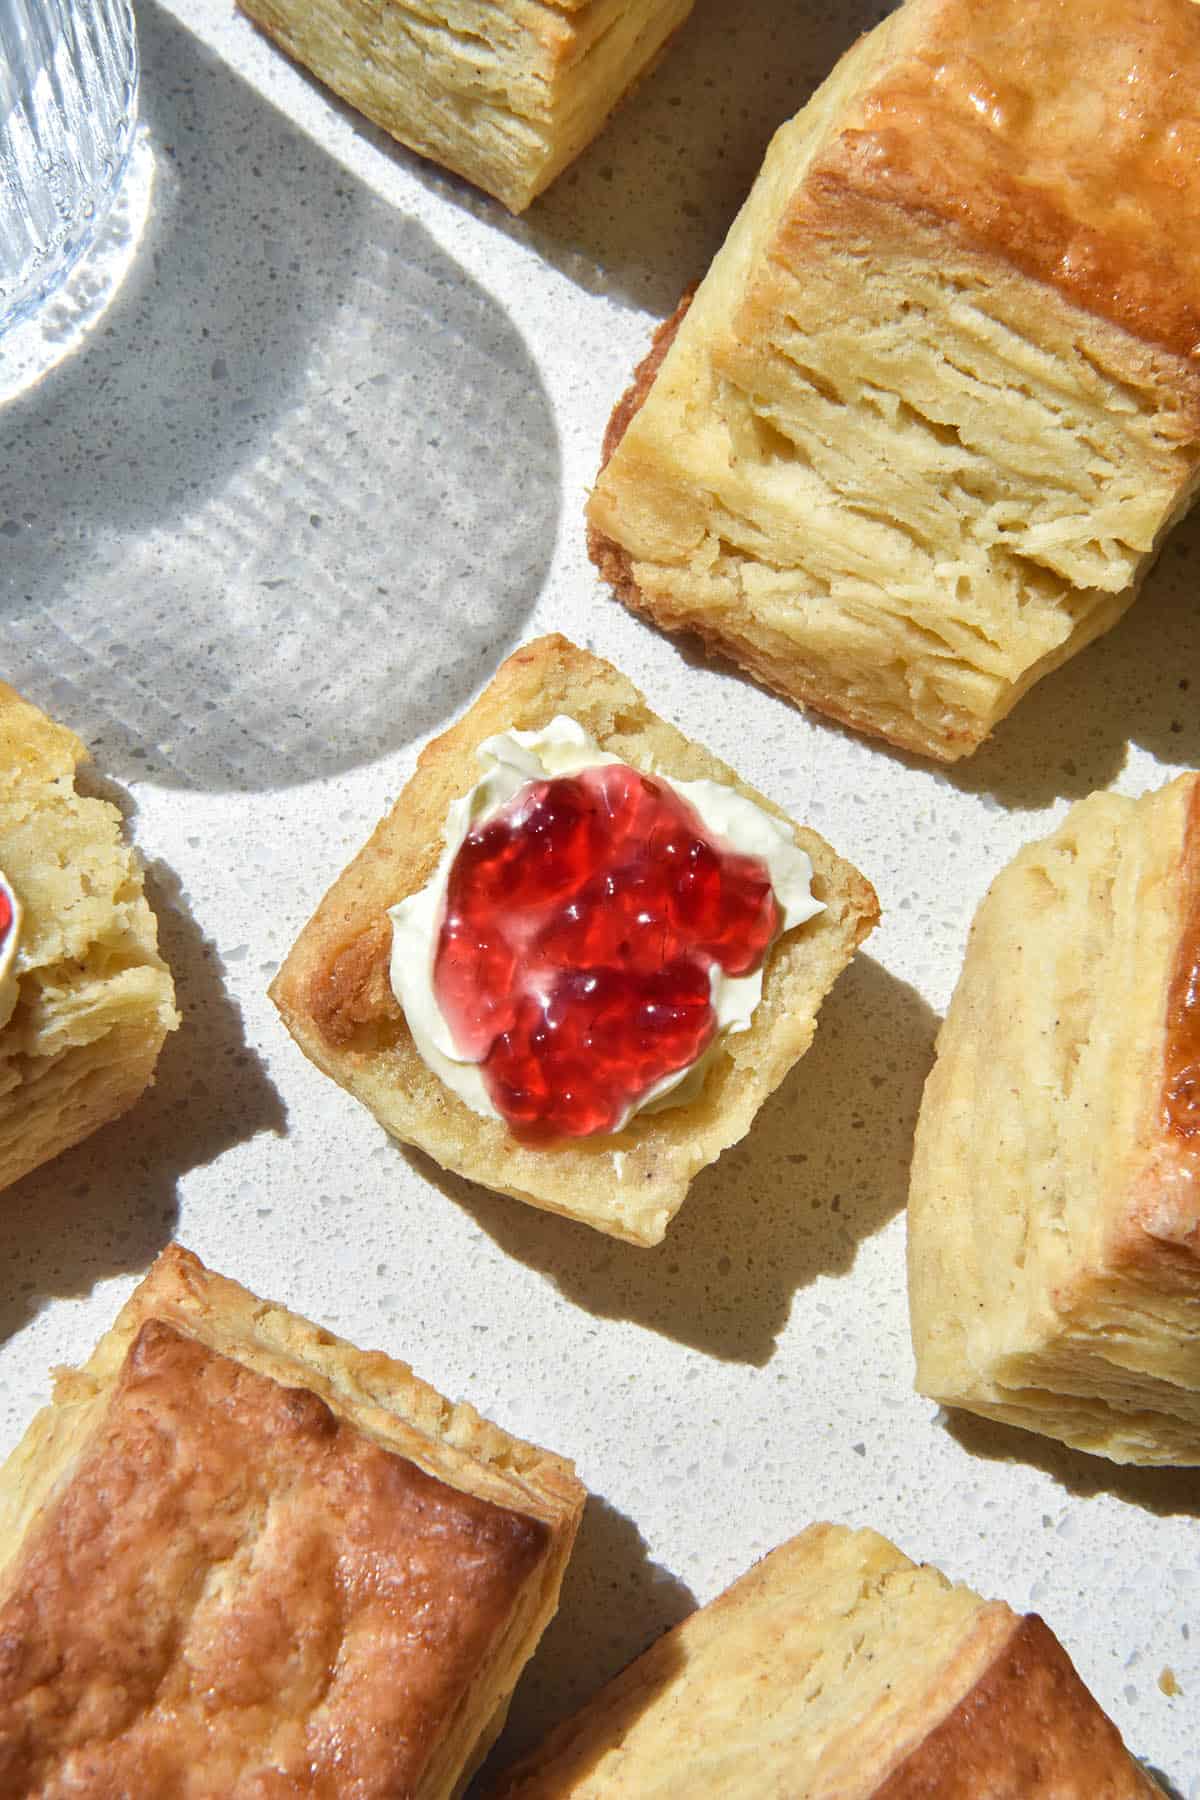
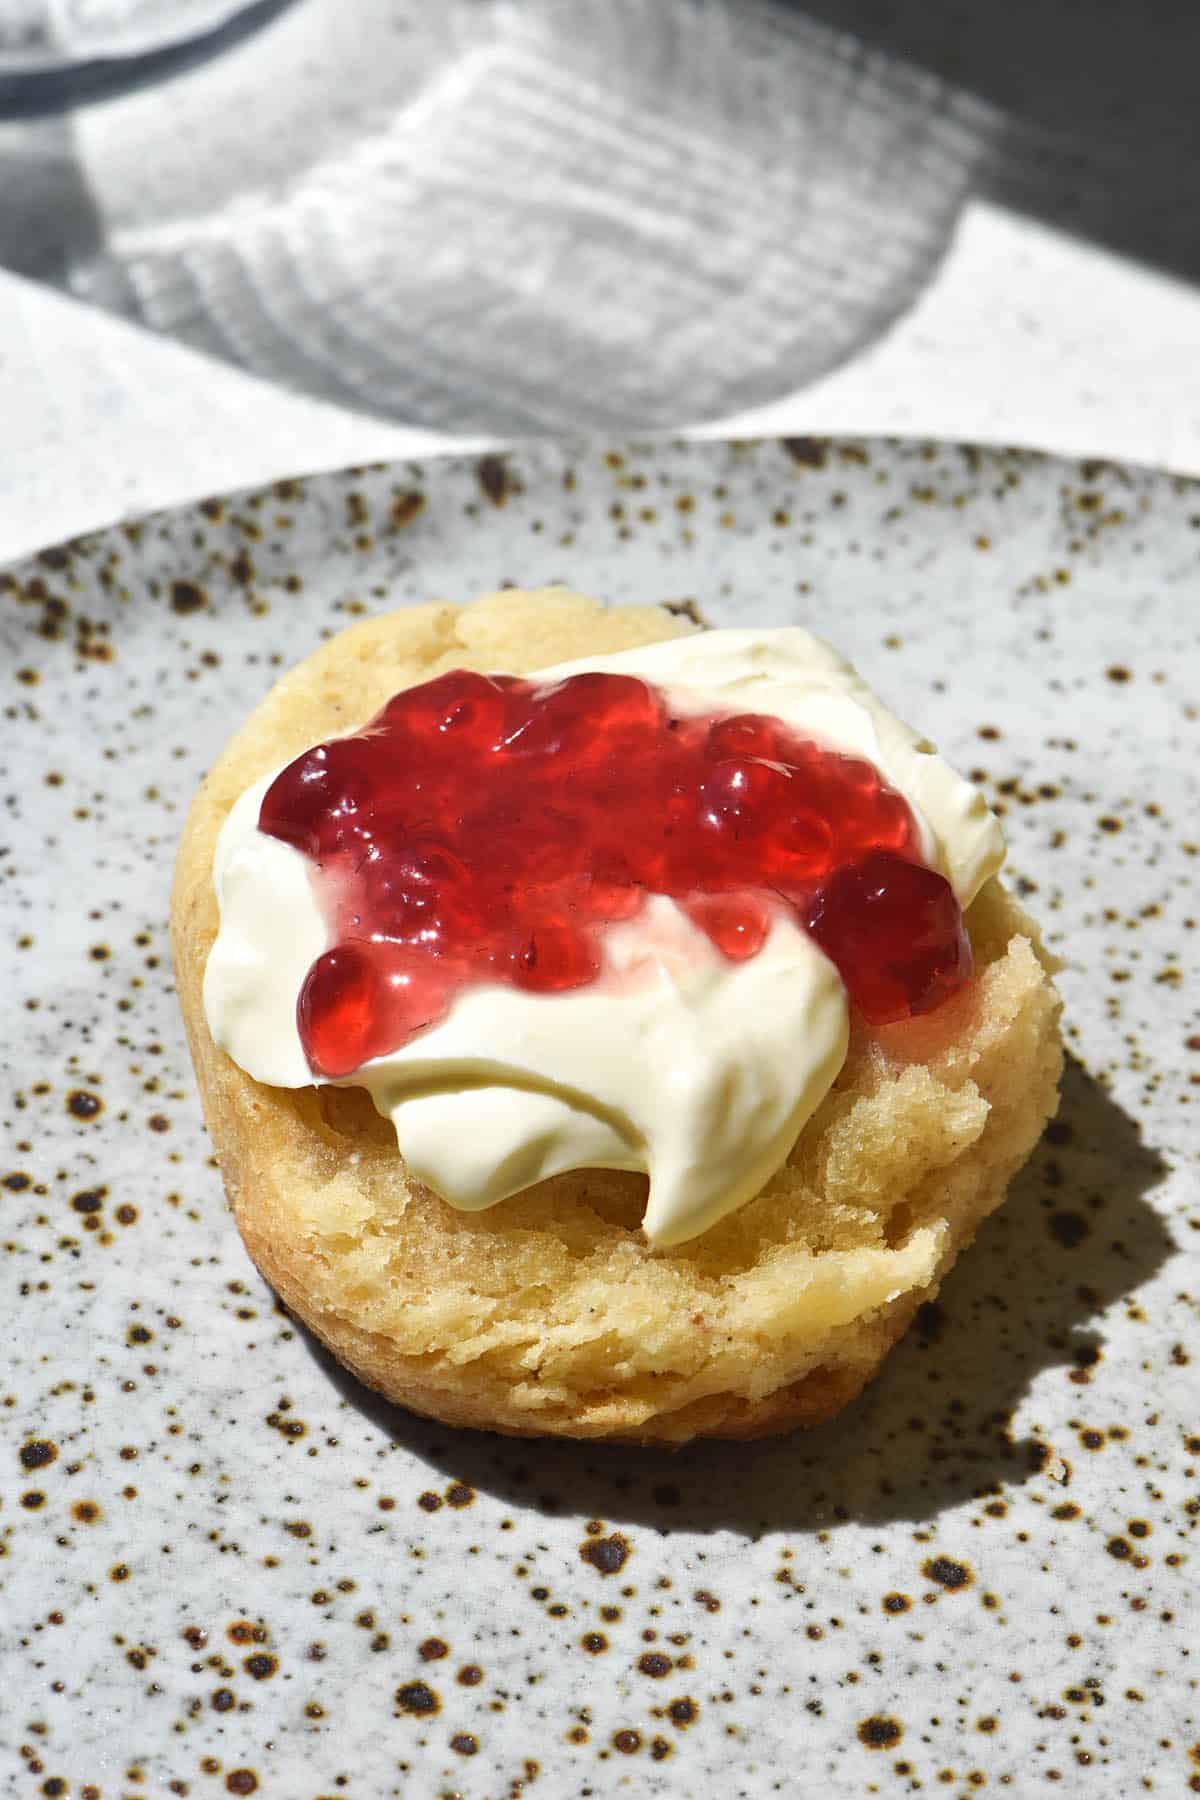
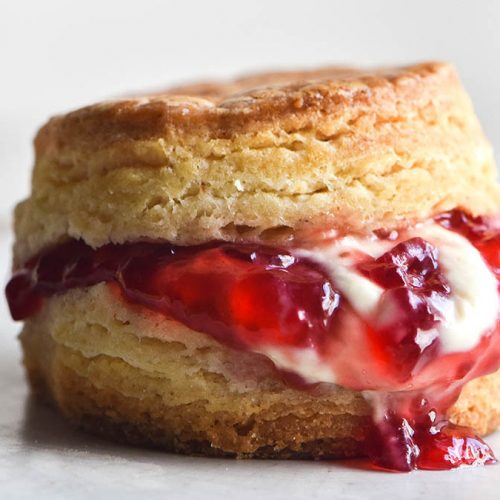
- Remove from the oven and set the scones on a wire baking rack. These scones are best eaten on the day of baking with cream (lactose free, if need be) and jam. Leftovers store well in an airtight container and are best reheated with steam (in the microwave or in an oven with a small tin of boiling water).
Notes
- Cold butter is critical to flaky scone success. If it’s hot weather, I recommend extending the refrigeration and resting times considerably.
- These scones work with 125-150g butter, so you can experiment with what works for you. If you are having trouble with lots of butter seeping out of the scones, try using 125g.
- You can also experiment with adding more or less cream (150-200g) according to your preferences. Add a little extra milk where necessary to the batch with 150g.
- Salt adds flavour to scones, which is why I have added it here. I like to add 1/2 teaspoon, but I am a salt fiend. Add whichever amount you are comfortable with.
- Every batch of flour will need a varying level of hydration. You want to ensure the dough is hydrated but not wet. It should just come together – think of puff pastry. You want to use the minimum amount of liquid for a flaky and tender scone.
- The notes in the post are long, but I have included all my tips and tricks for getting the perfect gluten free scone.
No Comments