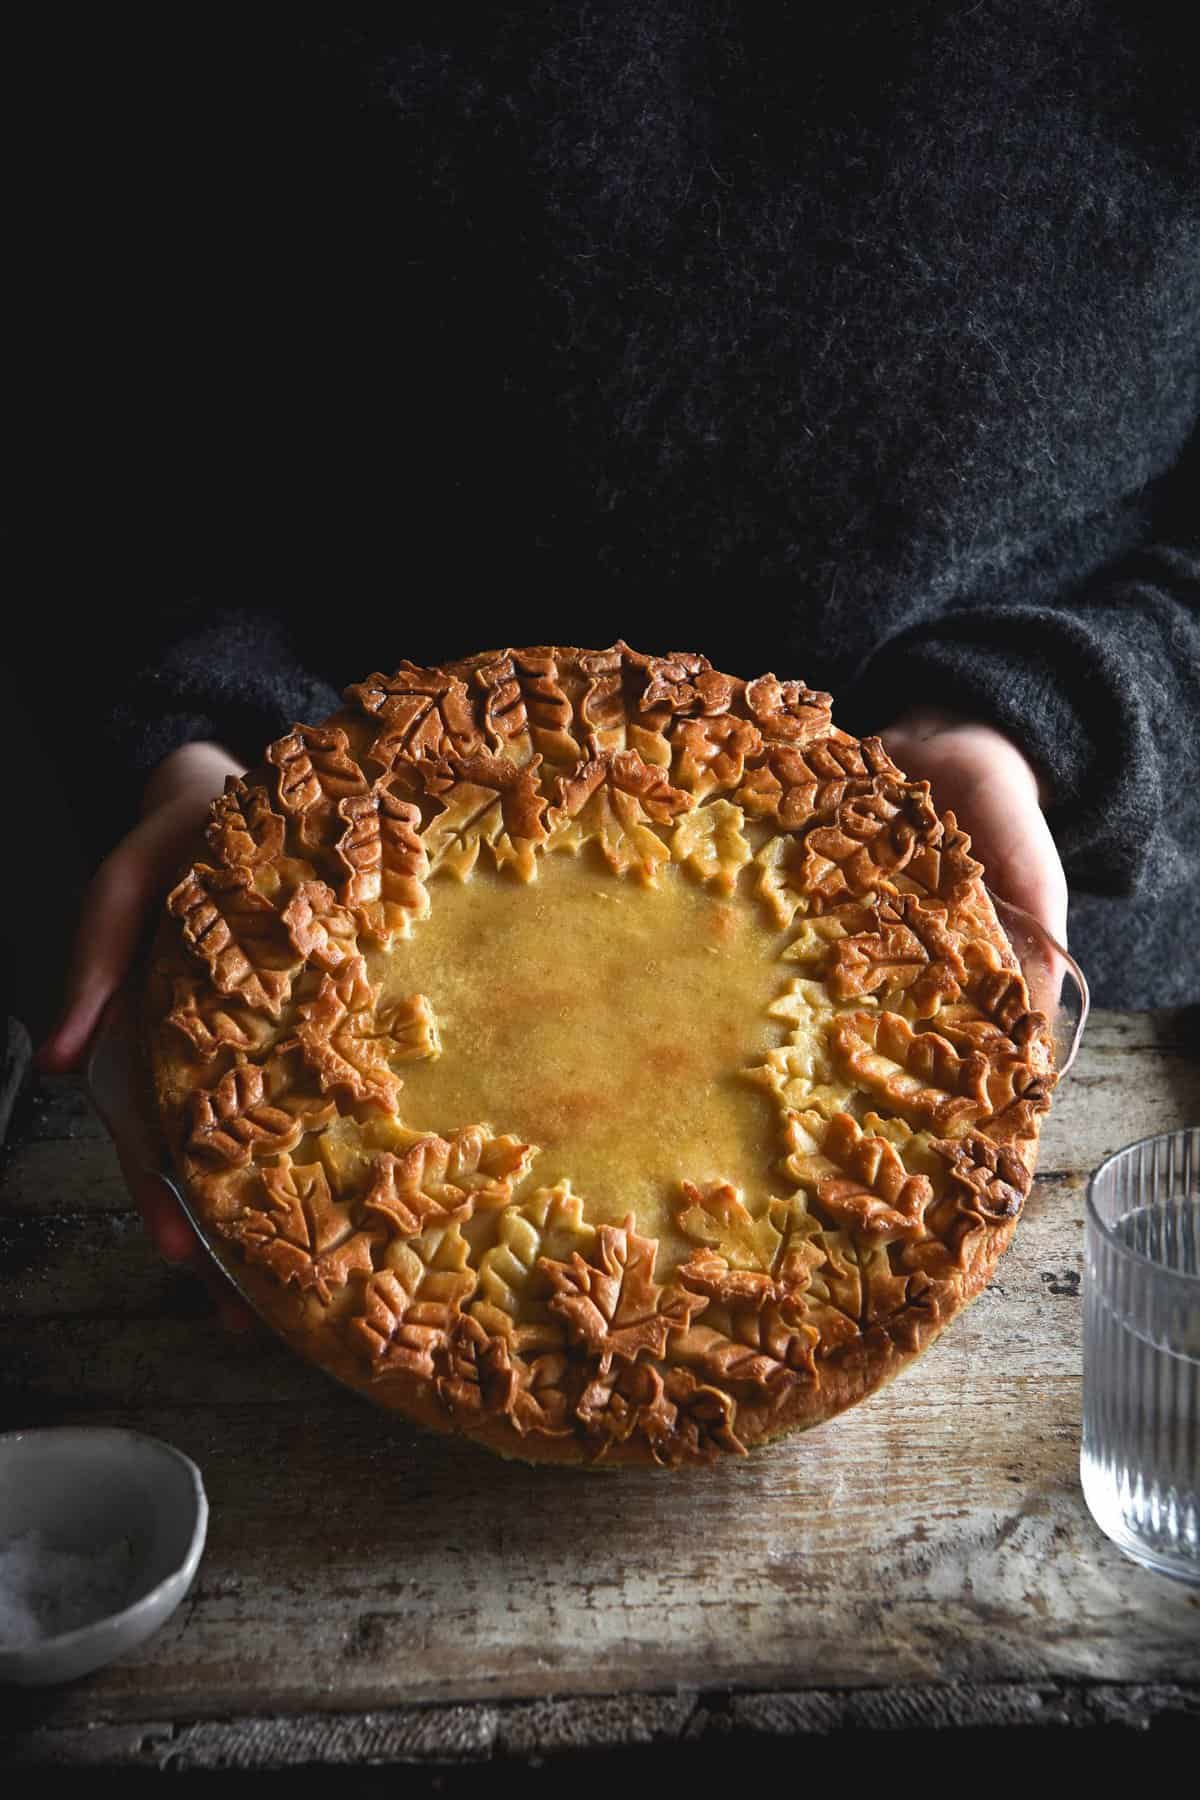
I get seasonal envy every year. When the Northern hemisphere has nice tomatoes, I long for summer. When they start making pies? I want to make pies. So today, I’m doing what I want and making a pie. A gluten free greens pie with feta, pine nuts, and an optional but fun intricate pie top.
Gluten free greens pie with feta (vegetarian and low FODMAP)
If you were thinking this pie looks similar to a spanakopita, you’d be right. It basically is a gluten free, FODMAP friendly spanakopita, just without the phyllo pastry. I haven’t mastered gluten free phyllo yet (if I ever will?) but this pie makes an excellent spanakopita replacement in the meantime. The pie is gluten free, low FODMAP, vegetarian and adaptable to be grain free, too.
Recipe notes for your gluten free greens pie
I have used my own recipe for gluten free pastry, the notes and recipe for which you can find below. If you’d prefer, you can use store bought. You will need 2-3 large sheets.
Making fancy patterns on top of your pie is half the fun, so I make one and a half batches of pastry. Whatever you don’t use can be stored in the fridge or freezer.
You could play around with the greens you use in this recipe. Whatever you do, make sure they’re cooked and well drained to prevent a waterlogged pie. I have used spinach, rocket (arugula) and chopped kale (without the stems).
FODMAP notes for your greens pie
If you’re baking for someone with a lactose intolerance, you have a few options with the ricotta. Firstly, you can use a ricotta substitute. You could, as I have done in my vegan zucchini tart, use blended tofu (with additional flavourings). See the tart post for flavourings. You could also make lactose free ricotta – I have a recipe here.
Because feta is a hard cheese, Monash detected only trace amounts of lactose. Smooth sailing!
In terms of the sour cream in the pastry, there’s not really a substitute that does anywhere near as good a job. Baking science wise, there’s (not currently) a plant based alternative that works quite the same way in terms of creating a flakey pastry in this recipe. I should say that at 115g, the serving size for each slice of this gluten free greens pie is small, so I recommend keeping the sour cream. You could try using a dairy free alternative, but I can’t guarantee the result will be as intended.
Big servings of spinach can be higher in fructans. For this reason, I quite like using a mix of spinach, kale (only trace FODMAPs) and rocket/arugula (only trace FODMAPs).
Ingredient notes and substitutions for the gluten free greens pie
- As mentioned, you can play around with the greens you add to this pie. You could also add other vegetables, if you prefer.
- Full fat sour cream is highly recommended for the pastry. It makes for the flakiest, most delicious version possible.
- Adding cheese to the pastry is optional, but it adds a delicious savoury and rich quality. The pastry works well without it, though.
- I like to use Greek feta (as opposed to Danish) for this pie. This is because Danish feta is soft and tends to melt away, whereas Greek holds firm during baking. You can really use whatever sort of cheese you’d like.
- Again, you can play around with the herbs, or even try adding dried ones as opposed to fresh. Whatever you have on hand!
- The spring onions are optional – you don’t have to use them if you don’t want to. Make sure you use the green parts only for FODMAP friends.

Flour options for your easy gluten free butter pastry
This gluten free pastry recipe has a little bit of flexibility in the flours you use, particularly the wholegrain ones. The original version called for tapioca and glutinous rice flour, although I have discovered that you can just use tapioca flour to simplify the ingredient list.
In terms of wholegrain choices, I have successfully used white rice flour, brown rice flour and white sorghum flour. These tend to be the plainest in flavour of the wholegrains. They’re also quite predictable in their function and liquid absorption.
If you would like to use a different gluten free wholegrain (millet, buckwheat, teff etc) I would recommend using half and half. That is to say, half rice flour and and half your wholegrain flour of choice. We want your easy gluten-free butter pastry to be as successful as possible, and this will help ensure that. Of course, feel free to experiment if that’s your thing.
I will also experiment in due course, and update this post with any combinations I find that work well. At the moment I’m enjoying adding 10g or so of buckwheat flour to baked goods – I think it has a nice stretchy quality when added in small doses.
Important tips for your gluten free pastry
Always use cold butter (and cold sour cream, in this case). If the butter melts, so too do your chances of a flaky pastry. I recommend cutting the weighed butter into small cubes and freezing for 15-20 minutes. If the butter was at room temperature beforehand, you might need to freeze for longer.
On the note of sour cream – PLEASE use full fat. It is a lower water content than low fat, so it moistens and elasticises the pastry without making it soggy.
I haven’t tried this pastry with vegan alternatives, so I have no suggestions. One day!
I have used both brown rice flour and white rice flour in the pastry with great results. You could also try sorghum or millet. I’m hesitant to recommend buckwheat – I think you would need to mix it with another flour to mellow the taste and the affect on hydration.
If you want to experiment with gluten free flours, keep the starches the same (50g total per batch) and use 2 different flours to make up the remaining content. Let me know how it goes!
If you’re cutting out pastry shapes and plan to re-roll it, don’t just scrunch all the leftover pieces up in a ball. Where possible, fold the pieces on top of each other or stack them up before rolling out. This will prevent you squashing up all the butter layers you incorporated by rubbing the butter in.
More low FODMAP, gluten free vegetarian pastry based recipes
- Pumpkin, feta and sage pie
- Grain free rough puff pastry
- Vegetarian sausage rolls
- Spinach and feta rolls
- Curried vegetable pie from Intolerance Friendly Kitchen
- Gluten free buckwheat pastry without xanthan gum or psyllium husk from my buckwheat e-book
Gluten free greens pie with flaky pastry (FODMAP friendly, vegetarian)
Ingredients
For the pastry:
- 100 g (just over 3/4 cup) brown rice flour
- 100 g (just over 3/4 cup white teff) flour or sub for extra brown rice flour
- 75 g (3/4 cup) tapioca flour
- 185 g butter
- 115 g sour cream
- Ice water to finish (8-10 tablespoons ish)
For the greens pie:
- 700-750 g greens I used a mix of spinach, rocket and kale
- 200 g ricotta
- 2 spring onions, finely chopped (green part only for FODMAP) optional
- 1 bunch dill
- 1/2 teaspoon nutmeg
- Pinch of clove
- Zest of 1 lemon
- Juice of 1 lemon
- Lots of freshly cracked black pepper
- 200 g feta
- 2 extra large eggs
Instructions
To make the greens pie:
- Begin by cooking down the greens in a dry skillet over a medium heat until they are soft but still verdant. Place them into a colander or sieve over a bowl and allow them to cool. As they’re cooling, gently squish the majority of the liquid out. They don’t need to be bone dry but most of the liquid needs to go (to prevent a soggy pie).
- Preheat the oven to 200C/400F.
- Take half the block of pastry and place it on a liberally (rice) floured sheet of baking paper.
- Gently roll the dough out with a rolling pin, stopping every couple of rolls to flour both sides of the dough. ‘Turn’ the dough regularly (pick it up and flip it over) to prevent it from sticking. Once the dough gets too big to turn, take another piece of well floured baking paper and place it atop the dough. Working quickly, lift the dough up and flip it onto the newer piece of baking paper. Then you can continue rolling.
- If at any point the dough becomes soft and hard to work with, place it flat in the fridge or freezer for a few minutes.
- Once you have rolled it out to a couple of sizes larger than the pie plate, place it flat in the fridge or freezer for about 5 minutes to get ready for the pie plate.
- Lay the pastry flat on a working surface like a table so you have a bit of space underneath for your hands. Place the pie plate gently in the centre of the pastry dough in whatever position maximises pastry overhang.
- Use one hand to pull a corner of the baking paper towards you, and place the other directly underneath the centre of the pie dish. As you pull the pastry off the table, your other hand will push the pastry into the pie dish, after which you will quickly flip the dish, letting the pastry fall into it.
- Don’t stretch the pastry into the dish – be generous with letting it fall into the dish. Patch up any tears as necessary, and then trim excessive overhang, redistributing it to places that may have none.
- Once you’re happy with how the pie dough is sitting, trim any extra overhang (you can cook this as little biscuits or use for extra decoration.) Use the palm of your hand to press down on the edges of the pie plate. This will create a flat and even pie edge, which is helpful when you’re putting the lid on.
- Scrunch up a piece of large baking paper and place it into the pie dish. Ideally, some paper will hang over the edges – this will protect them from burning during the long blind baking time.
- Gently fill the pie with your pie weights. I really recommend using enough weights to go right up the edges of the pastry – this pastry easily buckles in. I use dried chickpeas and rice for my pie weights and they go right up to the edge of the pie dish.
- Place the pie pastry in the oven for 40 minutes. Take the pie out of the oven and very gently remove the pie weights and baking paper, noting that they will be extremely hot (don’t put them in something ceramic, and don’t handle the bowl if you put them in metal.)
- Place the pie back in the oven for 10 minutes. After this, egg wash the entire pastry and cook it for a final 10 minutes.
- Once done, remove from the heat and allow to cool while you get on with your filling.
To make the greens:
- Finish wringing out your greens, and then add them to a large mixing bowl. Add and combine all the ingredients except for the egg – this allows you to taste and adjust as you see fit. I like to make mine quite lemony because the pastry and the feta are rich, but you do you.
- Once you’re happy with how it tastes, add the eggs and mix to completely combine. Place in the fridge while you roll out the lid of your pastry.
To finish:
- Roll out the second half of the pastry using the same method as you did for the pastry base.
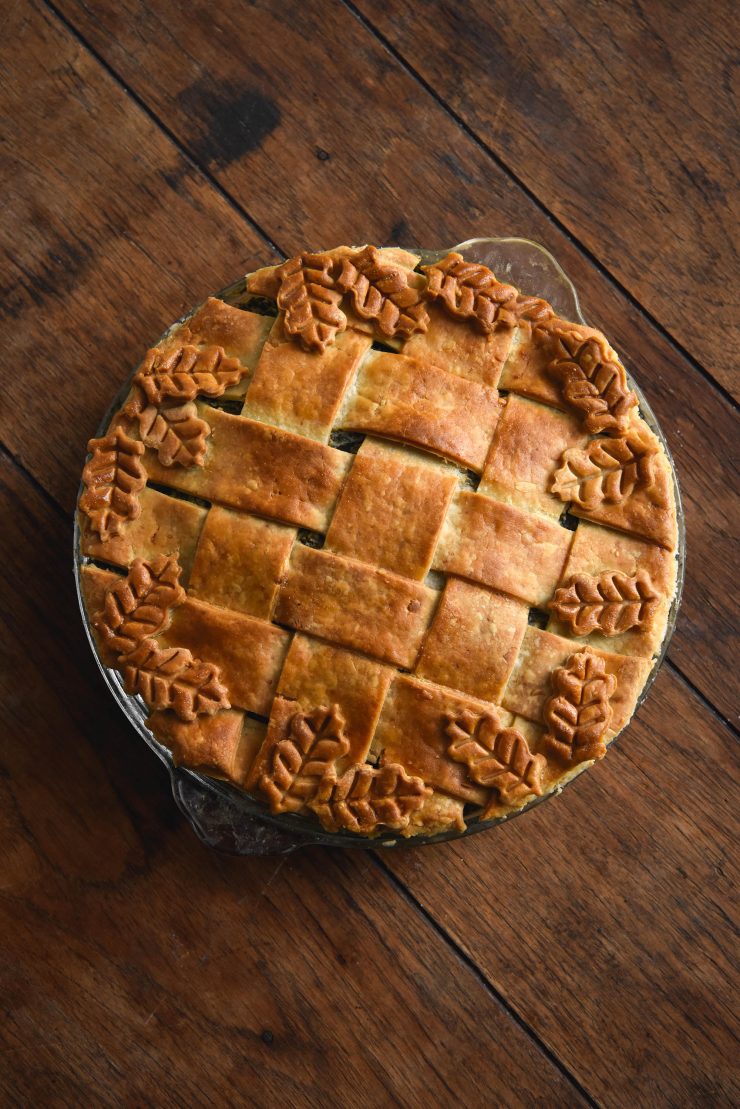
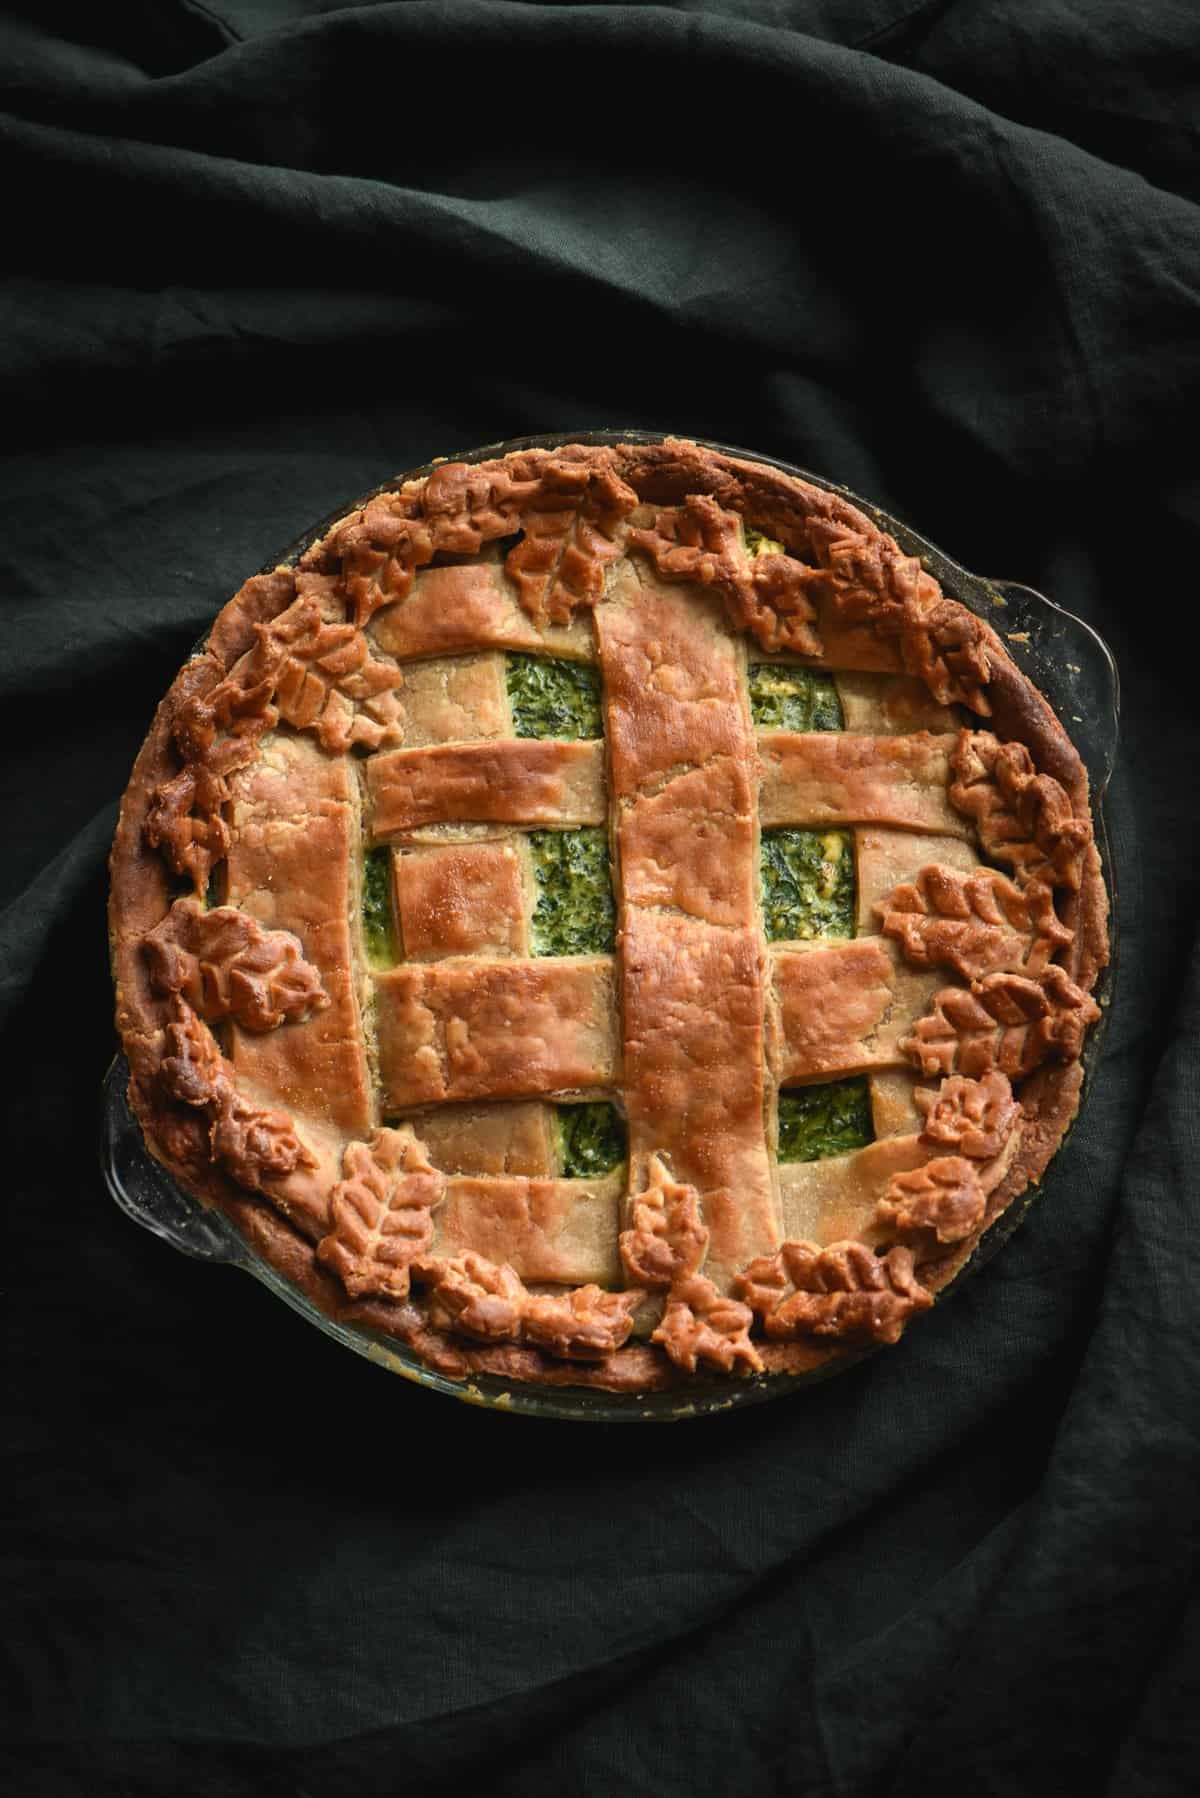
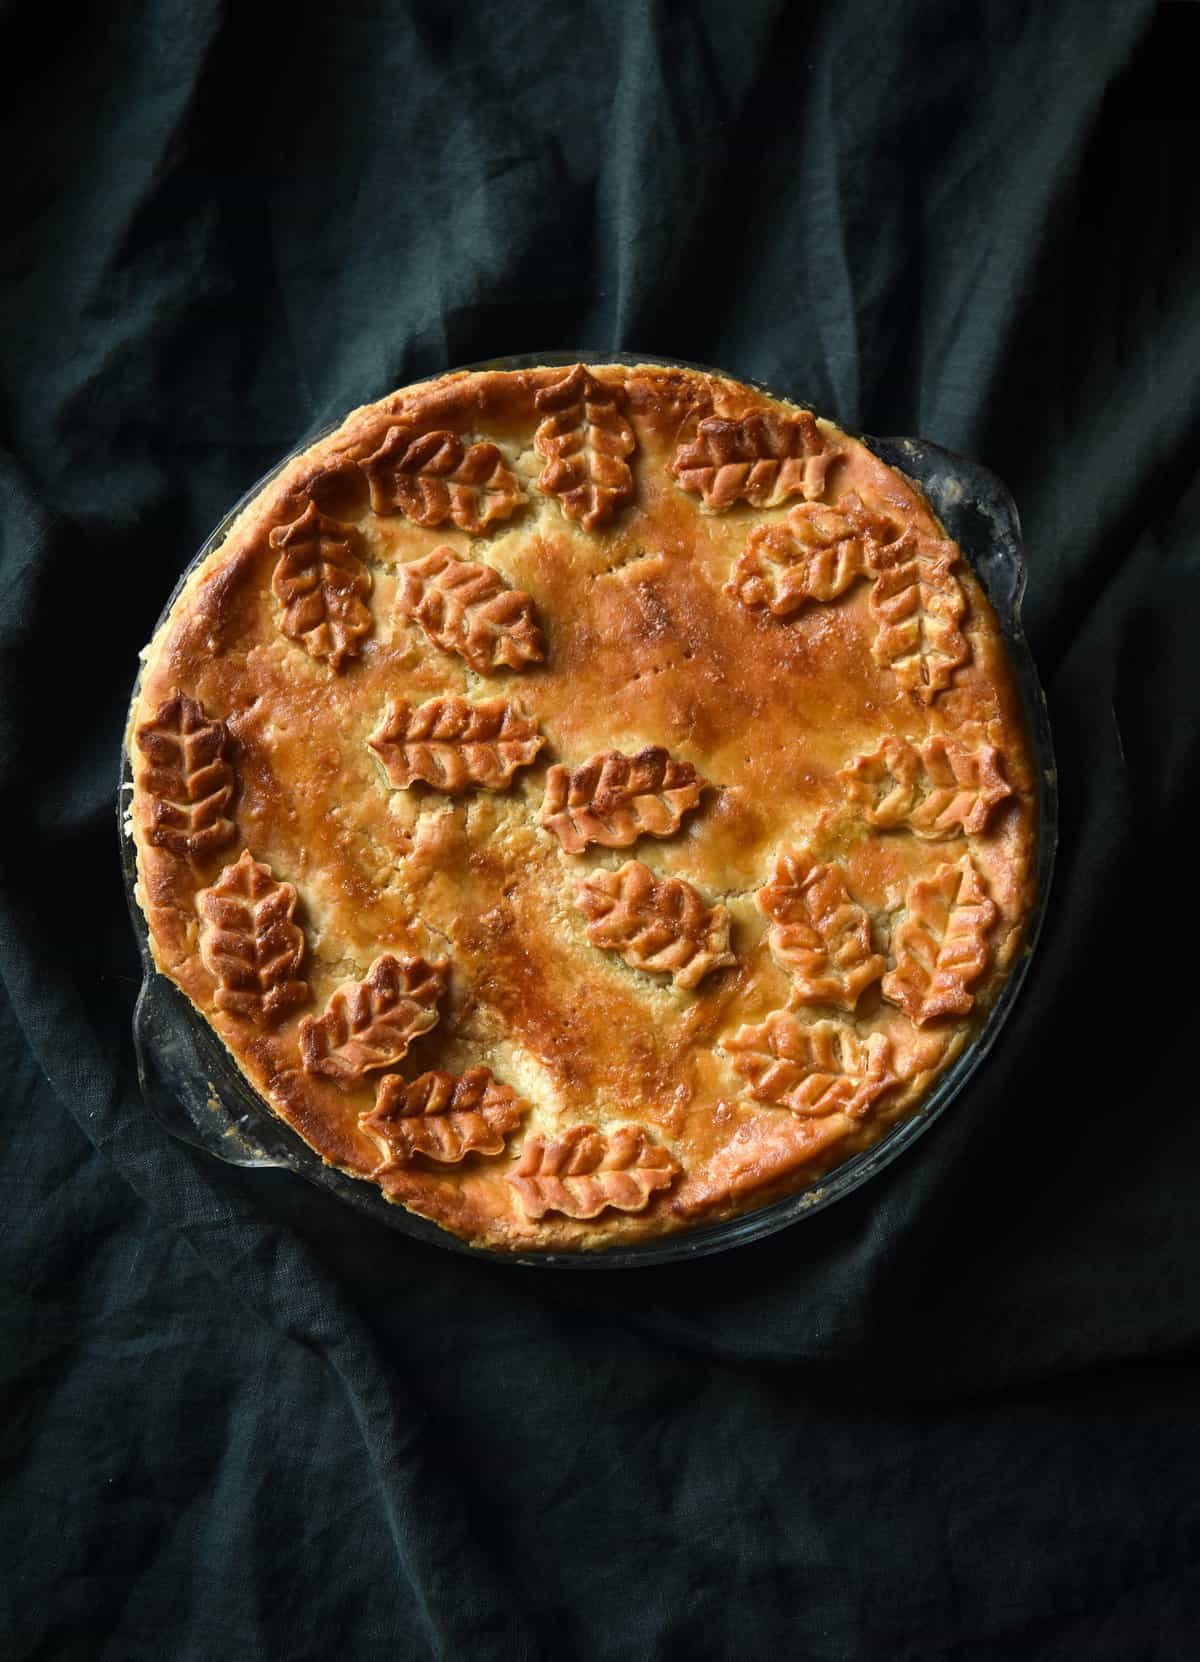
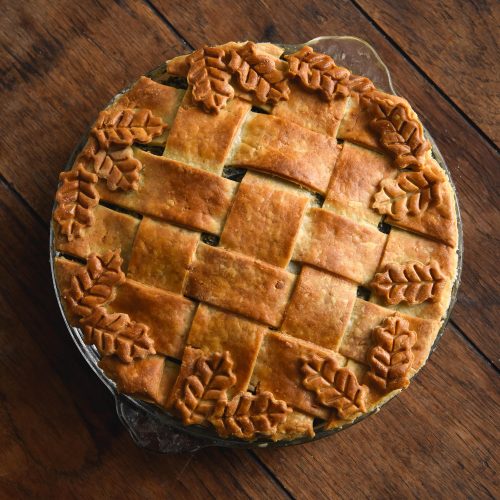
- You can either make a complete lid to cover the whole pie or create latticing. There is a link above to a visual demonstration on latticing.
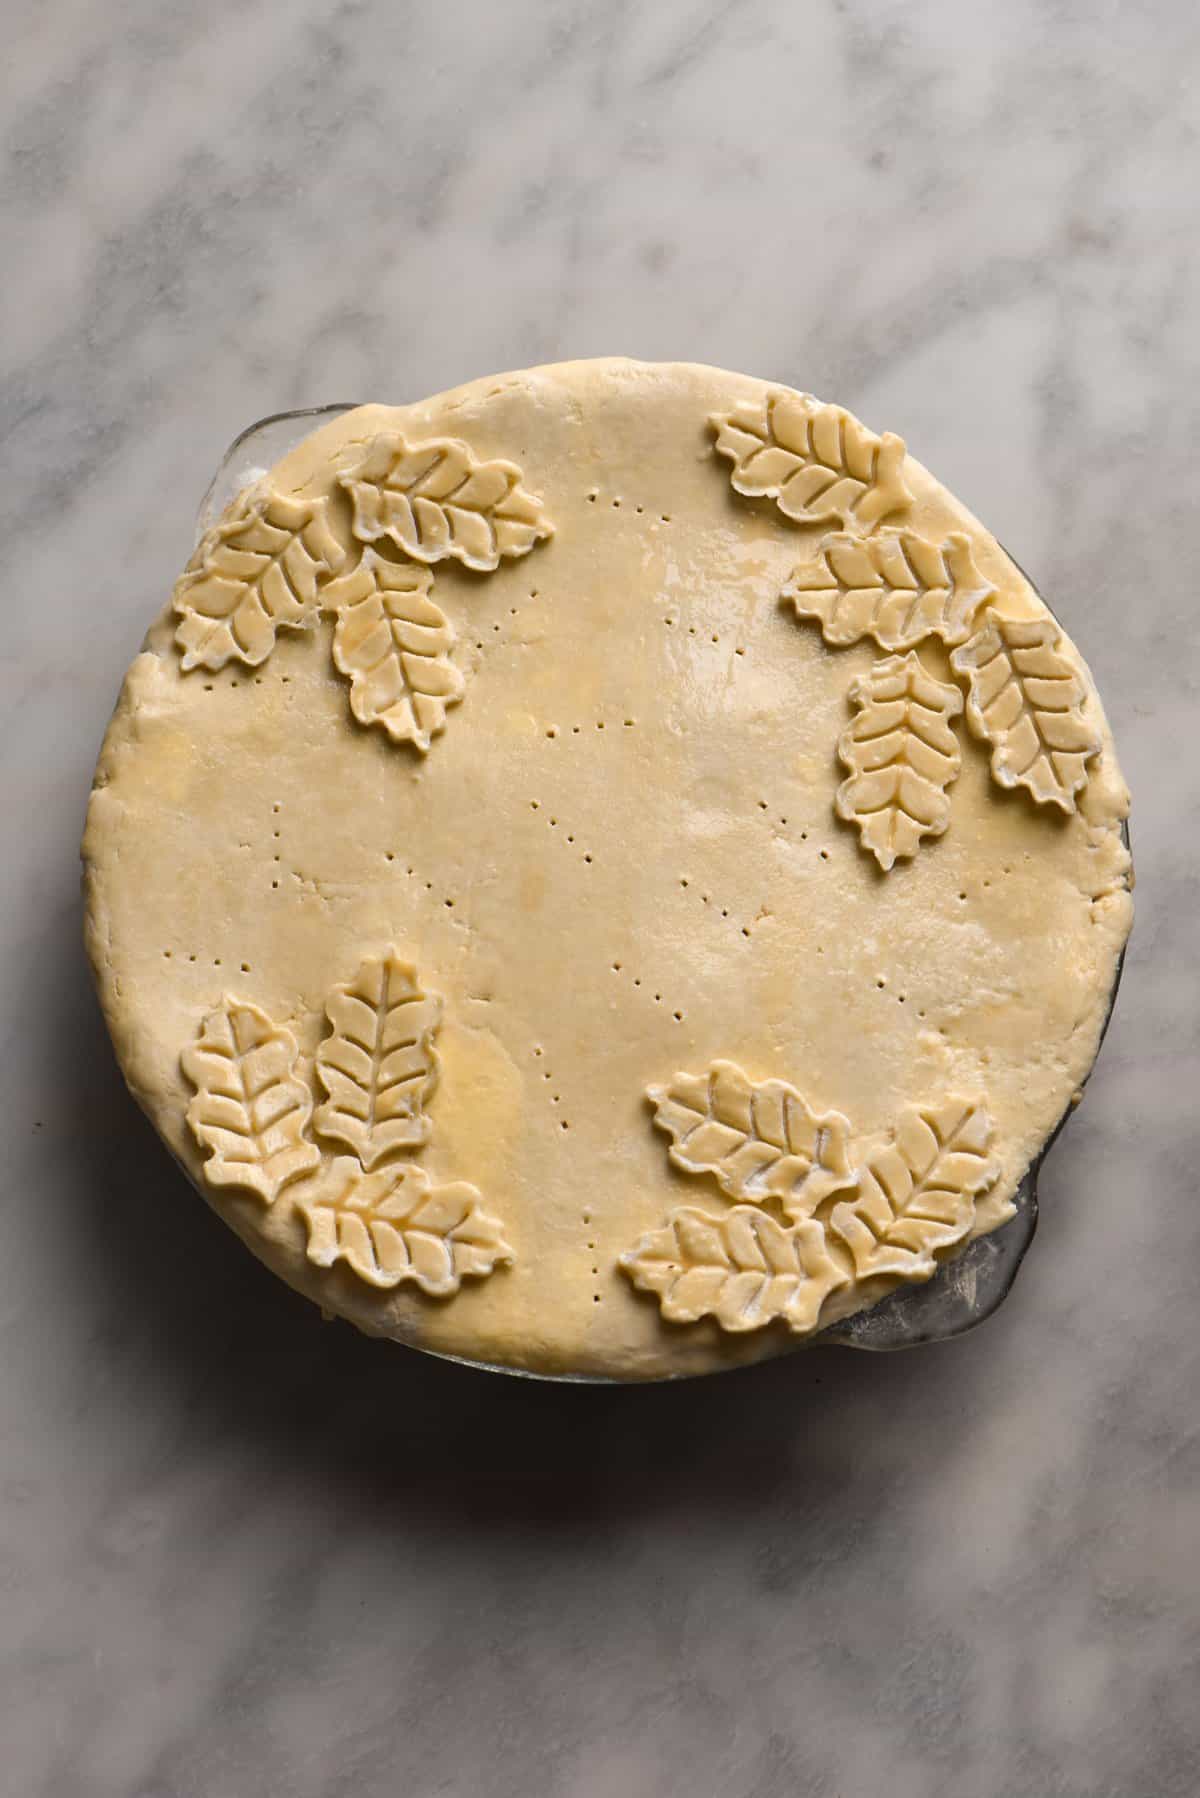
- If you’re making them, make the pastry decorations while you’re at it.
- Gently pour the greens filling into the pie and smooth the top. Lightly brush the cooked edges with egg wash, and begin placing the pastry on top, pressing gently to adhere. Trim any edges (I like to trim them shorter than the pie dish and tuck them in for latticing) and brush liberally with eggwash.
- Return to the oven with 20-30 minutes, finishing with the grill function for extra colour if necessary.
- You can serve this pie hot or cold and it keeps well in the fridge for at least a few days.
Hi there, this sounds delicious! I’m thinking of making it for a friend on a low FODMAP diet, but am wondering if the ricotta and sour cream will be ok for her? I have heard that these ingredients aren’t FODMAP friendly.
Hi Maddi! What a good friend you are. The ingredients are fine as long as she isn’t hugely intolerant to lactose (not everyone on FODMAP is). If she is, you can make lactose free ricotta (I have a recipe here – https://georgeats.com/recipes/lactose-free-ricotta/) You could actually potentially even use tofu that you’ve added flavour to like I did in this vegan zucchini tart – https://georgeats.com/recipes/vegan-zucchini-ricotta-and-herb-tart/
In terms of the sour cream, each serve will only have around 10g of it, so it shouldn’t be an issue even for someone with lactose concerns. You could also try using a vegan ricotta, but baking science wise, sour cream makes the best and flakiest pastry. Hope that’s helpful!