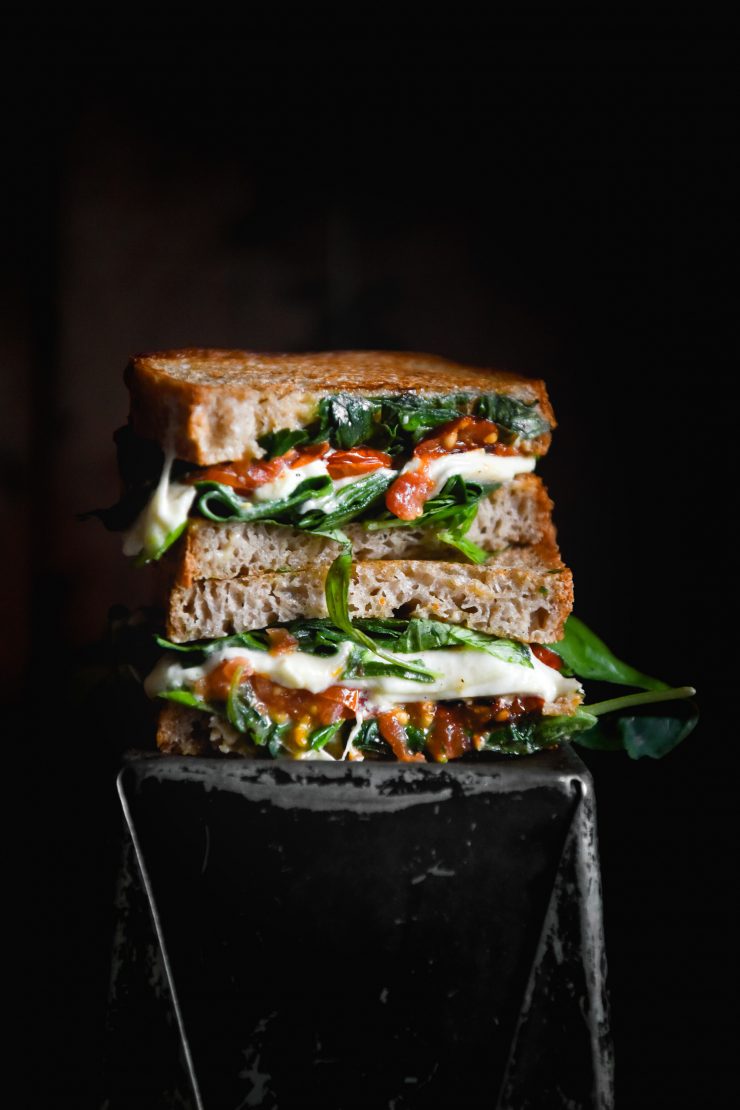
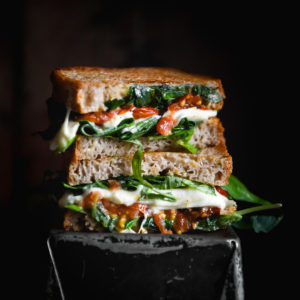
So I’ve been making toasties on Instagram recently like I myself discovered the toastie (I can confirm, I did not). What I did discover, though, is that toasties are a seasonally appropriate way to consume your favourite summer salads whilst in the depth of winter. Enter: the gluten free caprese toastie.
Gluten free Caprese toastie
Obviously, a caveat to this idea is that your favourite salad should potentially contain a heavy cheese (not strictly necessary, but relevant to me so I’ll carry on). Thus far, I have had success with a haloumi, fennel and cucumber variety, as well as with, obviously, the humble caprese toastie. Except not humble at all, because cheesy and carby and delicious.
With gluten free bread and garlic-free pesto, this Caprese toastie is both gluten free and FODMAP friendly. The recipe makes 2 toasties, although I’ll leave it up to you as to whether that means it serves two people.

FODMAP notes
Since posting this recipe many moons ago, Monash has lowered the FODMAP threshold for tomatoes. At present, cherry tomatoes are low FODMAP in 3 tomato (45g) serves. This is considerably less than it was previously.
Common tomatoes have a slightly higher threshold at 65g or half a common tomato, so you might like to use those instead. Keep in mind, of course, that there’s no need to lower your consumption of tomatoes if they don’t give you issues.
Pine nuts are low FODMAP in 14g or 1 tablespoon serves. They become high FODMAP at 100g or around 1/2 a cup. Although you will not be using the whole quantity of pesto on your toastie, I generally use walnuts in their place these days. They are cheaper and lower FODMAP at 30g serves. A moderate serve is 135g, which gives you lots of wiggle room.
A note on garlic infused oil
I love using garlic infused oil to bring some garlic flavour into my pesto. The fructan content of garlic is water soluble but not oil soluble. This means that if you were to use garlic cloves in a soup, the fructans would leech out. However, if you were to use them in oil the fructans cannot escape.
Because garlic oil can have food safety issues, store bought garlic oils use stabilisers. As a result, I find they are not as delicious as homemade. I love making my own and do so often. The food safety concern (namely, botulism) is only really an issue if you don’t consume the oil within a few days. It can be frozen, as can pesto made with garlic infused oil. If you are interested, see my recipe for garlic infused oil here.
Gluten free bread recipes
- 100% buckwheat bread from my buckwheat e-book
- Grain free white bread without xanthan gum
- Gluten free sourdough bread
- Buckwheat yeasted bread
- Gluten free bagels without xanthan gum
Gluten free caprese toasties
Ingredients
For the toasties:
- 6-10 cherry or Roma tomatoes (see notes)
- 1 teaspoon olive oil
- 1 teaspoon balsamic vinegar optional
- Good pinch of salt and grinding of fresh pepper
- 4 slices of good quality gluten free bread I used a buckwheat loaf and a gluten free sourdough
- 1 ball of burrata or mozzarella burrata melts a lot easier in the sandwich press – use 1/4-1/2 per person and save the rest (or don’t)
- Handful of basil
- Handful of greens I’ve used spinach and rocket
FOR THE PESTO:
- 1 cup of pine nuts or walnuts
- 1 bunch of basil
- 1/2-3/4 cup olive oil this depends on whether you like a firmer or a runnier pesto, use more oil for runnier
- 75 g parmesan
- Juice of 1 lemon
- Generous salt and pepper
Instructions
METHOD:
- Preheat the oven to 180 degrees Celsius. Lay the tomatoes on a baking tray lined with baking paper, and cover them with the oil, balsamic and seasoning. Once the oven is ready, place the tomatoes in for 20-30 minutes, or until juicy and blistered. Set aside.
- Place the pine nuts on a dry baking tray and into the oven for 3-5 minutes. Too much longer and the pesto will be darker in colour, although still delicious. Place the pine nuts straight into a bowl to stop them cooking on the residual heat of the oven tray, and allow to cool slightly.
- To make the pesto, place all the ingredients for it into your food processor, and blend until your desired consistency is achieved. If you store the leftovers in an airtight container, they last for at least a week. Unsure if I’m legally permitted to suggest longer but I’ve probably kept a batch for longer than that, just.
- Use your sandwich press, if you’re using one, to toast the individual slices of bread before assembly. If not, heat a pan with a SMALL knob of butter and salt, and cook the pieces over a medium heat, on all sides. The idea is to create crunch and crumb, not make it soggy, so use heat and butter accordingly, turning the heat up if necessary, and making sure not to overcrowd the pan, which will make the bread soggy. If you’re using a small pan, toast the bread in batches.
- Once the bread is ready, layer the toastie ingredients onto it. If you’re using mozzarella, it’s a good idea to place it down first or last, so it’s close to the heat source. Burrata is often best in the middle, so the cream doesn’t soak straight into the bread and make it soggy. Add the remaining ingredients, and season lightly with salt and pepper before closing the lid.
- Cook using your preferred method until the cheese has melted or is done to your liking.

I did start my sourdough starter with gluten – regular flour. When I realized gluten was not my friend I switched my starter over to gluten free. I started feeding it gluten free flour. Mainly White Rice Flour. It has now been 6 years since I switched over. I am one that does not utilize my sourdough daily. I do stick it in the frig and day before in summer 2 days before in winter as I live in high mountain dessert and winters are cold I pull it out and feed it. Summer time takes 2 feedings and winter 2-3. In winter we heat the house with a wood stove. I put my container on the hearth and that helps speed things up on a chilly 10 degree Fahrenheit day. I use my sourdough in pancakes, English muffins, cakes, breads and brownies. I’ve even had times where I have gone 2-3 weeks not using it. Pull it out of the frig, feed it for 2-3 days and it’s back in business.