
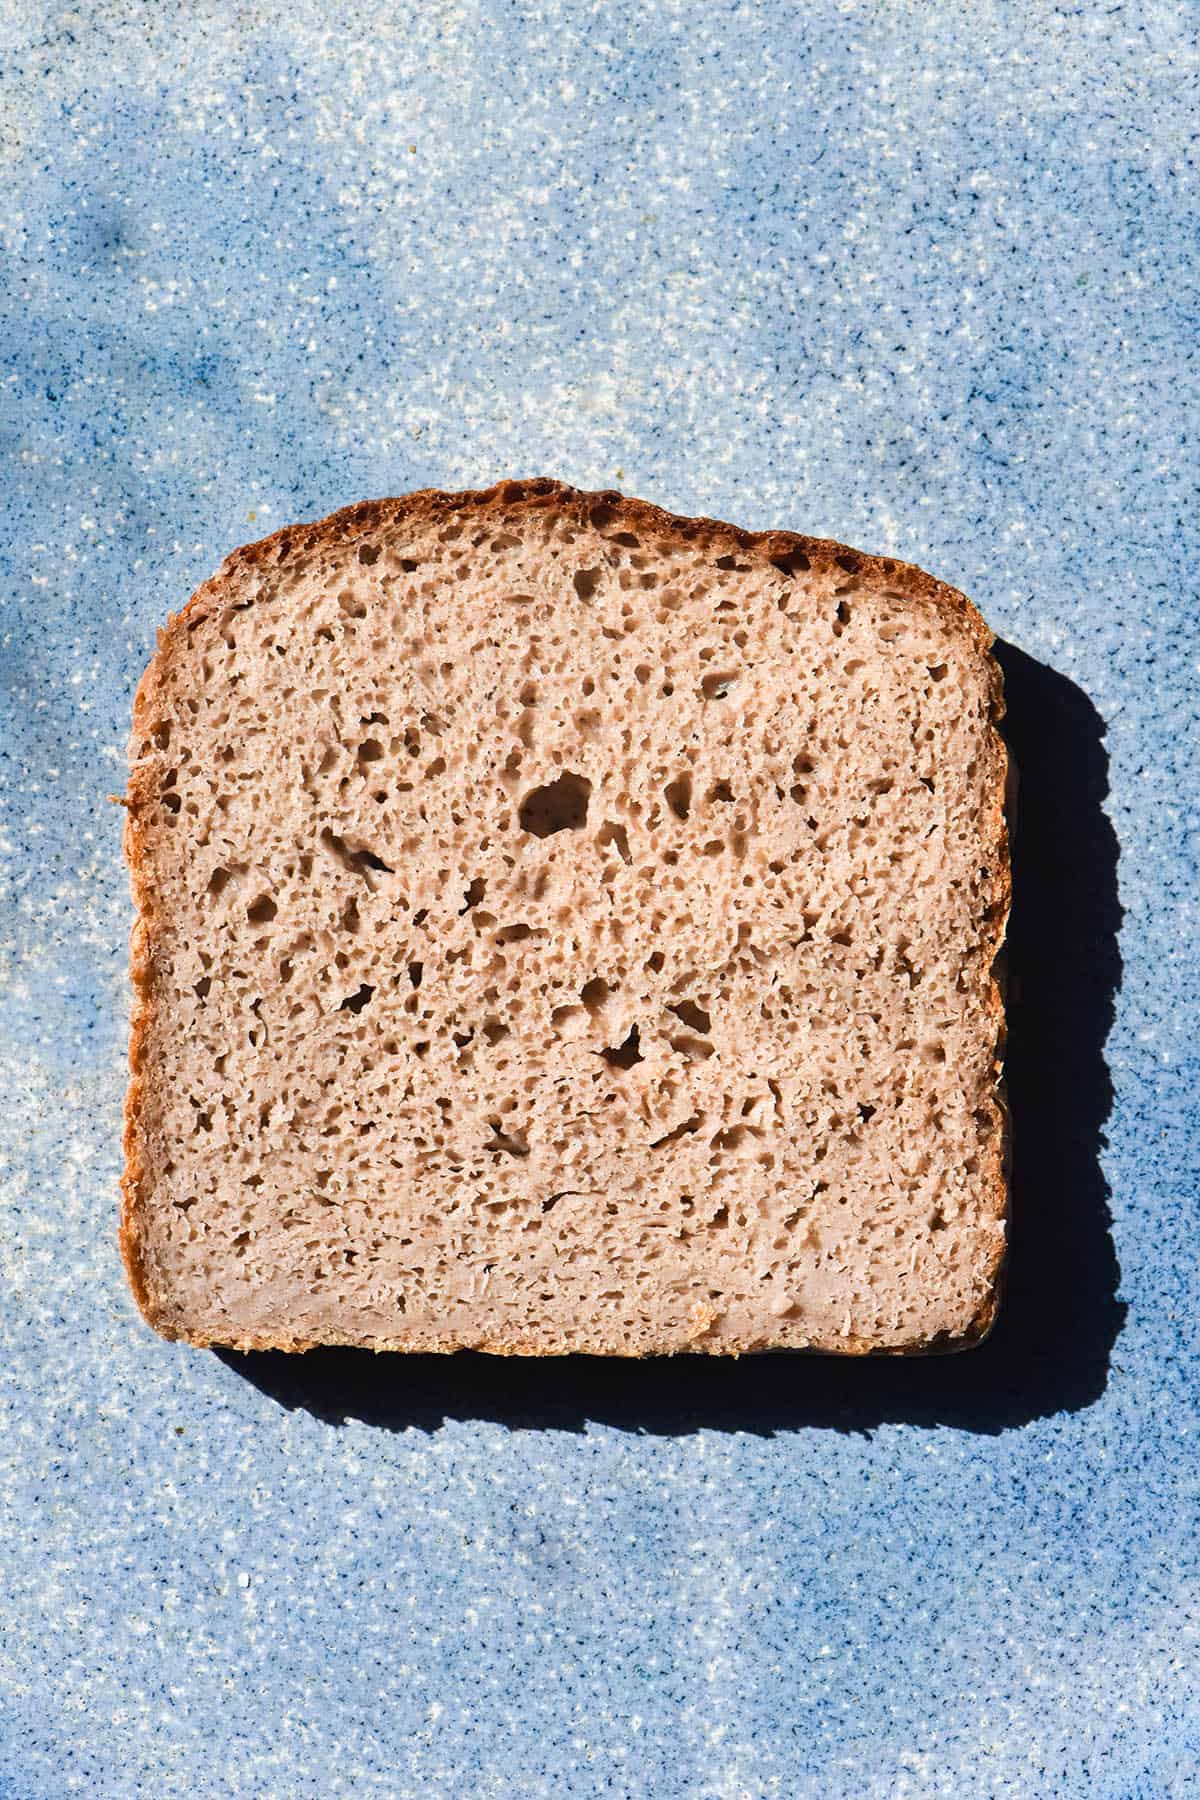
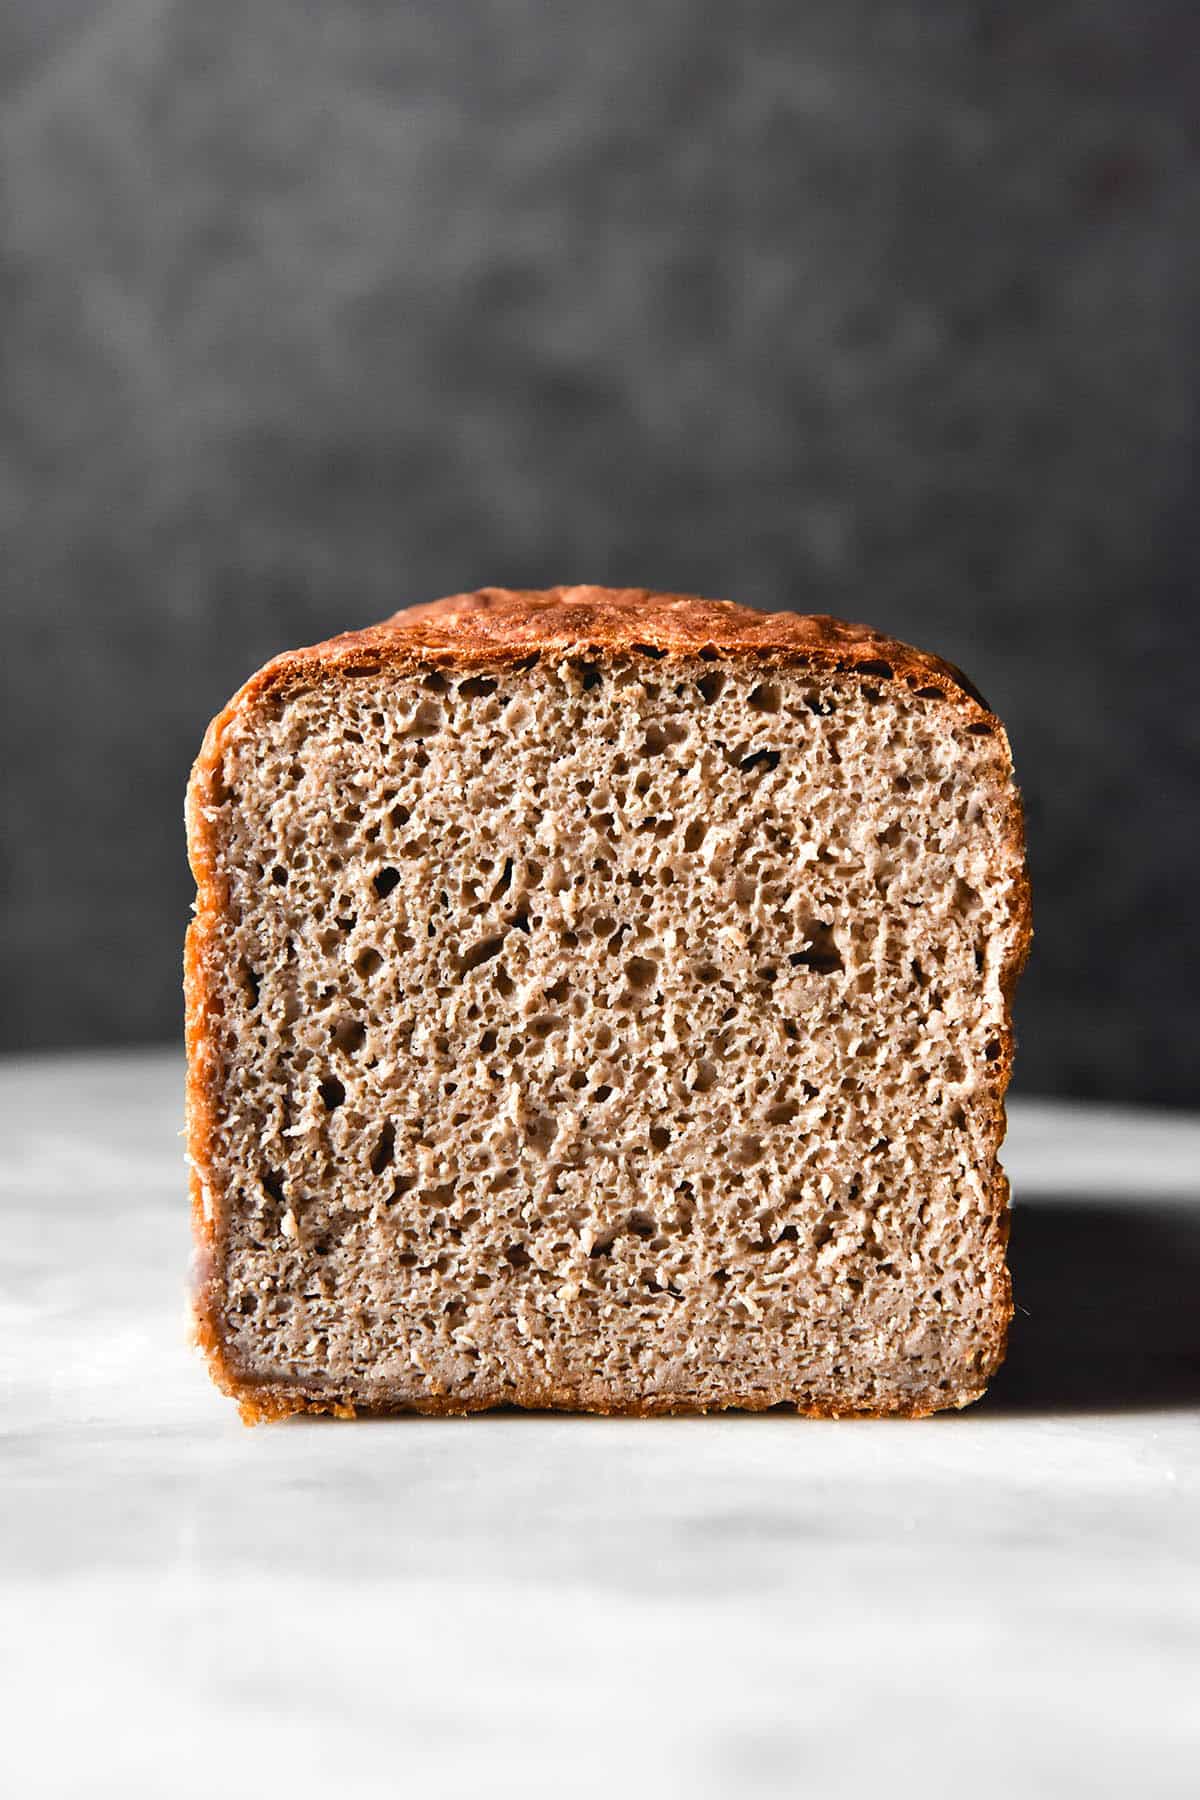
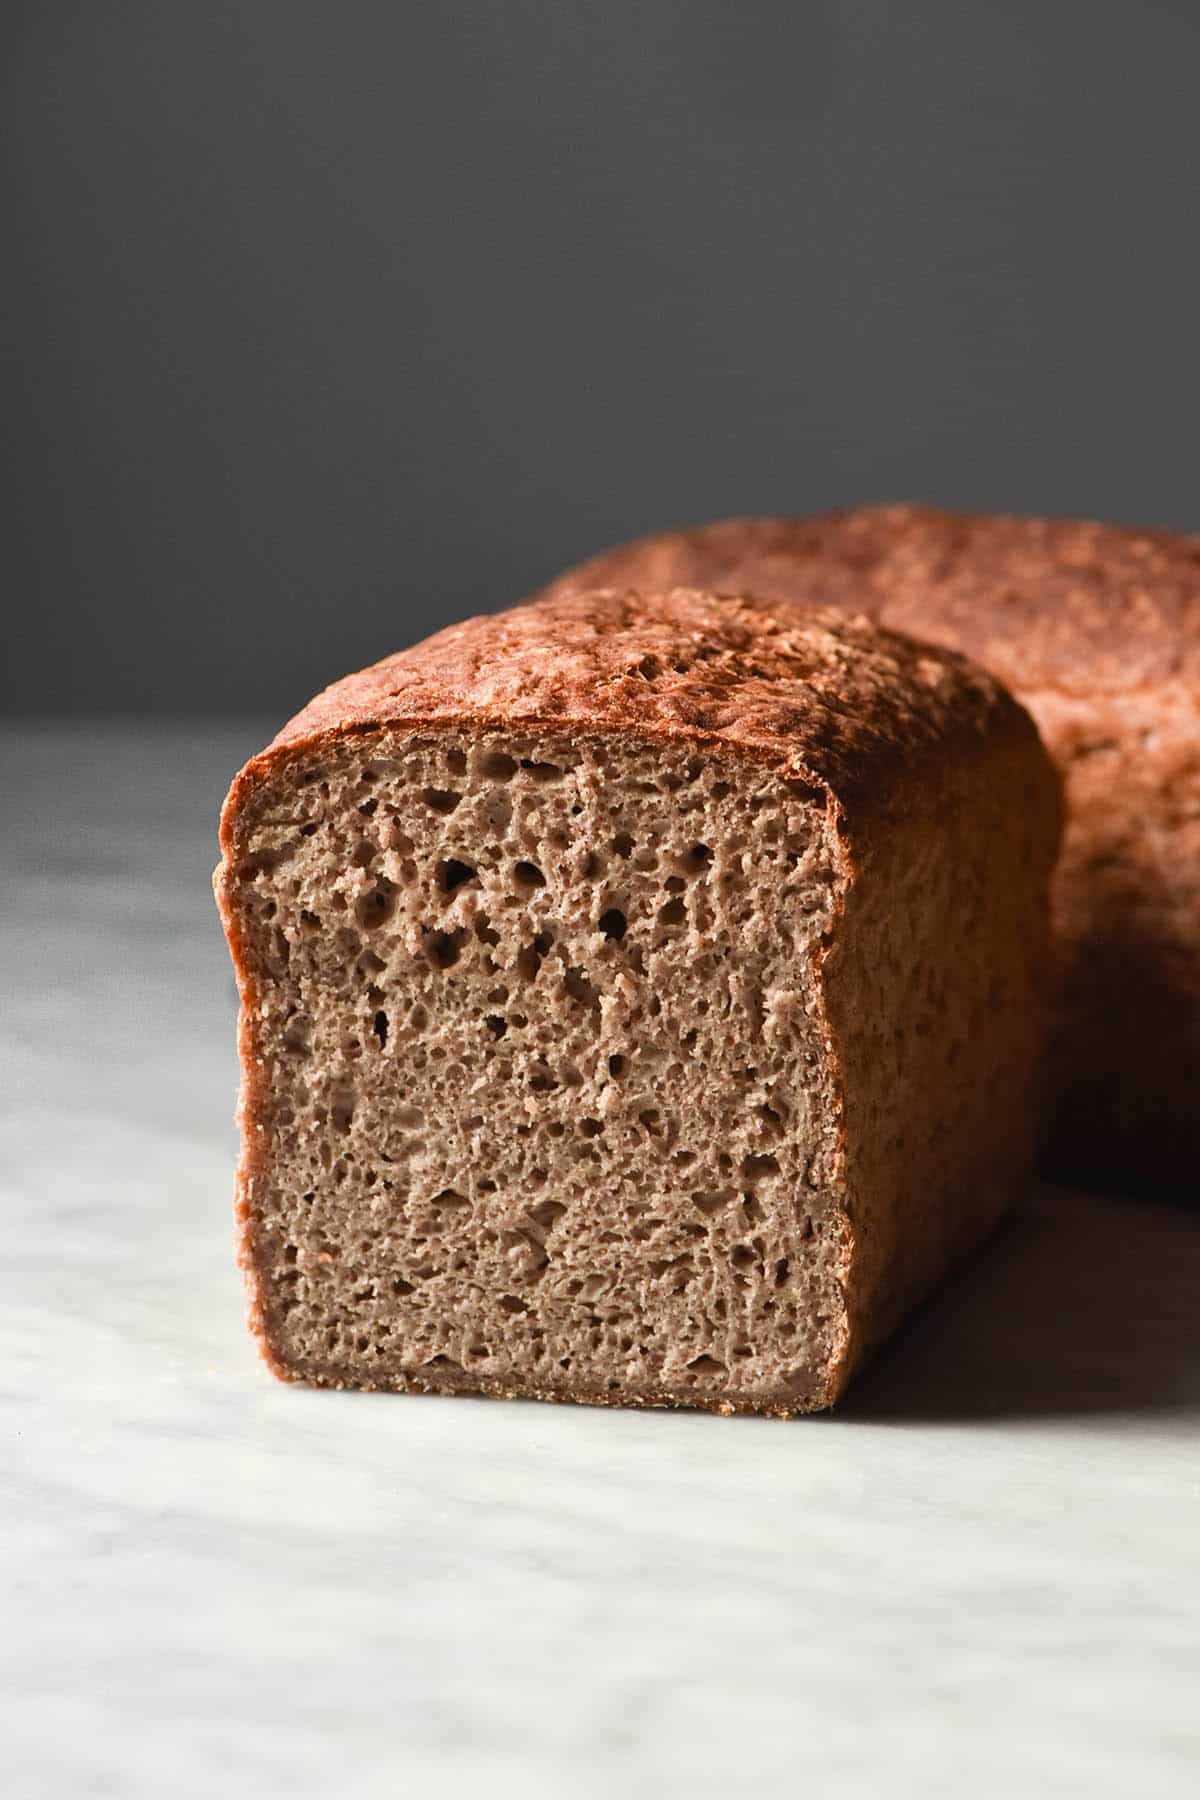
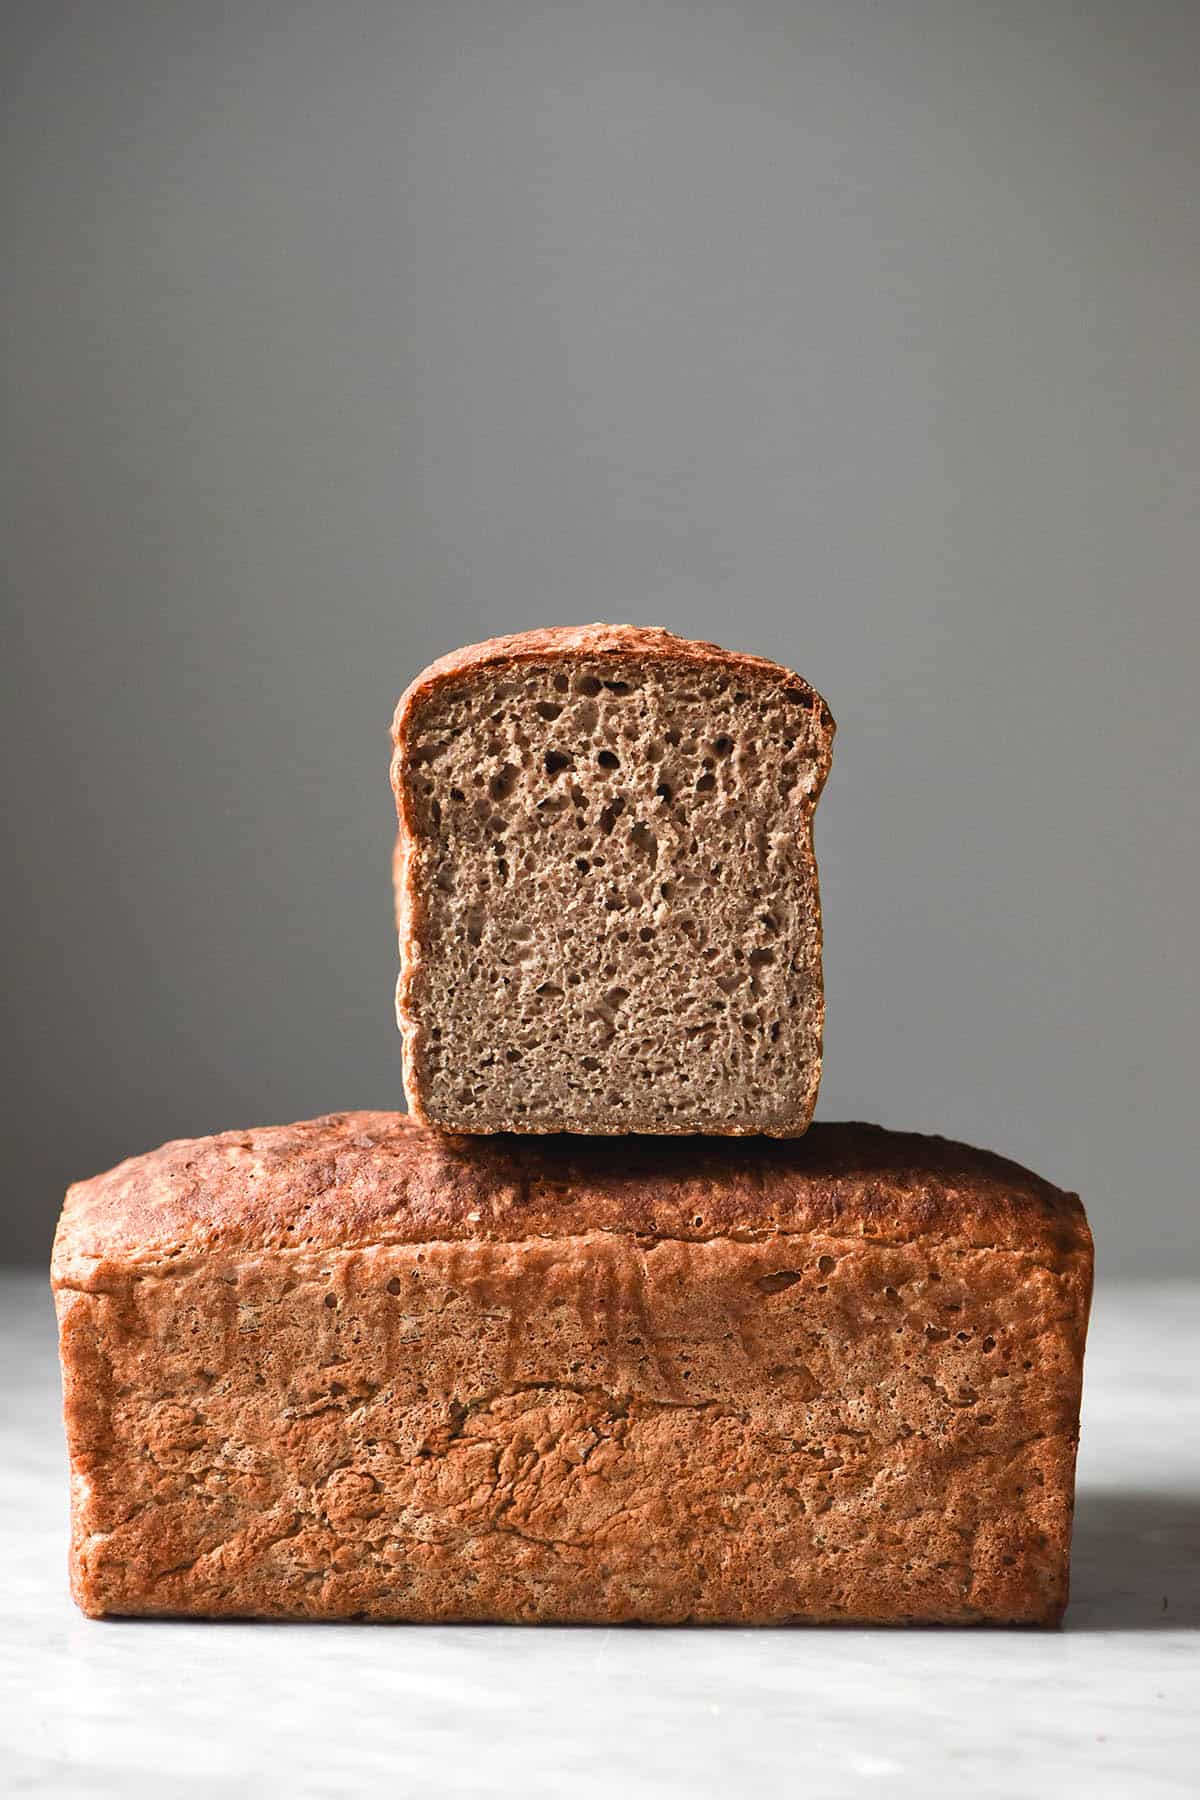
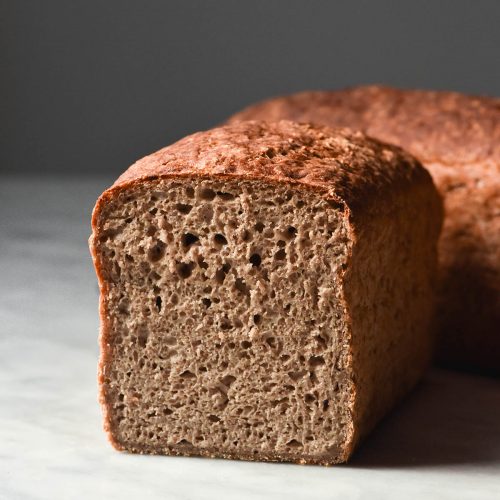
A lot of gluten free buckwheat bread recipes online tend to be mostly a gluten free flour blend. Sure, they have some buckwheat thrown in, but they’re not predominantly buckwheat. I get it! Buckwheat has quite a distinct taste that not everybody loves. But for the people who do: this bread is predominantly buckwheat. It has a small amount of cassava flour or tapioca flour for extra elasticity and a nice crumb, but it’s mostly buckwheat.
If you’re after an 100% buckwheat flour recipe, my new buckwheat recipe e-book includes a recipe for 100% buckwheat flour yeasted bread. It also has a recipe for 100% buckwheat flour sourdough, as well as bagels, choc chip cookies and noodles.
A note, before we dive in: I have only used light buckwheat flour for this recipe. The darker variety that I see recipe creators in Europe and the US use isn’t commonly available in Australia. As such, as I have never worked with it and can’t give you any advice.
Gluten free buckwheat bread without xanthan gum
This gluten free buckwheat bread contains a number of simple ingredients that we will quickly go into below
Light buckwheat flour forms the backbone of the bread and makes up the majority of the flour. I have recently tested dark buckwheat flour and found it works well too (more on that below).
Cassava flour or tapioca flour for some added elasticity and a light crumb. Technically the bread does work with 100% buckwheat flour, but it can be a little more prone to breaking.
Psyllium husk powder to bind the loaf together and create structure, as well as to hold enough water in the dough to create a lovely soft crumb. I like to grind my own psyllium husk powder from whole husks as I find the store bought powder clumps up very easily.
Instant yeast and baking powder to proof the bread and provide the lift and height necessary for a nice crumb.
Water, oil, maple syrup and salt to bring the dry ingredients together, feed the yeast, provide a soft and browned crumb with a delicious taste.
Recipe notes and substitutions
If you need the bread to be yeast free, I have a gluten free yeast free buckwheat bread recipe here.
Tapioca flour and cassava flour both work for the starch component of this loaf. They have different absorbencies, though, so add a lesser amount of liquid if you use tapioca.
I have recently tested Bob’s Red Mill brand dark buckwheat flour and it worked well, although the bread was a little fragile. I used 25g psyllium husk powder and 800g water. Next time I would use 30g (or even maybe 35g) psyllium husk powder and maybe 25-50g less liquid. I found it to be a less less sturdy than a loaf with light buckwheat flour, but still absolutely delicious.
Any oil or liquid sweetener works here. I have not tested any sugar substitutes such as allulose or Monkfruit. I have no experience with these so I have no suggestions.
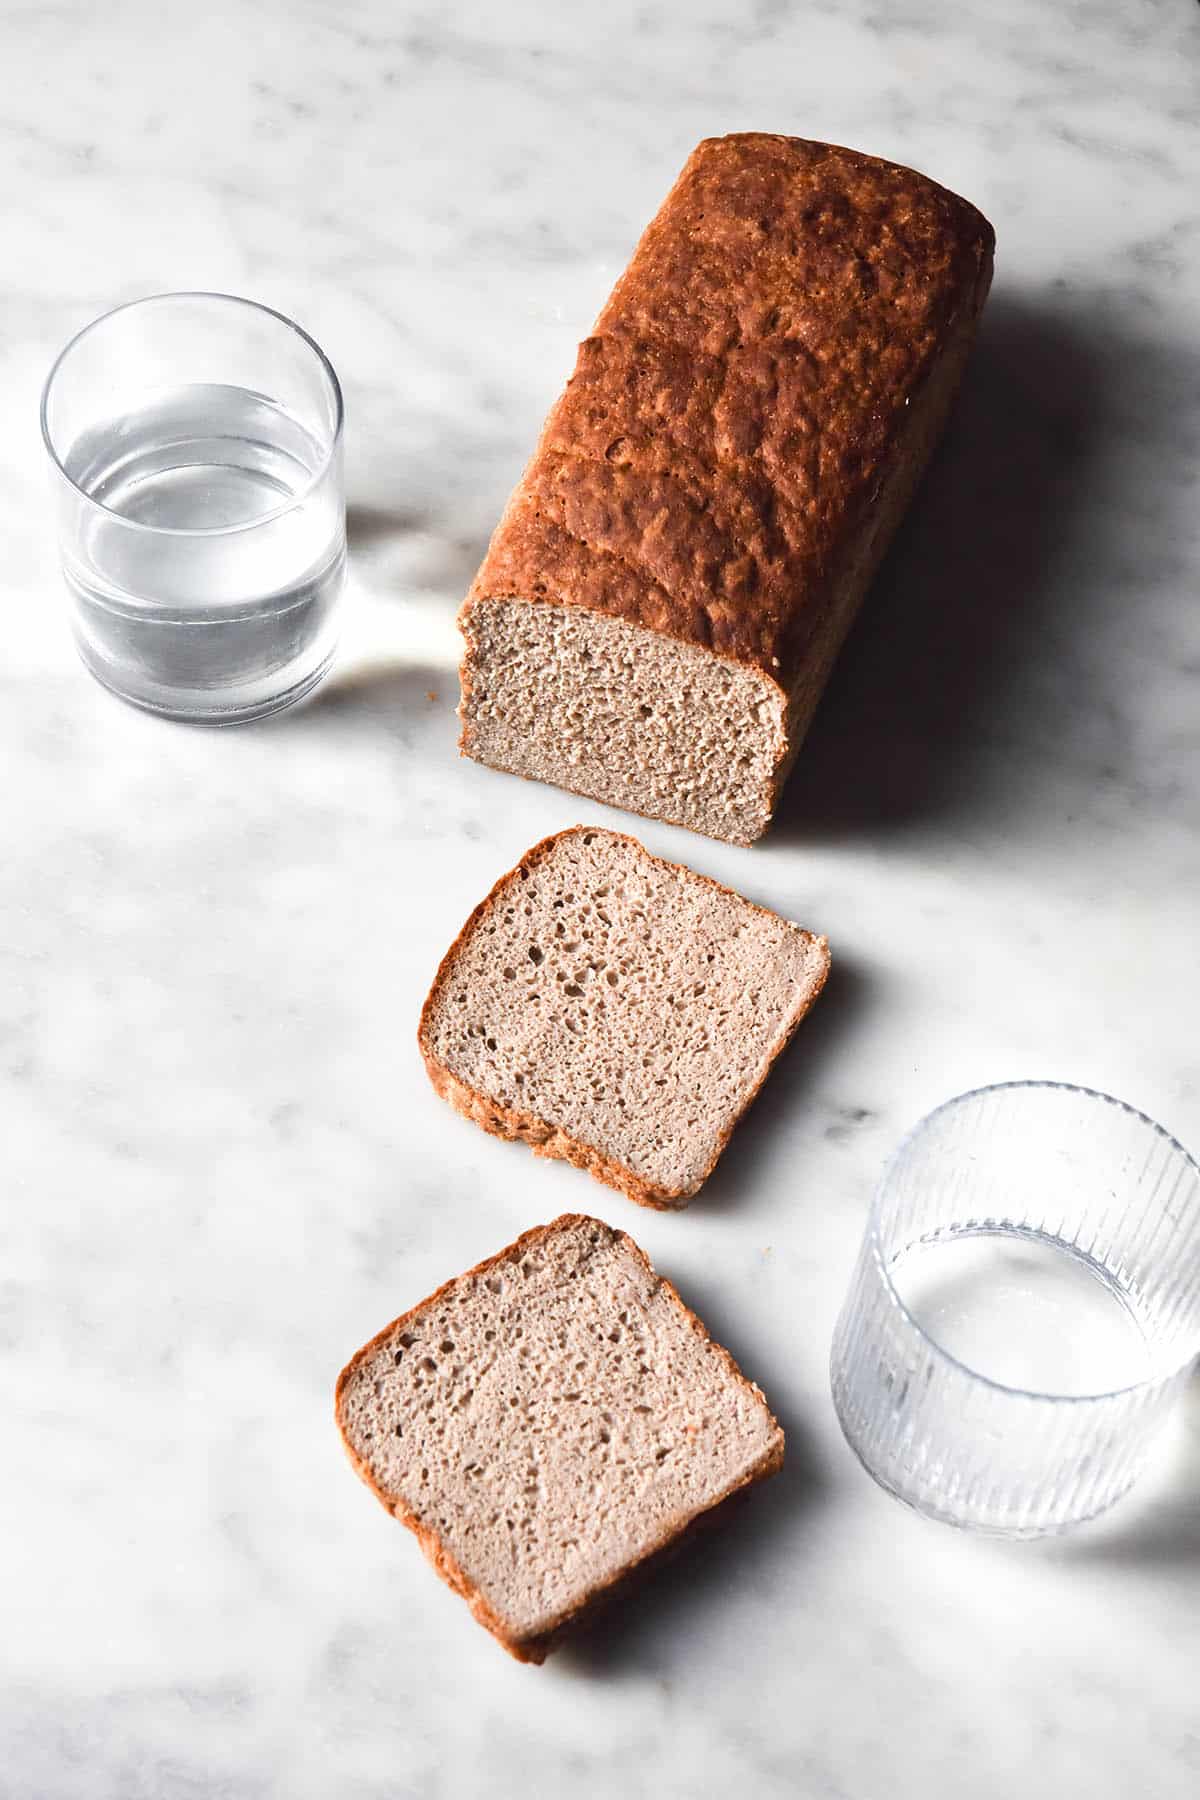
A steel loaf pan is where it’s at for this recipe. Because the dough has very little structure, a steel pan holds everything in so the loaf proofs upwards. If you want a gluten free sandwich bread, the small Pullman steel bread pan will be your best friend. With that said, I have posted a gluten free buckwheat boule recipe for those who don’t have a steel pan.
Important notes on how much water to add
Firstly, as always, it’s important to mention that the quality of gluten free flours differs dramatically from brand to brand, country to country. In terms of quality, I mean how finely it is milled, it’s freshness and how absorbent it is. This means that you need to have your wits about you when determining how much water to add to your buckwheat bread.
Further complicating things is the fact that tapioca flour is less absorbent than cassava flour. This means that you will need to add less liquid if you use tapioca, and more if you use cassava.
The best course of action when making gluten free bread is to add water conservatively at first. When adding a high volume of liquid, it’s impossible to tell how the loaf will turn out. If you add the lesser volume of water, you can always add more later if you find the dough is dry.
How to tell if you’ve added enough liquid
My buckwheat loaves have all used more or less the same amount of liquid each time. A lady in the comments, however, needed 1 litre of water to achieve the right texture for her bread.
I say this to emphasise how important it is to get the hydration right for this loaf.
Add the lesser amount to the psyllium husk powder mixture, then assess your dough once you have added the gel. The dough should be moist and floppy, with no dry spots. You should be able to pick it up, but it should feel completely hydrated. In terms of texture, the dough should look smooth rather than spiky.
If you have used cassava flour, it’s worth waiting 5 minutes before making the assessment. Cassava flour absorbs a fair bit of moisture, so it’s worth waiting to double check before you make any decisions. Another point is that fermented cassava flour (like Ottos) tends to be considerably more absorbent than non-fermented cassava flour.
More hydration notes
The more liquid you add (to an extent) the taller the loaf will be. So, you have to balance how moist you like your bread with how tall you want the loaf to end up. For a drier crumb but a shorter loaf, use a lesser amount of liquid. You might even find your flours or preference need less liquid than the recipe specifies.
For a taller loaf with a more moist crumb, use a higher amount of liquid. The loaf below used 800g of water and tapioca flour. Some people in the comments needed 1 litre of water, which does prove just how different hydration can be with varying brands of flour. Be open to adding more liquid to your dough as you see fit.
Proofing notes for your gluten free buckwheat bread
I have tested this gluten free buckwheat bread with two different proofing options. While I didn’t find there to be too much difference in this case, it is worth mentioning. Why? Because I have found, in the past, that double proofing gluten free bread seems to be beneficial. While I was developing my grain free white bread, I found that proofing the bread once in the bowl and again in the loaf helped it retain structure after baking. It also aided in eliminating that gummy line that sometimes forms in the bottom of the loaf.
So, there are two proofing options for this bread. Firstly, if you need a slightly more hands off version, you can proof it straight in the bread pan. Allow it to rise to the top of the pan – for me, this took about 1 1/2 hours on a mild summer day.
Secondly, you can proof the dough, covered, for one hour in the bowl, and then another 1/2 – 1 hour in the bread pan. This is my preferred option – mainly because it doesn’t take much extra effort, but can help ensure you get the best loaf possible.
What sort of baking tin do I need?
You need a steel bread pan for this recipe. Because the dough is high hydration, it doesn’t have a lot of structure on it’s own. As such, a steel pan is necessary to prevent the loaf proofing outwards instead of upwards. It provides the structure necessary to hold the dough together to create a gluten free sandwich bread style loaf.
I use a small USA pan Pullman pan for all my loaves. The specs are 10.16 x 10.16 x 22.86 cm; 453.59 Grams. It’s perfect for gluten free loaves, which tend to be smaller than regular bread. It holds everything up and in for the tallest gluten free loaf possible.
I would not recommend making this loaf in a silicon pan – they don’t have the strength to support the bread as it proofs. If you don’t have a steel pan and don’t want to buy one, see my buckwheat boule recipe instead.
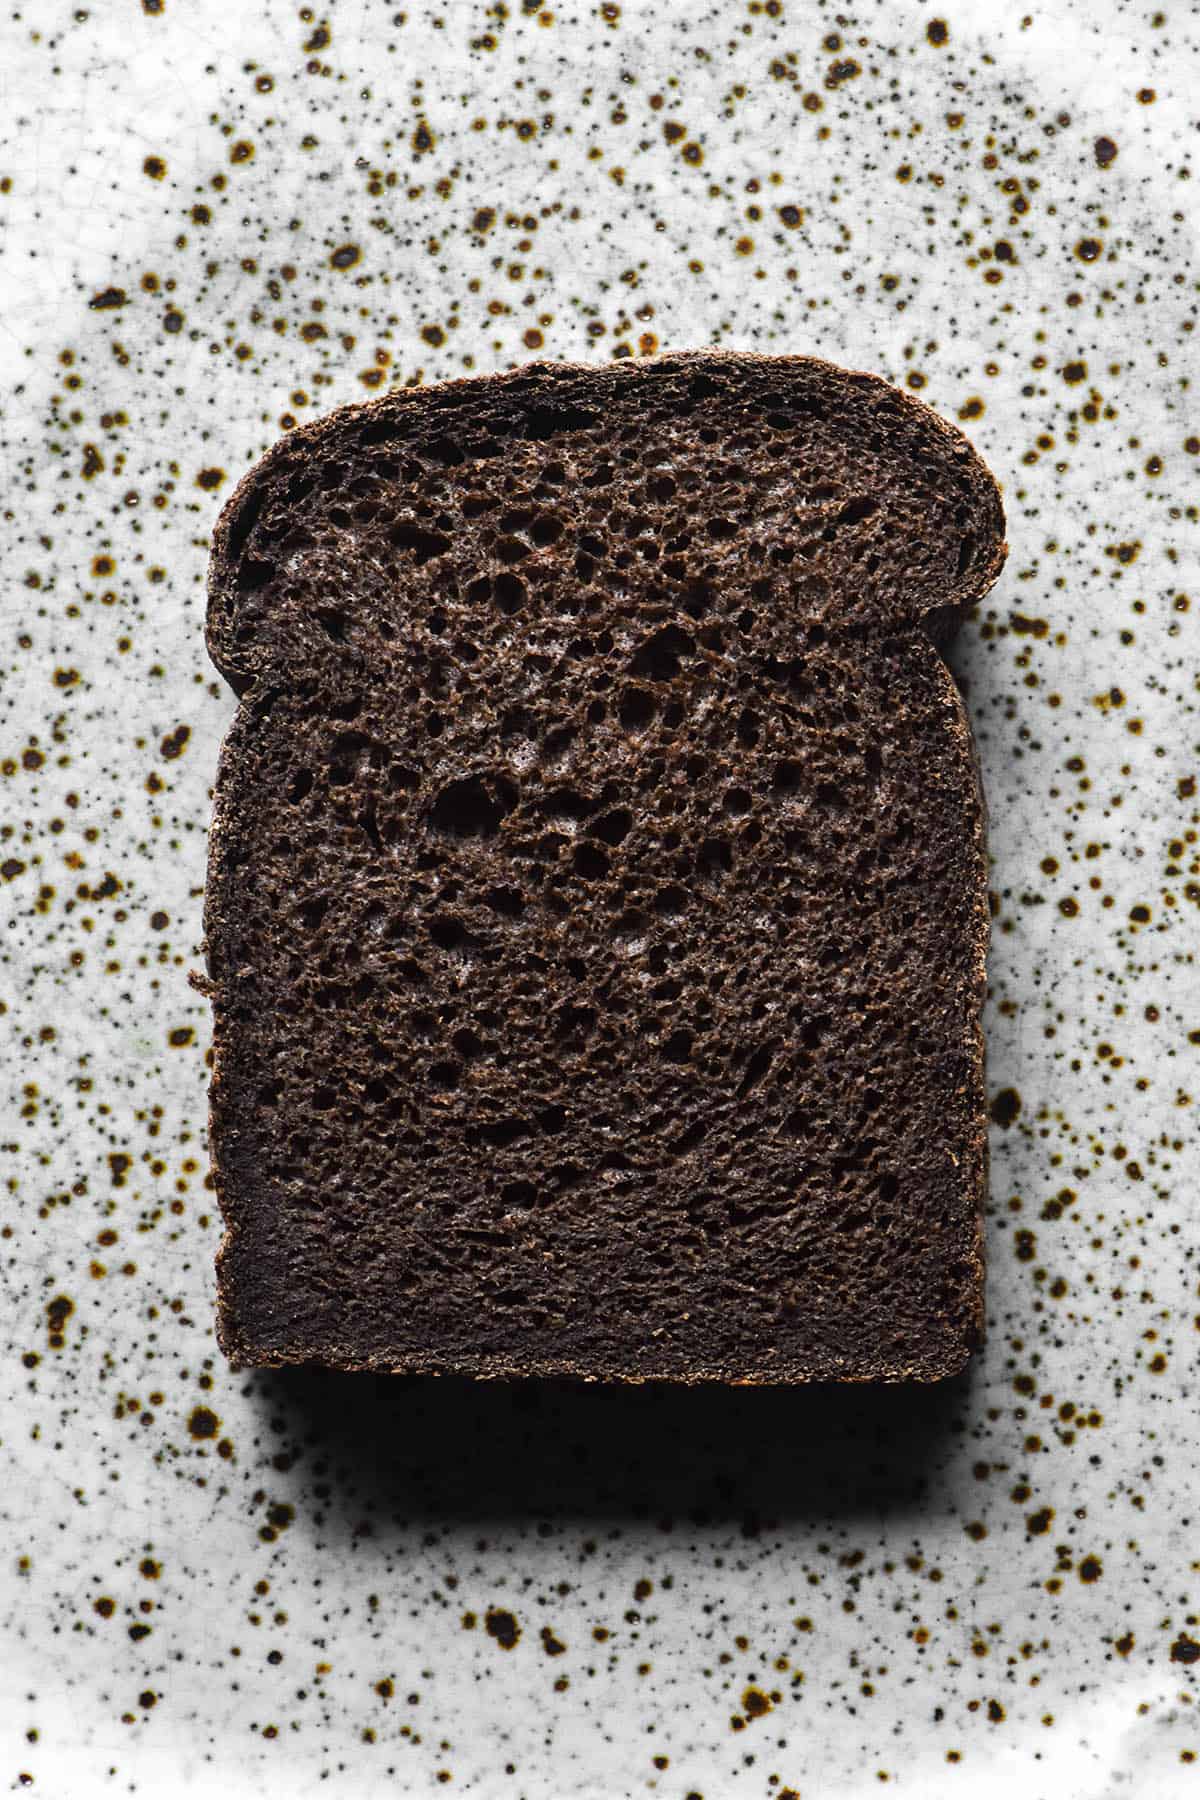
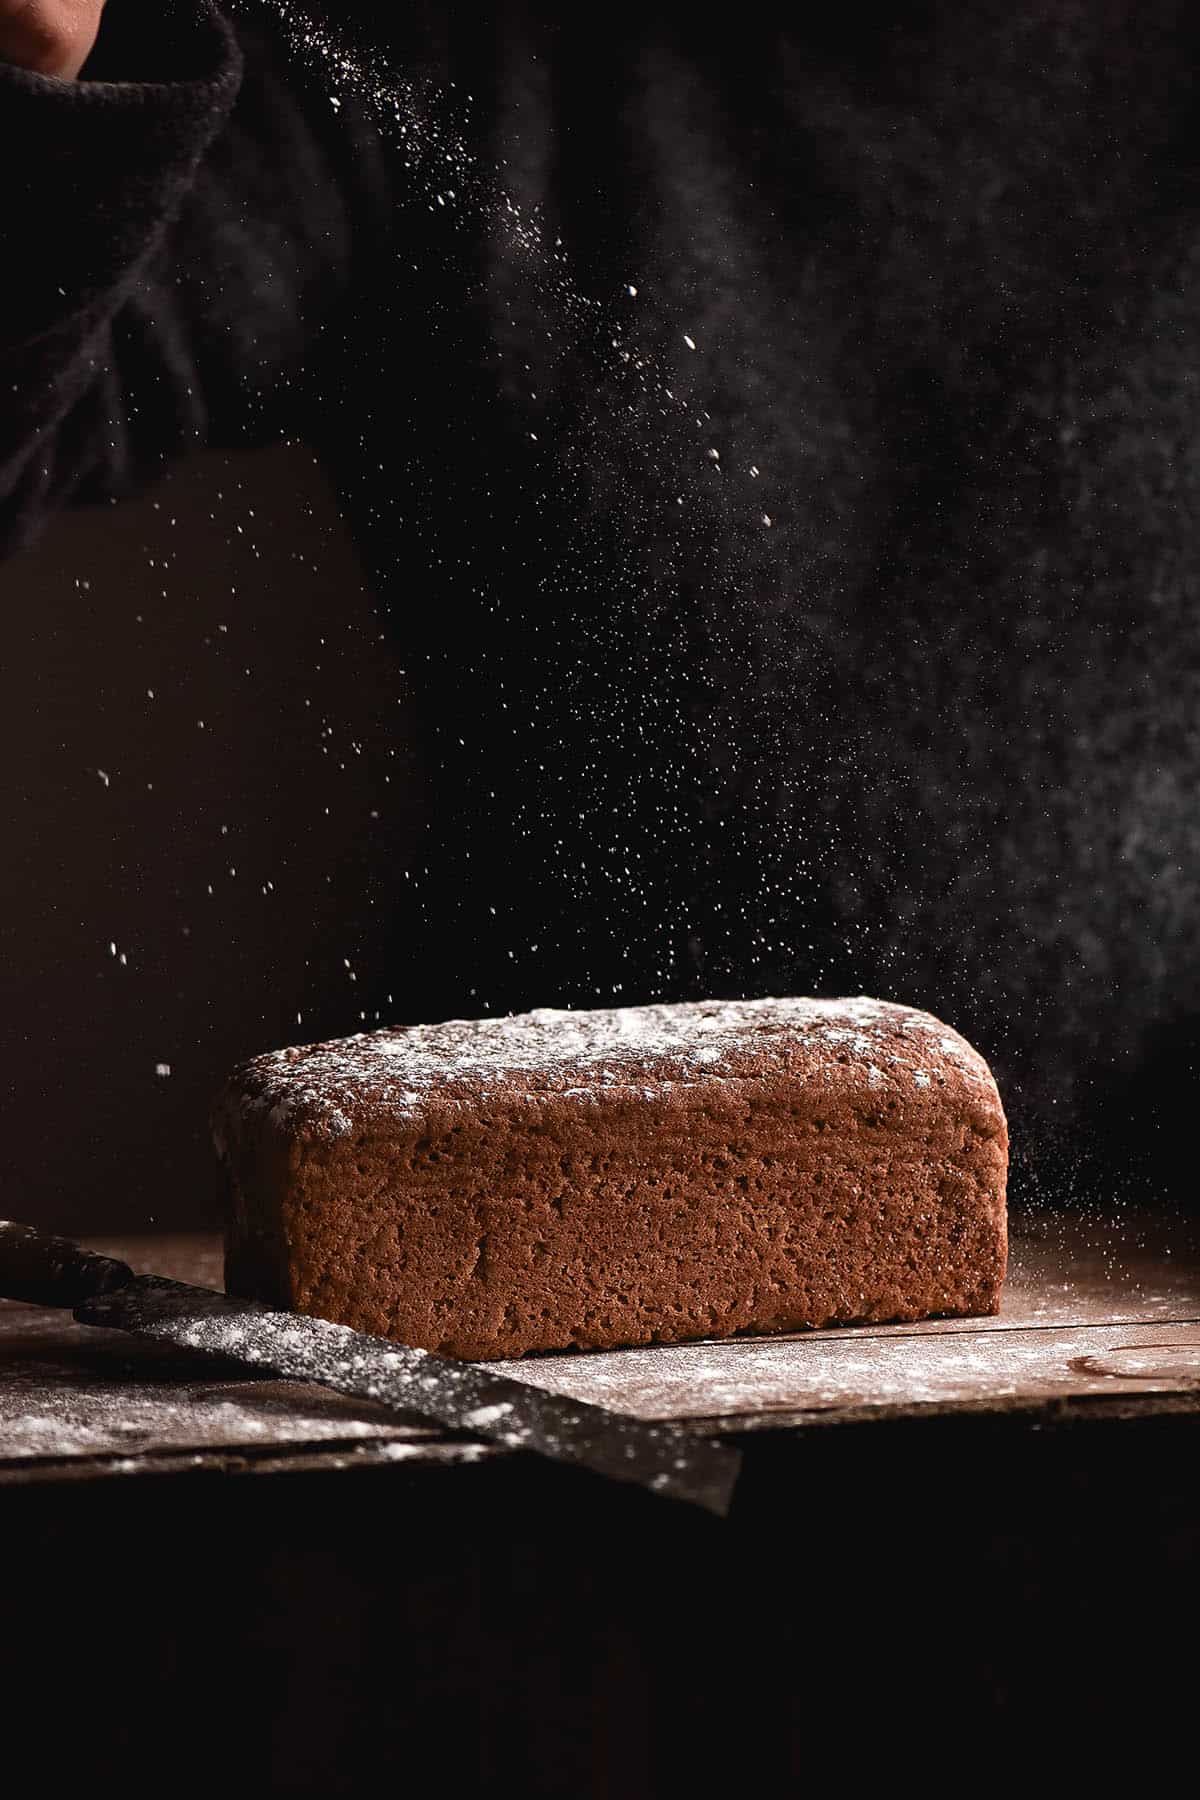
Can I use dark buckwheat flour in this recipe?
Short answer: yes, you can. However, I recommend reading through these notes to ensure you get the result you’re hoping for.
Up until recently I have been unable to get my hands on dark buckwheat flour here in Australia. I recently found an exorbitantly expensive bag of Bob’s Red Mill dark buckwheat flour so I decided to bite the bullet and try it.
The difference between light buckwheat flour and dark buckwheat flour is that light buckwheat flour is hulled before grinding into flour. This means that light buckwheat flour only contains the buckwheat seed and not the hull. Dark buckwheat flour contains both the hull and the seed. This is what gives it a dark appearance and its higher fibre content.
I am not super experienced with dark buckwheat flour as it is hard to find where I live. I do have a few observations from making this loaf with dark buckwheat flour, though.
Firstly, I found that the loaf absorbed slightly less liquid than a loaf made with light buckwheat flour. On reflection, this makes sense as the hull is unlikely to absorb liquid. So, I would actually recommend using a little less water (or adding it gradually) for a dark buckwheat flour version.
Secondly, I found it would have benefitted from the whole 30g of psyllium husk powder (maybe even 35g). It was more of a fragile loaf than I expected, particularly when cutting the inner slices. I found that the mushroomed top of the loaf was a lot more prone to tearing off as I sliced the bread.
Which leads me to my final tip: I would omit the boiling water in the oven and bake the loaf for an hour as opposed to 50 minutes. It felt like it needed a little extra time.
With all that said: every loaf is different! Always use your intuition when gluten free baking and be guided by the look of your loaf.
More gluten free buckwheat flour recipes
- Gluten free buckwheat wraps
- My buckwheat flour recipe e-book, which contains ten 100% buckwheat flour recipes – no starches, other whole grains or gums.
- This gluten free high protein bread recipe which uses 100% buckwheat flour
- Gluten free buckwheat muffins
- Yeast free buckwheat bread
More gluten free bread recipes without xanthan gum
- Gluten free buckwheat bagels from the buckwheat recipe e-book
- My original gluten free sourdough bread recipe
- These easy gluten free bagels with a vegan option
- Gluten free focaccia
- The gluten free seeded bread in Intolerance Friendly Kitchen
- Or, if you like things in one spot, this gluten free bread recipe roundup
- Gluten free buckwheat wraps without xanthan gum
Gluten free buckwheat bread
Equipment
- 10 x 10 x 23 cm steel bread tin
Ingredients
- 450 g buckwheat flour (I have tested light and dark buckwheat flour and both worked well)
- 60 g cassava or tapioca flour see notes
- 10g (2 teaspoons) baking powder
- 10-12 g salt
- 1 x 7.5g sachet instant yeast
- 25-30 g psyllium husk powder
- 750-800 g water (see body of post for hydration notes)
- 20ml (1 tablespoon)* oil
- 20ml (1 tablespoon)* maple syrup
Instructions
- Grease and line a steel 10 x 10 x 23 cm steel bread pan. I use a small USA pan Pullman loaf tin.
- Combine the flours, baking powder, salt and yeast in a large plastic or glass bowl and whisk to remove any lumps.
- In a medium mixing bowl, combine the psyllium husk powder and water. Whisk thoroughly to remove any lumps, then set aside for 10 minutes to form a gel.
- Once the psyllium mixture has formed a gel, whisk in the oil and maple syrup.
- Add the gel to the flour mixture, and use a spoon to combine the ingredients most of the way. Next, use hands to squelch the dough through to thoroughly combine, ensuring there are no dry spots or lumps left in the dough.
- Proof the dough in the bowl for one hour, before transferring to the bread pan to proof for 1/2 – 1 hour or until the bread reaches the top of the pan. Use a moistened hand to flatten the dough into the pan before it proofs.
- Alternatively, proof the dough straight in the pan for 1 1/2 hours or until it reaches the top of the pan.
- While the bread is proofing, thoroughly preheat the oven to 200C/400F.
- 10 minutes before the bread is ready to bake, boil the kettle and place an ovenproof cake tin or pan filled with boiling water at the base of the oven. This will help the bread rise and stay moist.
- Bake the bread at 200C/400F for 30 minutes, then remove the water dish and reduce the heat to 180C/356F. Bake for an additional 20 minutes. The loaf should be medium brown in colour and hard on top.
- Remove from the oven and allow to cool for 10 minutes before removing from the pan and transferring to a wire rack to cool.
- If you’re struggling to remove the bread from the pan, allow it to sit an additional 10 minutes. The crust softens as the loaf cools, making it easier to remove.
- Allow the bread to cool for an hour before slicing. For best results, allow to cool completely before slicing.
Notes
- Cassava flour is thirstier than tapioca flour, so you might need to use a higher volume of water.
- I have recently tested Bob’s Red Mill brand dark buckwheat flour and it worked well, although the bread was a little fragile. See the notes in the body of the post for full details as well as tips and suggestions.
- Fermented cassava flour (like Ottos brand) is considerably more thirsty than non-fermented cassava flour.
- 1 Australian tablespoon = 4 American teaspoons
- See body of post for hydration notes.
- If you need a yeast free buckwheat bread, see my recipe here.
Oh. My. Word. This recipe is nothing, but genius. The resulting bread is excellent. Soft and tender, with the taste and texture of traditional gluten bread. I am seriously dumbfounded at how good this is. I had a go-to gluten-free sandwich bread, but this will be on the rotation, for sure!
I have worked with psyllium husks quite a bit, and would like to make a suggestion to those who are having trouble in making the gel. Skip this, and instead, add the psyllium husks directly to the dry ingredients. Add 750 ml water, and let sit for a bit. Adjust liquid, as needed.
Thank you so much for sharing!
After making this, will never buy gluten free bread!
I’m not coeliac or gluten free but I’m trying a diet that avoids gluten for a certain time.
First attempt and it came out of the oven so fluffy and full of flavour! More over, no gums!
My husband is a baker and he was shocked of the result!!
I’ll try other breads for sure!
Please tell me if you have any other pages or you’re on Instagram.
Hi, can you confirm the amount of yeast? Is it 75 grams?
Hi Clara! It is 7.5g not 75g. You might have missed the little . in the recipe 🙂
1 sachet of instant yeast. If they are 7g instead of 7.5g where you live then thats fine, just use 7g
Thank you! I did miss that (.) Thanks for clarification. My dough is rising at the moment. Looking forward to this.
Overall, I’m very please with my first loaf using this recipe. My bread didn’t cave in as usual, and the recipe is much easier than some others I have tried. Although the bread was completely baked, I wonder if I used to much water. I did use the whole 800 gm because the dough was too rough looking without the extra water. I think the bread will dry out a bit, but it is slighty gummy. Too much water? Thank you.
Very glad to hear you enjoyed it Brenda!
I would wait until the bread is cooled and the crumb set to make a call on that. Gluten free breads can often feel more ‘wet’ than regular breads and because of the high hydration they can take a while to fully set.
If you find once it has cooled that the crumb is gummy, you can try dropping the hydration back by a small amount – maybe 25-50g. Some people also find they can correct gumminess by dropping the psyllium back by 5g or so. That might be a path to try if you are having persistent gumminess issues.
Another solution can be to cook it for 5-10 minutes more to allow a little extra liquid to cook off.
Slightly gummy as opposed to hugely gummy is a sign that you are close to your ideal hydration and a few small tweaks (provided you are using the same flour, as they all vary in their absorbency) should get you there 🙂
Let me know how you go!
Thanks so much for this recipe — I tried it for the first time yesterday after being frustrated by the cost of quality gluten free bread (which I’ve refused to buy for many years). I had a lot of fun watching the loaf transform and the end result is fluffy, light, yet substantial.
In place of the loaf pan, I used a ~20cm x 8cm spring form cake tin and added an extra ~8mins to the end of the baking time. The result is exactly as I had imagined it to be, albeit a slightly rogue shape :•)
Will be keeping this in my repertoire moving forward.
So glad you enjoyed it Amy! Great to know that it worked in a cake tin too, I know people often wonder if it adapts well to other styles of pans 🙂
Can I use regular APF instead of the cassava? I have buckwheat flour I want to use up. Not trying to be GF .
Hi Eman, I eat gluten free so I don’t work with all purpose flour. You are welcome to try it but I can’t advise on how it might turn out. Good luck!
Could one just put it in a bread making machine to cook ?
I don’t have any experiencing using a bread making machine Jan, so unfortunately I can’t say if it would work!
did you try it Jan in the machine?
Hi, Does it matter if I use sugar free maple?
Hi Danielle! I have never tried this so I can’t say for certain. The purpose of the maple syrup is to provide an easily available boost for the yeast as well as a little bit of flavour and browning.
I don’t know if sugar free maple syrup will contribute positively to the taste and browning but it should be fine from a proofing front as the yeast also has the flour as a food source.
You can also simply omit if you don’t want to use sugar 🙂
This is a great recipe. I am new to baking bread, in fact, this was the very first loaf of bread I have ever made (outside of sweet breads). I did add a scant 1/4 c flax seed and pepitos to give it some extra fiber. I would personally increase the maple syrup a bit, as it has a bit of a strange after taste. Maybe the Flax seed? It’s still delicious. I used the light buckwheat. Thanks!
I am so glad you enjoyed it Shannon! Have you tasted much buckwheat before? It does have quite a unique flavour which might be what you’re tasting?
Great to know the seed inclusion worked well 🙂
Really great Gf bread with a lovely texture. Very refreshing after a lot of more cakey feeing recipes in the past.
I’m after a few hints to perfect it as I tend to get a dense area at the bottom of the loaf. I’m using a bread machine on gf setting so aware things have shifted from your instructions. Things have got slightly better if I leave the lid off for a bit while it prooves as I suspected it was over proofing. Would you suggest anything else like less yeast or more/less hydration?
Thanks in advance!
Jonny
Hi Jonny,
Unfortunately I have never used a bread machine so I can’t offer any advice on that front. I don’t know how they differ from making bread the regular way.
More generally, I often suggest using a little less water if you are experiencing a gummy base. If that doesn’t work, dropping the psyllium husk back a bit can also help. The combination of these two things should help you with a machine as well I’d say.
Let me know how you go if you try! 🙂
Hi Jonny, I love this recipe as well and have found making half the loaf at a time in the bread machine works better. I weigh everything out, I am using Tapioca flour and each time using less water. I manually mix everything after placing in the bread machine. When I made the full recipe half of the loaf (bottom half) was gummy, so I decided to try out half recipe. This works the best. I use the GF setting. I am currently experimenting with cutting the water down with each loaf as the texture when slicing is still too wet. When we toast the bread, the texture improves and tastes wonderful. I have experimented with using different flavor oils, and adding more salt and maple syrup.
HI Georgia I have made a lot of gluten-free bread and this one was not only delicious and nutritious and my husband also enjoyed it! I’m really enjoying your recipes and appreciate the time and money it takes to create and perfect them!
What could I use in place of cassava flour? I have read that several brands contain high levels of lead so an alternative would be great. I did see that one person made it successfully with 100% buckwheat so I’ll try that too. Thankyou so much.
Hello,
Love this bread. Easy and delicious! Even the non-gluten free eaters in my life love it!
Have a question about purchasing your e-books. Have been trying to purchase the buckwheat e-book with grams. However, it just doesn’t work for me (have no issues purchasing other things online). Is it because I am in Canada? Perhaps only those in Australia can purchase? Would love more buckwheat recipes, really enjoy working with this flour.
Thanks,
DebS
Hi Deb,
I am so glad you are all enjoying the recipe! It’s one of my favourites too 🙂
Oh no! There shouldn’t be an issue with buying it in Canada or anywhere abroad. I wonder if maybe switching browsers might help?
I have had orders come through in the past few days so I don’t think the system is down
LOVE IT. I actually made it in my bread maker on the Whole wheat flour setting and it was perfect!! I hydrated the psyllium husks first and then dumped them with the flour into the bread maker. I had to give them a manual mix first to get the mix to become cohesive, then left the bread maker to do it’s thing. It was the first time my daughter has eaten bread in over year and it was perfect. Tasted yummy with perfect soft and fluffy texture. Thank you so much!!!
Absolutely lovely recipe and rather simple. I let the dough raise in the tin from the get-go and found both the proving and baking needed less time than specified (though I did activate the yeast before kneading, which might have sped things up) and used a blend of buckwheat, white teff, and oat flours (as they are all structurally quite similar). This is a rather slack dough and so it helps to knead with a VERY generous amount of flour on the work surface. To those struggling with lumpy psyllium, make sure the psyllium is hulled. I also find that slowly whisking water into the psyllium clumps more than just chucking it all in at once. Anyway, thanks for the lovely STARCH-FREE recipe! X
Hi Max, great to hear the recipe works with all the subs and thank you for the tips!
Amazing that it works without any starch too, I will have to give that a whirl 🙂
You are an amazing recipe developer! The texture and taste on this bread are fabulous. In case helpful to anyone, I made a half recipe successfully in a 1.5 liter cast iron pan.
My question is, on some of your bread recipes you note to store overnight before cutting. Do you leave at room temp or refrigerate, before cutting?
Appreciation for your excellent recipes!
Hi Jaya,
I’m so glad you enjoyed it! Oh wow – so you poured the batter into the pan and baked it like a boule? That is so cool if so!
After I first bake, I generally just store it on the bench overnight. Most of time I have baked it in the afternoon/evening so it isn’t cool enough to go in the fridge yet.
If the loaf is 100% cool I guess you could put it in an airtight container and into the fridge but I don’t think it’s strictly necessary!
After the first day or so I would recommend storing it in the fridge in an airtight container or slicing it and freezing it. It does take a few days for the bread to stale but obviously we want to try and delay that!
Perfect, thank you so much for the advice about cooling, cutting, and storing the loaf.
I have made the half-recipe three times in my 1.5 liter cast iron pan, greasing and lining the pan with parchment paper–it forms a beautiful boule! My pan has high sides and the loaf rises to the top of the pan.
Thank you, it’s so great having a delicious whole-grain gf loaf!
Dear Georgia, this sandwich bread has become our standard household loaf which I make in slightly adapted form (using sourdough for leavening and adding a little powdered egg white for extra stability) every single week! I’ve also found that it holds up well to different flour blends. Our current favorite is half buckwheat and half a blend of teff, oat, and millet. I love that it’s mostly whole grain yet still manages to have a lovely chew and lightness. Just wanted to say thank you for such a versatile and delicious recipe!
I’m so glad you enjoyed it Melissa! Amazing to know that it works with flour subs as well, that is really great to know 🙂
Could I replace cassava/tapioca for something like rice flour? Thanks
I haven’t tested anything but cassava or tapioca in this recipe! It is designed to give it a bit of extra elasticity which rice flour doesn’t have.
You’re welcome to try it – let me know how it goes if you do 🙂
This is the best recipe l have found for gluten free bread. Commercial gluten free bread does not agree with my weird digestion but this is perfect. My first few attempts turned out a bit wet and heavy but l realised that the psyllium might be responsible as it doesn’t seem to differentiate between husks and powder when you buy it here in UK. So l experimented with grinding the psyllium and also using buckwheat groats, which l also grind myself, and it comes out perfectly every time. Thank you so much!
I usually use buckwheat groats, but I had exactly 500g of flour in my pantry, so I baked this recipe. It rose really well and I used arrowroot instead. Thanks for sharing this recipe. I can have bread today instead of tomorrow ????
Gluten free bread baking can be a total nightmare. Excellent crispy outside and fluffy, non crumbly center! One of the best Buckwheat recipes I’ve found. I did end up using less water, my dough was like cake batter. I used Arrowhead Mills Organic Buckwheat flour. No odd flavors, dark and hearty and savory!
I had dark buckwheat fl9ur and followed your recommended changes (35g psyllium husk, 750g water, no boiling water in oven, 30 minutes at 356F for the second half of baking). The loaf came out great! Thank you for this recipe.
For those who had lumps when mixing their psyllium husk with water, I also struggled. Instead of throwing it out, I used a hand blender to get a smooth texture. Then, I proceeded with the recipe.
Hello! Can I use potato starch instead of tapioca? I only have that at the mo x
Unfortunately not Katja! The tapioca or cassava flour adds binding capacity, elasticity and chew which potato starch won’t do
Please can you explain why the psyllium is not mixed in to the dry ingredients. Wouldn’t this make it easier to avoid clumps?
Also, is there any chance you will ever do a YouTube video so we can see exactly the consistency we need to achieve with the dough. I’ve not tried this recipe yet because I’m so scared it will just be a repeat of wasted expensive ingredients, like all the other GF breads I’ve attempted! Many thanks.
In my experience of working with psyllium, it absorbs more liquid if it forms a gel on its own prior to being adding to the dry ingredients.
This means that you can add slightly more water while achieving a workable dough that is easier for beginners to handle. I wanted to make the recipe as easy as possible for all skill levels which is why I did it this way.
I’d love to do a YouTube one day but as I’m sure you can appreciate it is a lot of work! I don’t have a team (only me) so I don’t have the bandwidth for it at the moment.
Hopefully soon though 🙂
All my trepidation was for nothing!
Came up beautifully.
I didn’t have maple syrup, so used honey.
Used more psyllium (~33-34 g)
Made a few boo boos, like forgot water in first part of baking and despite all warnings used UK spoons ????????♀️, but the recipe is robust, got a lovely loaf.
I didn’t have a tin the size you mentioned too, so used a 20x20x7 cm3 pot!
Thank you very much!
Next I’ll try it in the bread machine ????????.
So glad you enjoyed it Krupa! Great to know it’s a flexible recipe, it is one of my favourites 🙂
Amazing recipe!!!! This is the first time I have made bread with buckwheat. Granted….I reviewed all your instructions 4 times before attempting. The bread came out PERFECT!!!! The whole family loves it and we are on our way to better health!
Tried today and it’s so easy, fluffy and delicious! The less good thing is that it’s so fluffy that it’s hard to slice, but I can live with poorly sliced bread.
This recipe worked great! Thank you! Just had a slice with cottage cheese.
Here’s to no longer having to buy GF bread!
Love this recipe! Quick question… What is the best storage for this bread? My first batch went mouldy quite quickly. Thank you so much!
Hi Sarah! I slice mine and store it in an airtight container in the fridge. You can also freeze the slices and toast them straight from frozen 🙂
Hi! I’ve made this recipe a few times. I love the flavour of buckwheat flour! I am curious though, I make the recipe exactly as it says but the bread never looks like the picture you have where the crumb looks a lot like normal wheat bread. Mine is always pretty dense, it rises well but doesn’t have any bubbles in the dough when it’s baked. Any idea why that might be?
Otherwise, I still love it!
Thankyou
Hi Kayla,
If you have a dense, tightly knitted crumb then the issue is either insufficient hydration for the flour you are using (ie add more water) or an insufficient proof, or both.
My rec would be to start by adding more water to your dough. A lady in the comments (if you scroll back) was having the same issue and resolved it by adding a full litre of water.
Flours will always have different absorbencies so it might just be that yours needs more than any of my tests did 🙂
Is this supposed to bake covered in Pullman loaf ? Can I bake this uncovered in standard loaf tin ?
Hi Ayesha!
It bakes uncovered in the Pullman. I have only ever baked it in the Pullman so I can’t speak to other tins.
The height of the sides needs to be the same as the Pullman and the loaf recipe is made for the specific size of the Pullman so you might end up with too much dough or a short loaf if you work with another tin.
🙂
What are the macros in this recipe?
Unfortunately I don’t calculate macros for personal reasons Marilea. If you input the recipe into My Fitness Pal it will give you a macro breakdown 🙂
Is this meant to be a really wet sticky dough? or more like regular bread dough?
Definitely not like a regular bread dough, especially before proofing. It’s a thin batter before proofing and a thick batter after proofing 🙂
I’ve used this recipe multiple times (with a few little tweaks) and it’s always been successful! Today I’ve made more dough to try it out as a pizza base and another huge success! It’s the best gf pizza base ever! Can’t thank you enough!
Pizza bases is a genius idea! I will have to give it a try. So glad you’re enjoying the recipe 🙂
This is a LOVELY recipe! A new favorite with so much depth. It’s wonderful to be able to eat toast again, without all the not-so-great gums and fillers of commercially produced loaves. On a quick sidenote…I was so enthralled with this recipe that I purchased both ebooks on buckwheat, but it’s been a few weeks and it hasn’t hit my inbox (and I double-checked promotions/spam tabs). What’s the best way to get those sent (or resent if I just missed them)? Sorry for the trouble, but so excited to try more of your lovely recipes.
Hi Jessica,
I’m so glad you enjoyed it!
Sorry to hear that the buckwheat e-books didn’t come through. Normally people find them in spam but it seems like you have already checked.
I will go through the order log and resend them to you – check your junk mail as well because the link to the download expires in 24 hours 🙂
I hope you enjoy them! George
I’m super excited to try this recipe. I have a daughter who cannot have tapioca products – would you suggest potato starch or cornstarch as a substitute? Fingers crossed you’ll have a great idea for me. 🙂
Hi Mary,
Unfortunately tapioca or cassava are all I have tested! The other flours work quite differently so I’m not sure how they would turn out.
You’d likely have to adjust the hydration if you tried with either of those. Let me know if you try it, I’d be interested to know!
I make it with arrowroot instead of tapioca and it’s great.
Hi,
New to buckwheat so trying out your recipe. Thanks for sharing it!
Do you leave the water pan in the oven whilst cooking or just in the 10 minute preheat stage?
Is the dough meant to be sloppy before proving? Mine seems quite wet, more like thick cake/ scone dough texture.
Thanks
Ruth
Hi Rutj! I leave the water pan in for the entire bake sometimes and sometimes just for the first 20. It really depends so you can do whatever you prefer.
Yes, ideally the dough should be very wet before proofing. The yeast needs a wet environment to thrive and grow 🙂
Hi there! Was going to reply to your comments from my original post, but couldn’t find it so…
“SUCCESS!!”
The buckwheat loaf came out perfectly. If you remember, Ikm had trouble with a dense, heavy loaf, and you suggested more water. So, rather than going by volume of water and mixing by hand, I took it to my stand mixer. Being familiar with how a GF loaf with proper hydration ‘should look’, I added water until I saw the right consistency of the dough; and you were absolutely correct, I needed more water. It worked!! I even placed it in a standard load pan and it turned out beautifully!
I made a loaf 2 days after all your supportive responses, thank you very much, and haven’t posted back because I’ve been making a loaf every week.
This bread is delicious! I use to make a sandwich, plain or toasted, and just have a slice toasted on its own with some honey.
Thank you!
Amateur baker here – I have a bread maker here and followed the instructions to a “t” until the proofing instructions. I proofed for 1.5 hrs on a “leaven dough” (no kneading) setting on my bread maker and then used the bake setting (on dark crust) for 70 minutes. The temperature came to 205 degrees and the bread came out quite good.
Hi!! I was wondering if tapioca flour is the same as tapioca starch. Im from Argentina and i cant find the flour kind. Sending lots of love!!
Generally they are the same, but just make sure it’s bright white in colour and feels squeaky in the bag.
Sometimes different brands/countries label things differently (potato flour/starch is always an issue) so as long as it has those characteristics, it’s fine for the recipe.
Hope you enjoy the loaf 🙂
PS I went to Buenos Aires for 2 weeks in 2019 and I loved it so much! Such a beautiful city, can’t wait to come back and explore more of Argentina 🙂
Hi – I am trying the recipe for the first time and it does not seem to be rising much. My yeast is fresh- just purchased it. Here is the USA, we have two type so yeast – active dry yeast and instant/rapid rise yeast. I used active dry type. I don’t see in the recipe which is specified. I purchased the recommended bread pan, used tapioca flour and measured everything carefully on my metric scale. Thank you for all your buckwheat recipes!
Hi Mo,
Sorry! Here in Australia we really only have the one common type of yeast so I didn’t think to mention it.
I used instant for this loaf as I do all my other yeasted recipes.
I had a quick google and found this Kitchn article on the differences between the two yeasts: https://www.thekitchn.com/whats-the-difference-between-active-dry-yeast-and-instant-yeast-54252
It says that active yeast needs a bit longer to proof, but I think perhaps there are a few other factors that could be at play.
Firstly, a dry dough doesn’t rise as much because the yeast needs moisture to thrive. This means it’s important to have a nice moist dough (even overly wet if it needs to be) rather than a dry one. It also needs to be fully covered during both proofs to keep the warm air in.
Secondly, is it cold where you live? Cold kitchens and weather often contribute to lacklustre proofs because the yeast needs heat to thrive.
Could it be a combination of all these factors? Generally when one of my loaves come out small it’s one of these things.
Let me know how you go if you bake it again! 🙂
I am in America, didnt add the yeast like the instructions said. Instead I followed the yeast packet instructions first. I added 1/4 c of warm water (100-110 degrees f) to a packet of yeast and let it sit and bubble up before I added it to the psyllium husk after the psyllium husk was fully gelled. I got a really beautiful rise.
Hey Georgia! I’ve made this bread a few times now, but only on one occasion did it rise during proofing. Do you have any idea what does the rising/not rising phenomenon relate to? The amount of water perhaps? Type of yeast? My breads turn out pretty consistent/dense. Still love them, but I’d enjoy them even more were they a bit more aerated. Any thoughts?
Hi Suzanne,
A few things: first and foremost, is your yeast fresh? are you using the type specified in the recipe?
Are you based in a cold climate or is it currently winter? If so, this contributes to the yeast being a bit lacklustre. You might need to leave the bread to proof longer if you’re in a cool environment.
Failing these, what does the dough feel like? Is it borderline dry? Yeast needs moisture to thrive, so you might need to up the liquid content. Every bag of buckwheat will need a different level of hydration though, so it might be that that the buckwheat you are working with is thirstier than mine.
Are you using cassava flour as the starch component? I have noticed that fermented cassava flour (like otto’s brand) is super thirsty and it might be making your dough a bit dry?
Are you using light buckwheat flour? I haven’t tried dark buckwheat in this recipe so I can’t speak to how much liquid it needs. I suspect it would need more given that it’s made with unhealed buckwheat, but that’s a guess until I get my hands on some.
Hopefully this helps somewhat!
It’s got to be the lack of moisture! The dough does feel dry.
Label says: Cassava/tapioca/manioka flour, so who knows what’s inside 🙂 z here they do not differentiate. I’ll try adding 50-100 ml water. Thanks!
Hi Suzanne,
Hopefully that’s it because the dough shouldn’t be dry. It should be floppy and moist and you should *just* be able to pick it up in sticky pieces after proofing.
Generally speaking you can often tell if you haven’t added enough liquid after the first proof because it won’t have grown by much.
You can experiment with adding 50-100g extra liquid at this point (before the second proof) as a fallback, because hydration is a bit of an art.
Good luck and let me know how it goes! 🙂
1000 ml (1 full liter) of water works like a charm! I also added 2 teaspoons of sugar because I use aloe syrup, not as sweet as maple syrup. Now the breads rise and shine 🙂
I’m so glad to hear that Suzanne! I hope you get the perfect loaf 🙂
Amazing bread.
Thank you so much!!
So glad you enjoyed it Clare! 🙂
Awesome recipe, works well, after having tried so many that did not. Thanks so much!
So glad you enjoyed it Suzanne! 🙂
What is the easiest way to convert grams to cups? 🙂
Hi Mandy,
Because cups are not universal (Australian cups are different in size to American cups, etc) I choose to use grams mostly these days.
They are universal (all scales have a function for them) and very accurate, which is hugely important in all baking, but particularly gf baking 🙂
Hey Georgia, forgot to mention…I am also from down under. Love your work.
*SMILES*
Hi Georgia, I just wanted to let you know that this recipe is AWESOME, the first buckwheat bread I love, out of many that I have made… I wanted to ask, what would be the best storage technique used for this buckwheat bread and how long does it generally last?
Thank you so much for sharing your wonderful work!
🙂
Hi Dianna!
So glad to hear you loved the recipe! This might not be what you wanted to hear but I generally slice mine and freeze it to have for toast every morning.
I toast it straight from the freezer and it only takes a few minutes to cook.
Otherwise I slice it and store it in an airtight container in the fridge, where it lasts 4-5 days (maybe more, but I have eaten it by then!)
🙂
Delicious bread wit beautiful texture like a bread should be! thank you for the recipe I added a bit extra psyllium husk and drizzled a couple of tbsps of coconut oil on the top. Turned out perfect.
So glad you enjoyed it Hazra!
Hi Georgia
I used tapioca flour and actually needed more water. Didn’t use the baking pan filled with boiling water in the oven and baked for an extra 15 minutes. The bread tastes great and I will be using this recipe weekly.
Most buckwheat recipes I have tried end up being hard and dense. This is moist on the inside and hard on the outside – just what I wanted, so thank you for sharing. Glad I don’t have to buy the gluten free supermarket breads that are filled with rancid seed oils.
Very glad you enjoyed it Ann! 🙂
This looks amazing! I’m going to try to bake this tomorrow. I can’t use most oils, I typically use coconut oil in baking. Do you think melted coconut oil could work or do you think it would harden and disrupt the proofing process?
Hi Larissa! I have never used coconut oil in this bread (or in any of my yeasted recipes) so I’m not 100% sure. However, a bread baking forum I like (not gluten free but still helpful) seems to suggest that there’s no issue with using coconut oil in bread recipes (https://www.thefreshloaf.com/node/22442/coconut-oil)
I’d say as long as you don’t proof it in the fridge you should be fine. Let me know how it goes, I’d be curious to hear your result!
Thanks so much! I’ll give it a try and report back ????
I want to give this a try, it looks so good. Have you (or anyone who sees this) tried using a bread machine? If so, what modifications did you make?
I have never used a bread machine so I can’t help sorry Deb! Hopefully someone can chime in here
Hi DebS ???? Roberta Adam’s has commented above, saying she used her bread making machine on the Gluten Free setting ????
Made this yesterday in my air fryer as i don’t have an oven, came out really well. It was slightly dense though and a bit cake like, any suggestions? Yours looks more crumbly and bread like. Still lovely though.
Hi Jake, I don’t know too much about air fryers as I don’t own one but I suspect that might have something to do with the altered texture.
I developed the recipe to be made in the oven and I’m not sure if there are alterations that can be made (if any) to better suit an air fryer unfortunately.
If I ever get an air fryer (on my list) I’ll give it a go!
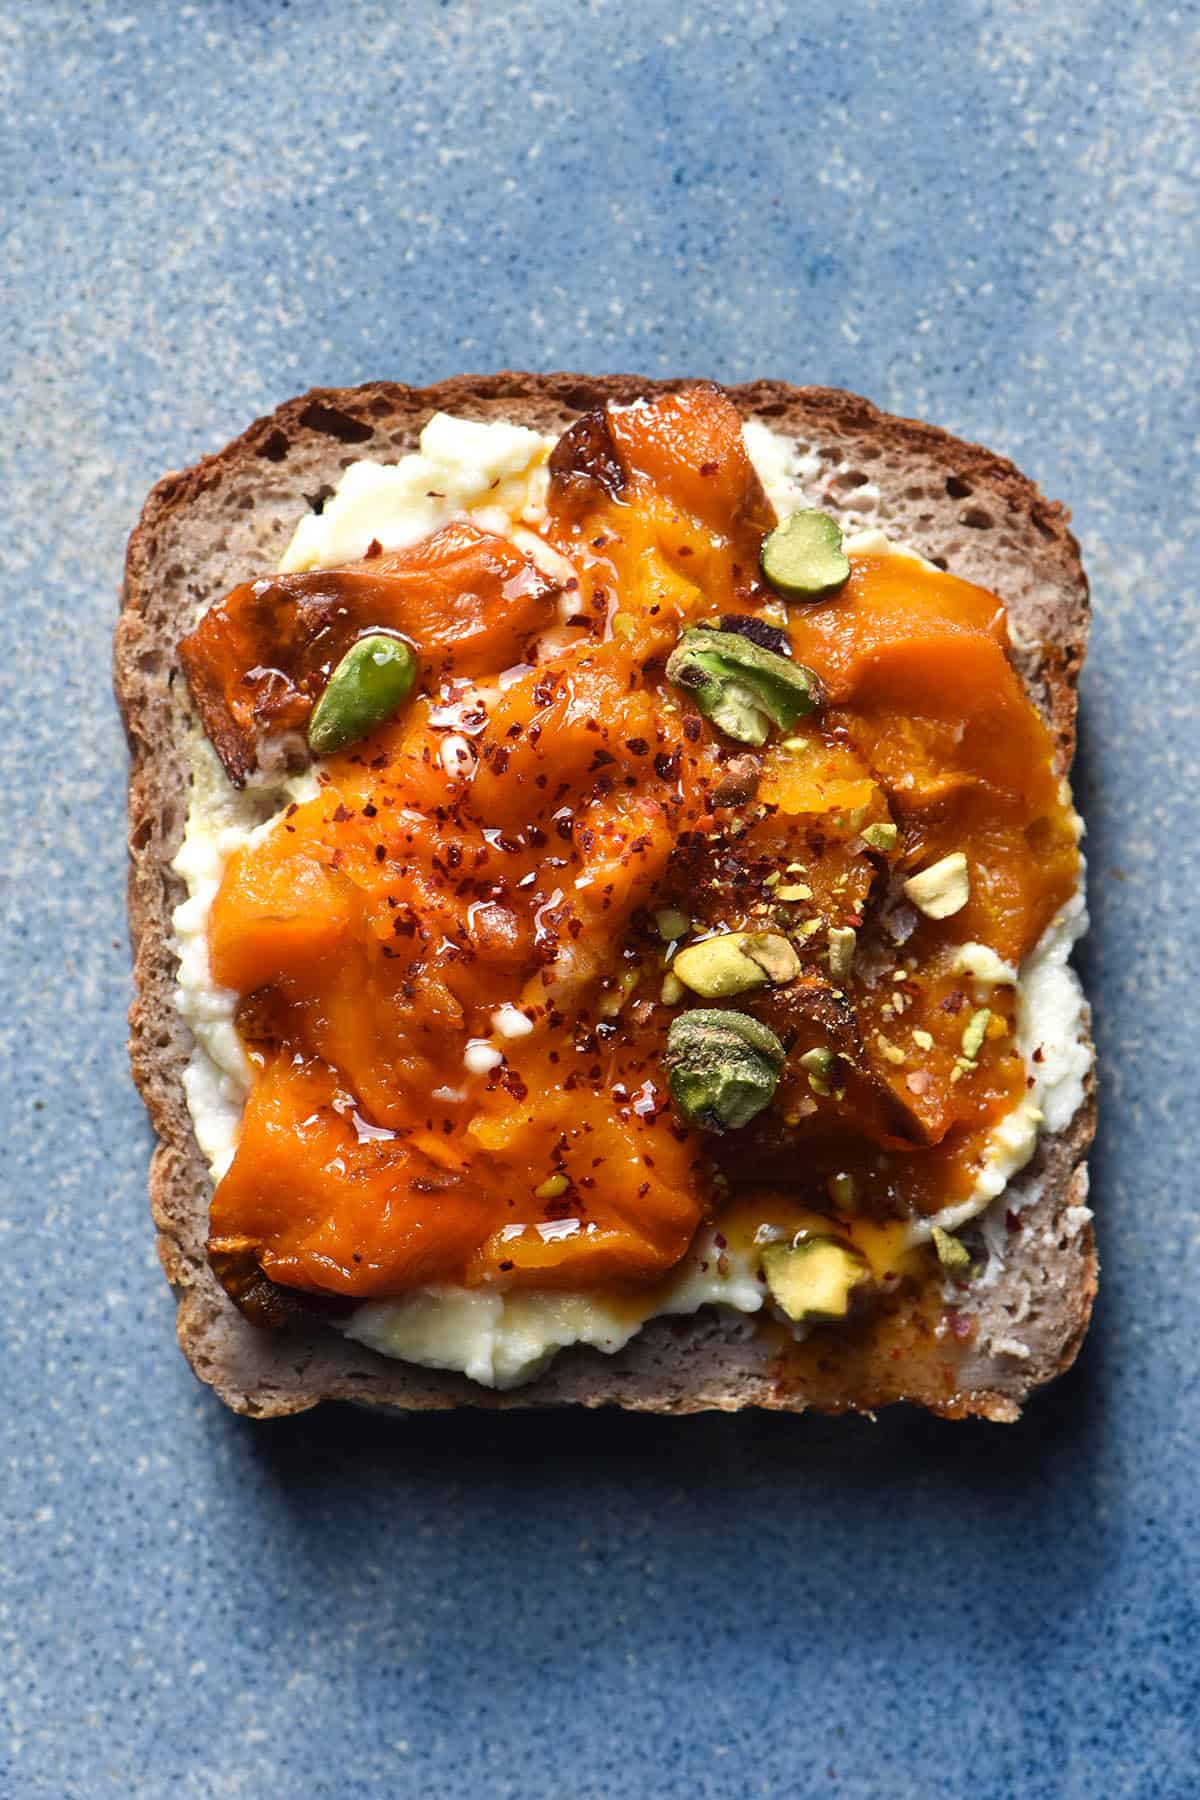
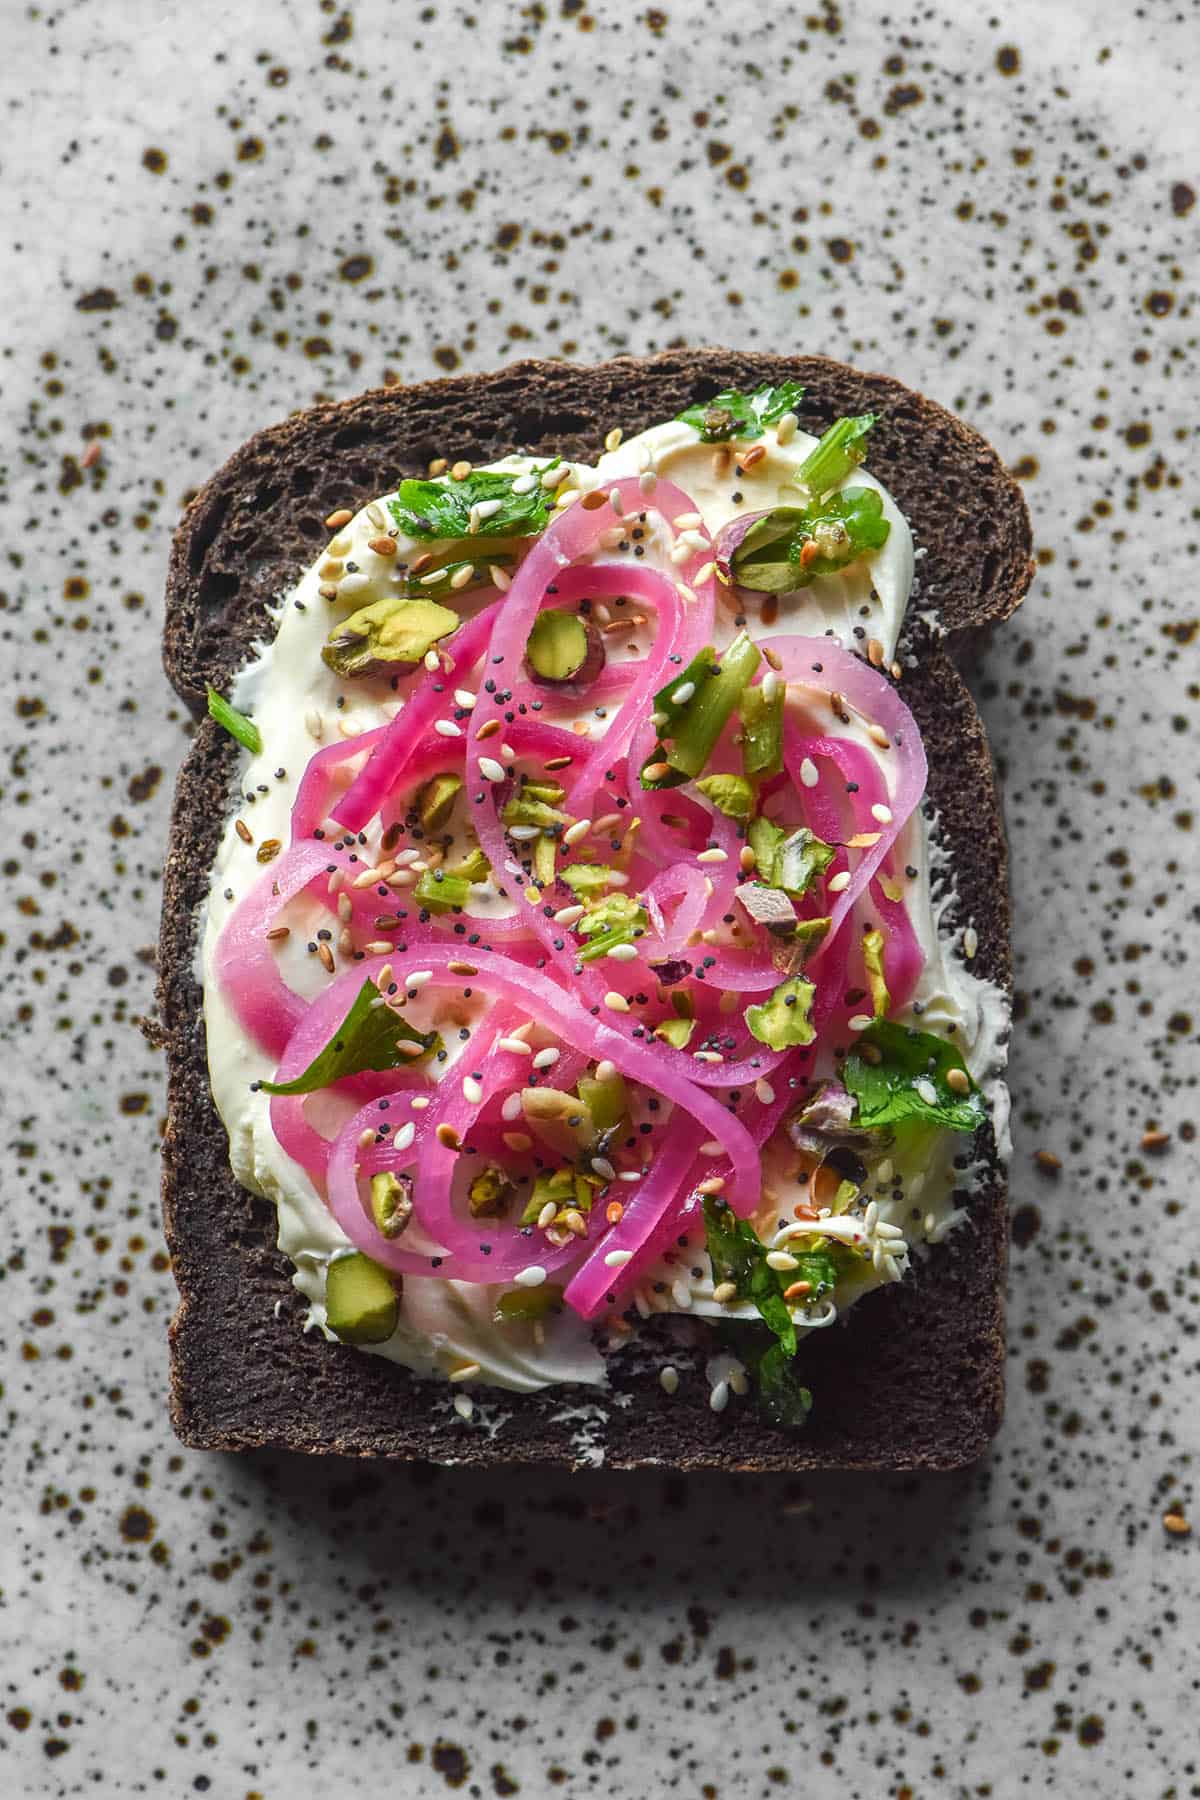
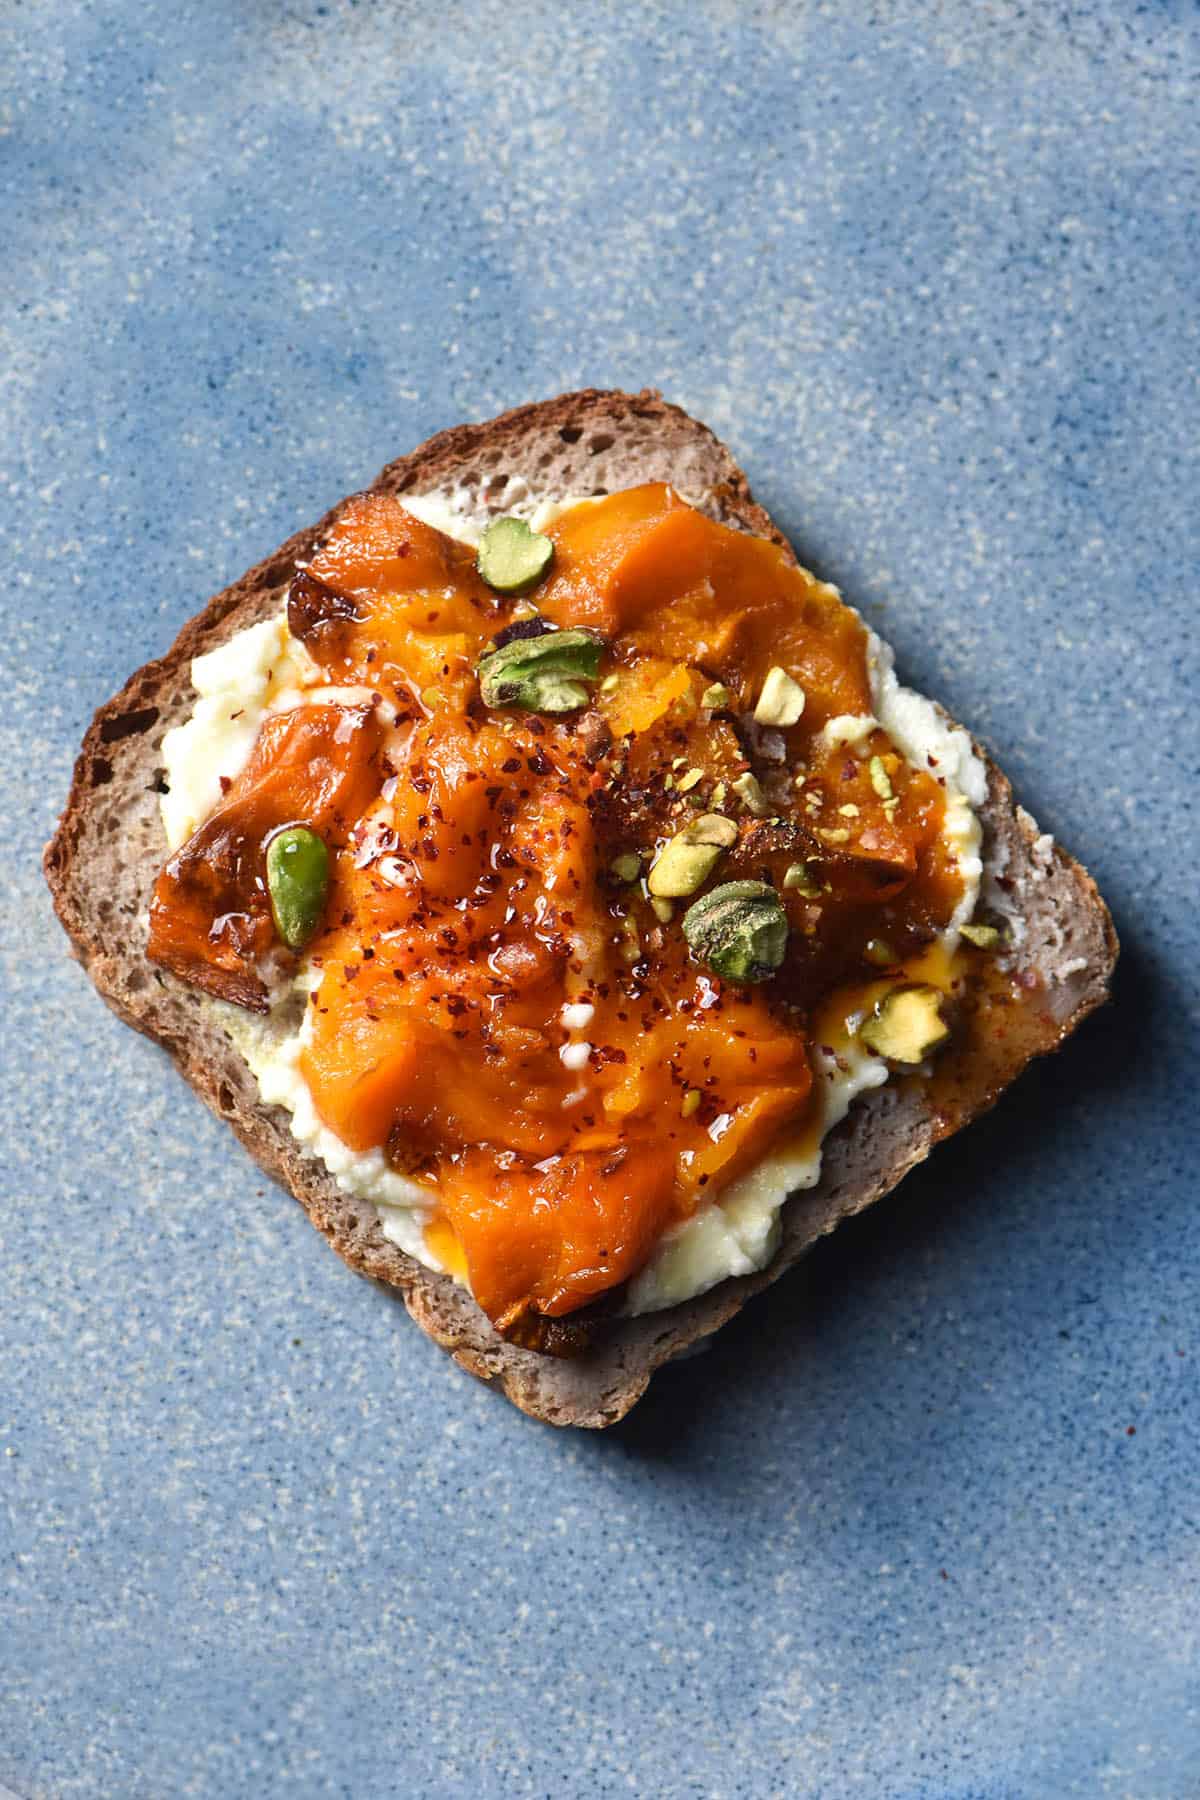
Fantastic bread! I have to know though, what are the toppings on the toast shown in the recipe? It looks so delicious!
SO glad you Enjoyed it! It’s mascarpone, roast pumpkin, chilli oil and some pistachios 🙂
Great recipe, I use 100% buckwheat flour and no sugar and it works every time. Keeps for at least a week in the fridge.
Hi Clive,
I’m interested in making this bread as you described. But I am worried about getting the right consistency. How many grams of buckwheat flour and water did you end up using?
Thank you,
Autumn
Love, love, love this recipe! Thank you. I’ve made it both in the oven and in my bread machine on the gluten free setting. I’ve also made buns with it ❤️
Hi George
On the first try, the bread rose wonderfully and has a great texture but a really weird smell and taste… do you think it’s the psyllium husk?
Hi Shilarna! Are you familiar with buckwheat flour? It does have a unique smell and taste.
The only other thing I can think is maybe some of your ingredients were off or rancid?
Psyllium husk is normally pretty imperceptible in bread so unless it was very old I don’t think it would be that
So yummy and tender. Holds together well. I did 400g dark buckwheat flour and 90g cassava.
I’m so glad you enjoyed it Marena! Great to hear that it works with dark buckwheat flour too 🙂
Hi Georgia,
I’m keen to make this but I keep failing at the psyllium husk powder and after 3 attempts it is still lumpy and a a runny gel consistency. Any tips you might have would be so helpful, or perhaps is I use flax/chia seeds or psyllium husks instead?
Hi Lita,
If the psyllium husk powder (are you sure it’s powder and not flakes?) isn’t absorbing liquid, there is an issue with the psyllium husk. May I ask what brand you are using?
Whisking as you add the water to the psyllium husk should help with lumps, but it does need to absorb liquid to become roughly the consistency of a medium to thick yoghurt.
So, some things you could try:
– leaving the mixture to absorb for 10-20 minutes longer
– ensuring you whisk quickly as the water hits the psyllium husk powder. If you wait while you search for the whisk, the powder will start to clump together and it’s harder to separate.
– using warm water (I find this is often makes the liquid absorb faster)
– triple check that you’re using powder and not flakes. Flakes absorb less liquid than powder.
I haven’t tried flax or chia and I don’t often use them as a binder so I can’t give you any advice there. I daresay their absorptive qualities would be different to psyllium powder so it’s a bit risky and I probably wouldn’t recommend it.
Hopefully the psyllium tips steer you in the right direction!
My first go with the psyllium husk I added the water to the psyllium husk and it was lumpy and horrible. I ditched it. My second try I added the psyllium husk to the water slowly while constantly whisking. This did the trick! nice and smooth!
I used your method, thank you, and it seemed to work very well. Just about to pop the tins in the oven now.
This turned out perfect!! Soft and flavorful and not gummy on the inside. I did use whole ground psyllium husk not the powder and it worked. This is my new go-to bread recipe. Thank you!
I’m so glad you enjoyed it Angela! 🙂