I have had these gluten free bao buns on the back-burner for a while now. They were a recipe I intended to include in my latest cookbook, Intolerance Friendly Kitchen. Unfortunately I didn’t perfect them in time but I have finally gotten around to finishing off my testing. The result? These light and fluffy buns that are gluten free, easily vegan and xanthan gum free.
Gluten free bao buns without xanthan gum
These buns are made with a simple mix of white rice flour and tapioca flour, with the option to add some glutinous rice flour. They work perfectly with the mix of only two flours, but the glutinous rice flour gives them a bit of extra chewiness, if you prefer them that way.
Side note, before we continue: glutinous flour is gluten free, made from sticky rice (hence, glutinous) rather than wheat or gluten. It is a starch based flour that adds a bit of elasticity and chew to gluten free goods.
Psyllium husk powder binds the dough together and allows it to absorb enough liquid to become soft and fluffy while still easy to shape.
The remaining ingredients in the buns are sugar, salt, baking powder, instant yeast, milk and water. Together, these ingredients add flavour, leavening and sufficient liquid to allow the yeast to do it’s work.
Recipe substitutions
TLDR: there aren’t many. I have designed this recipe to be similar to what I remember the wheat based buns to taste like. The flours have been chosen to replicate a light, neutral flavour.
Yeast adds both flavour and leavening and I have not tested a yeast free version at this stage.
I have used white sugar to replicate the taste and appearance of regular buns. As such, I have not tried any ‘unrefined sugar’ options or sugar alternatives.
Psyllium husk powder is the binder I use. It is stronger than the flakes and alters the appearance less than the flakes do. However, I find that supermarket bought psyllium husk powder tends to give things a purple grey tinge. This is why I grind my own psyllium husk flakes in a spice grinder.
In terms of the milk, you can experiment a little. I have used full fat milk (not lactose free) as that is what I had on hand. To make a vegan version, use a neutral tasting plant based milk. Note that oat milk isn’t considered gluten free in Australia.
In a pinch, I daresay you could use all water in these buns. They won’t have that creamy, milky taste but it will work if you’re out of milk.
FODMAP notes for your gluten free bao buns
The only ingredient that is of note for FODMAP concerns in these bao buns is the milk. If you’re on a low FODMAP diet, you will need to use a low FODMAP milk.
I have only tested these with regular, full fat milk. Lactose free milk is sweeter than regular milk because the lactose is broken down into two different sugars, galactose and glucose, which taste sweeter. If you intend to use lactose free milk, use less sugar in the dough to compensate. I’d suggest trialling 10-15g instead of 25g. If you don’t like things too sweet, you could even try using no sugar (for the lactose free milk option – I don’t recommend it for other milks).
If you need the buns to be low FODMAP and vegan, I suggest:
- Rice milk
- Macadamia milk
- Soy milk made with soy protein, not whole soy beans
- Hemp seed milk
- Oat milk is only low FODMAP, not gluten free in Australia (so don’t use this for a coeliac, but you can use it for a low FODMAP low gluten option)
Recipe tips for your bao buns
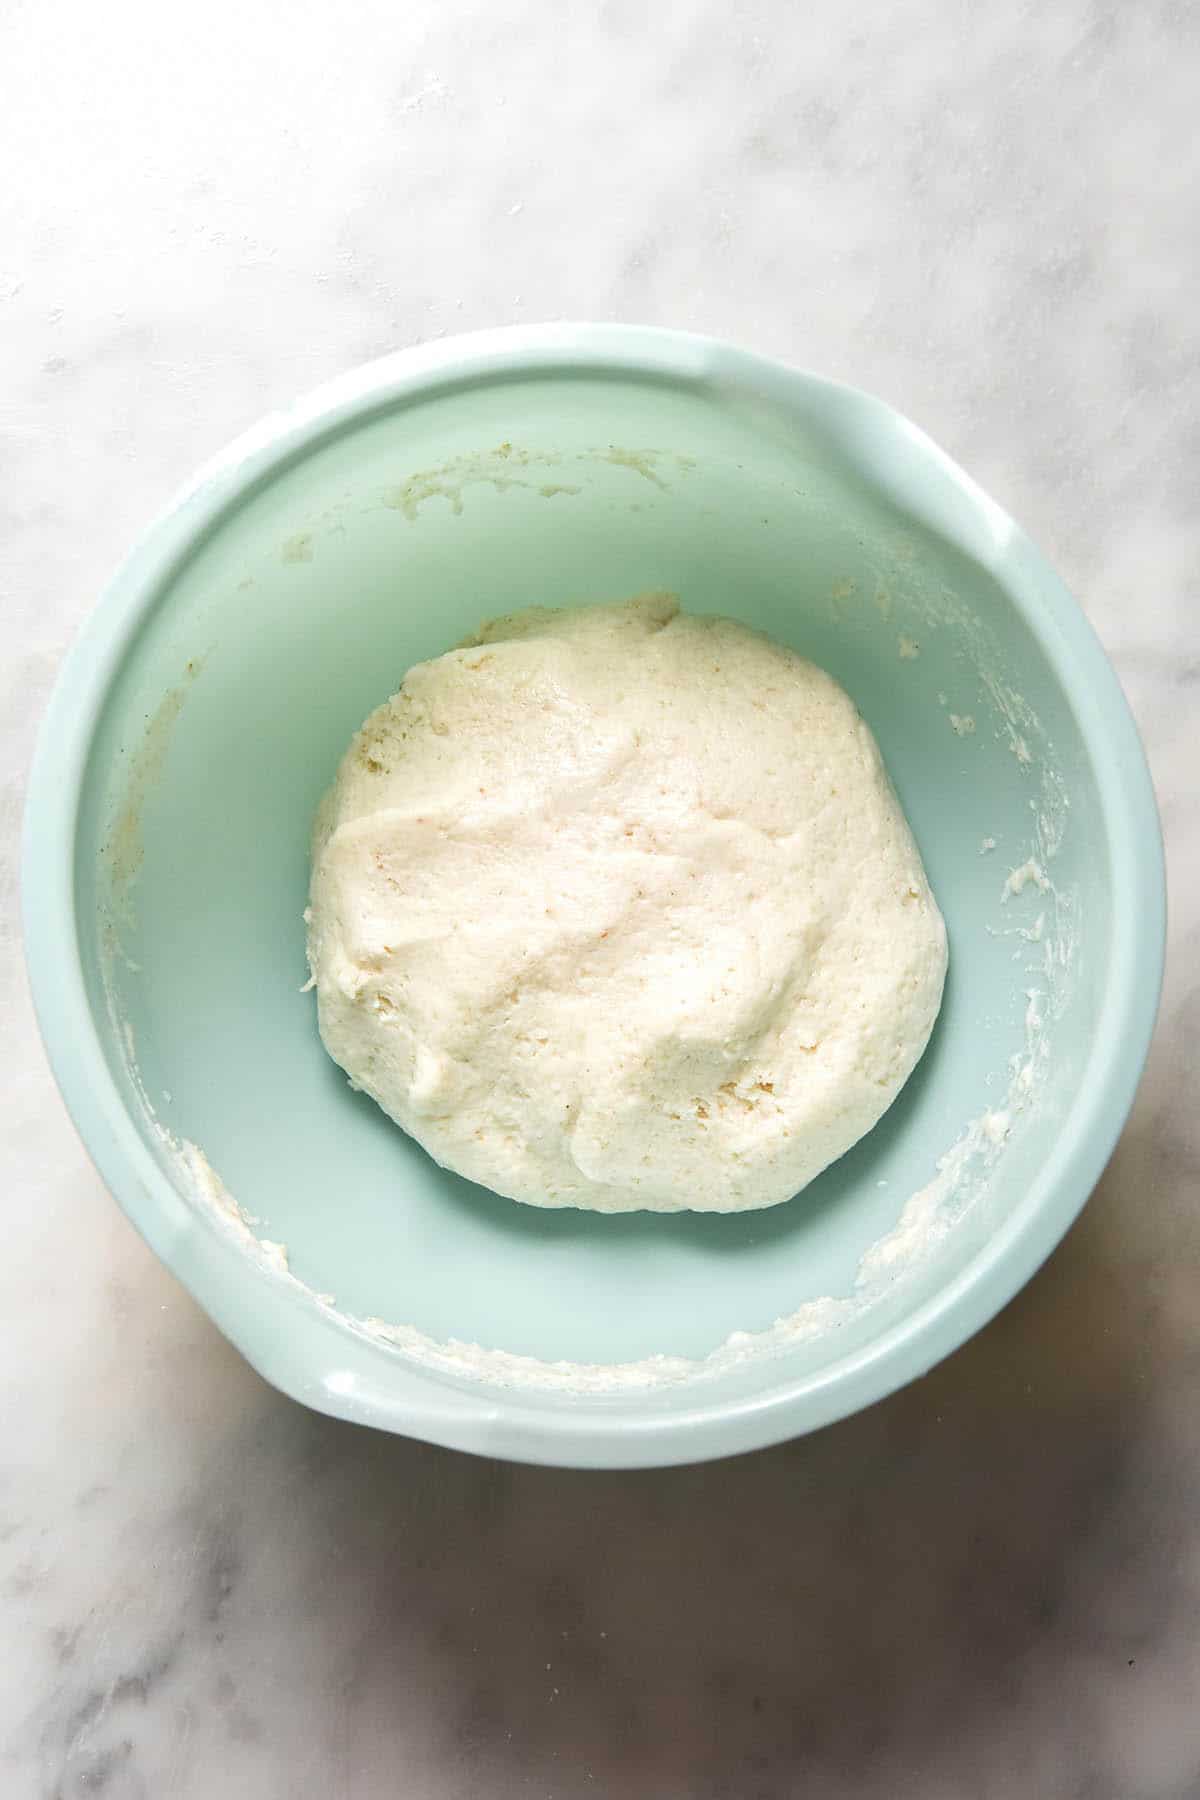
My number one tip is not to panic when the dough looks liquid as you mix it up. It is particularly thin when you use the option without glutinous rice flour (as it is more absorbent than tapioca flour). It is supposed to be runny as you first mix it. In time, however, the psyllium husk powder will absorb the liquid to create a dough that is soft, rises easily and makes for delicious gluten free bao buns.
The below images are how the dough should look after proofing.
My second tip is to have extra tapioca flour on hand. Sometimes the dough can feel a little too wet or sticky to easily shape after proofing. A little dusting of tapioca flour fixes this right up, but aim to use as little as possible for soft buns.
Try and roll each piece of dough into a smooth, round ball before you shape it. No cracks, no dry lumps of tapioca flour. How your bun looks as you shape it will largely determine how the cooked bun looks, so make a bit of effort at this step.
Notes on proofing your gluten free bao buns
Most recipes I looked at online proof the dough once shaped. This dough requires proofing before shaping as it gives the psyllium husk powder time to absorb the excess liquid as it proofs. The dough is simply too wet to handle before proofing.
However, I find it easiest (as with my gluten free baguettes) not to proof the gluten free bao buns once shaped. They lose shape easily and morph into giant Michelin man blobs.
I find the buns puff up really quickly after shaping them and continue to puff as they cook. If your steamer basket is small, they will also puff as you work through them in batches.
So, these bao buns only require one proof. I have tested this recipe on cooler days in Australian summer, and a 1 hour proof was perfect. You know the dough is proofed when your can pick it up in a single blob. It should feel light, airy and compress if you press on it.

How to shape your bao buns
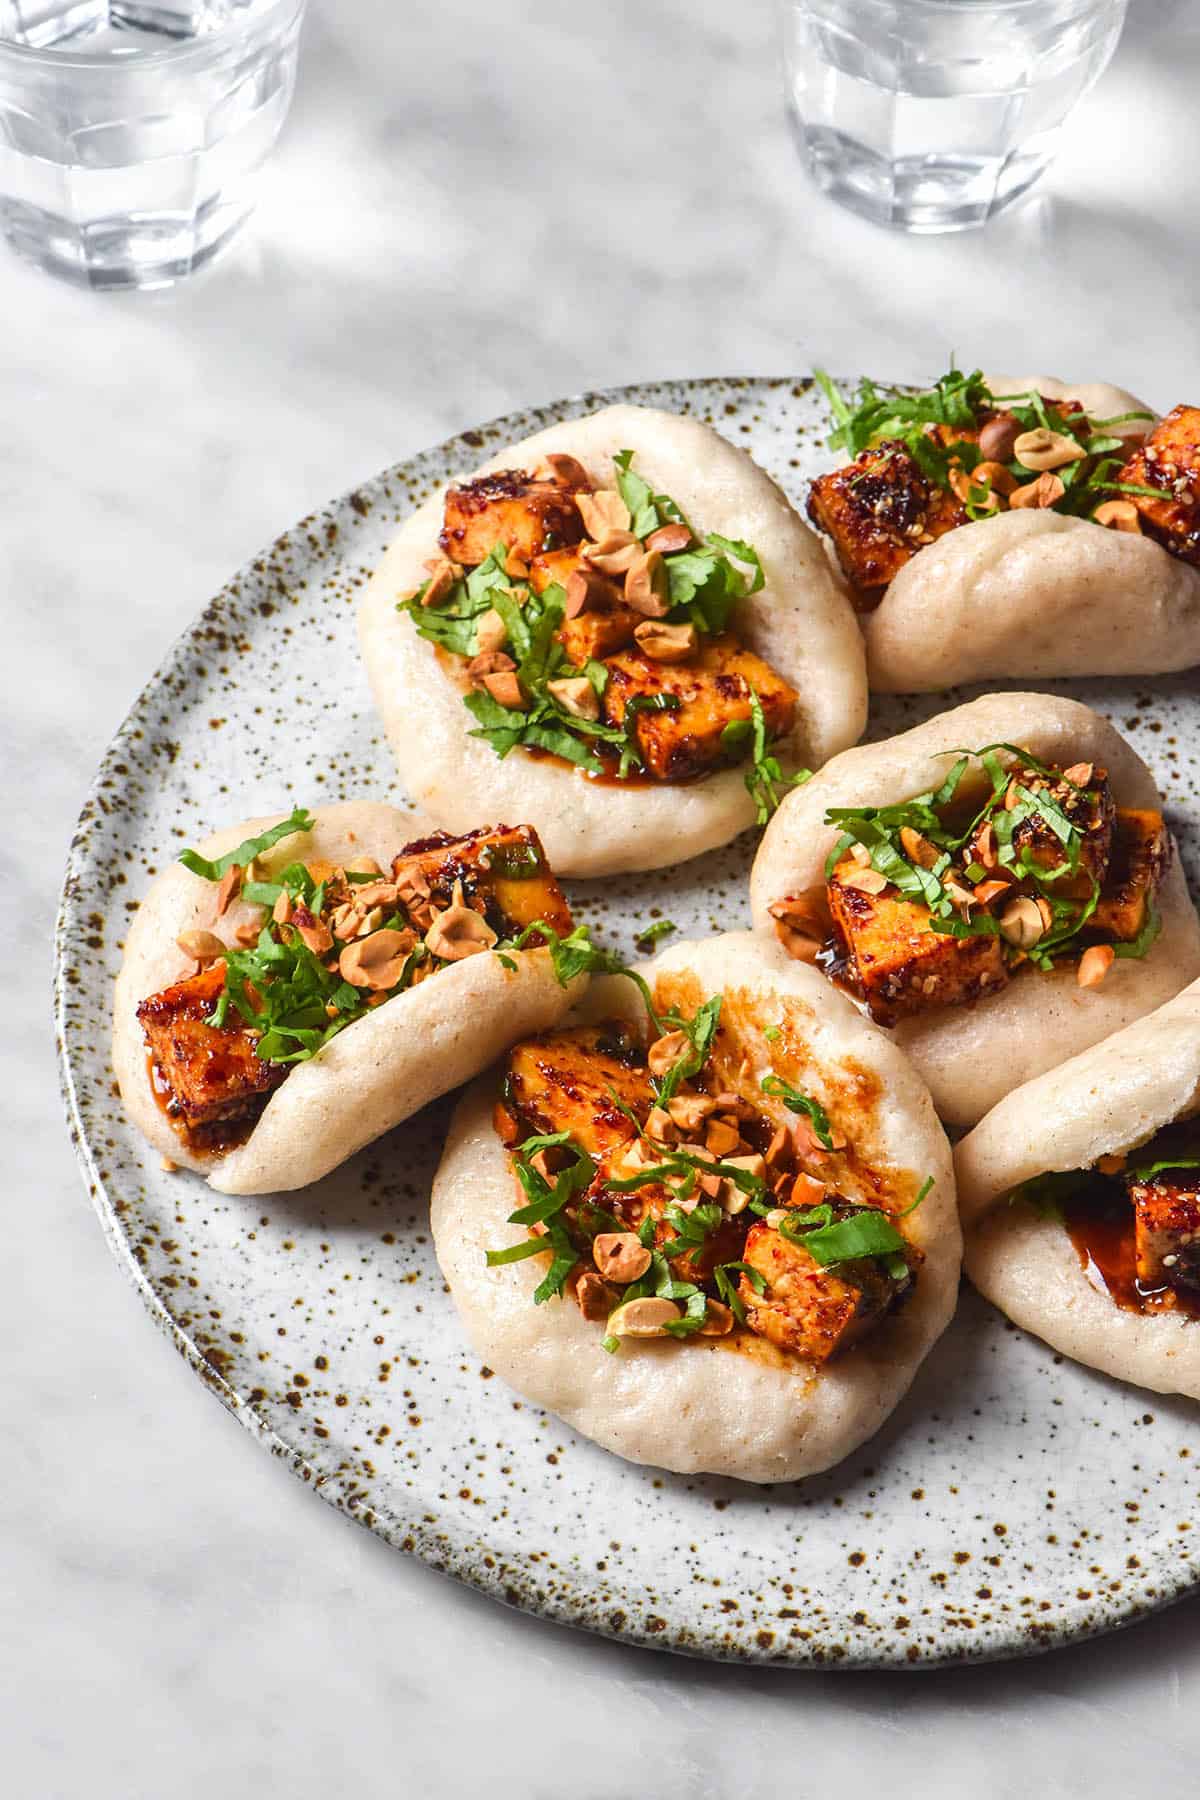
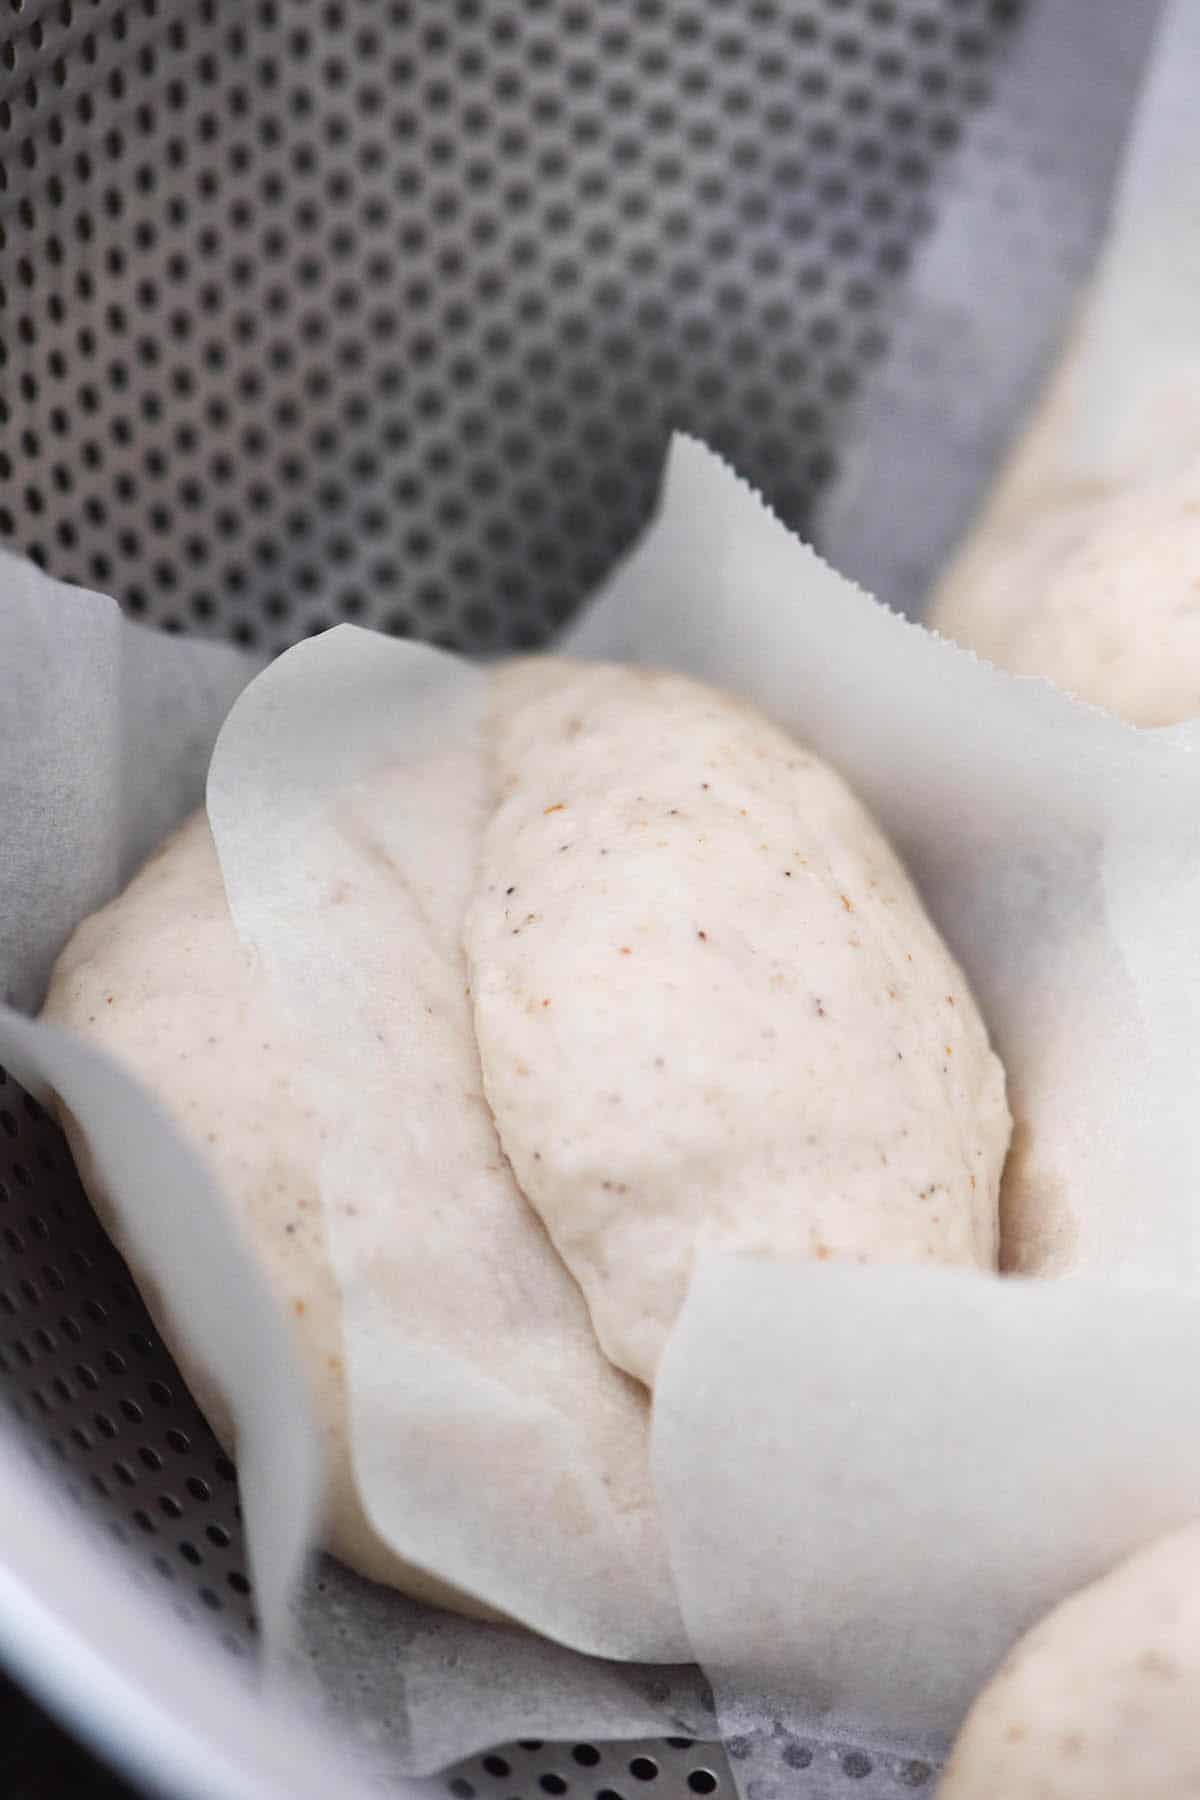
The first step of cooking your bao buns to cut medium-large squares of baking paper for them to sit on. Each bao should sit safely within the confines of the baking paper square without any edges falling off the paper. The buns will stick to your steaming basket easily, so they need to be safely on their sheet of baking paper.
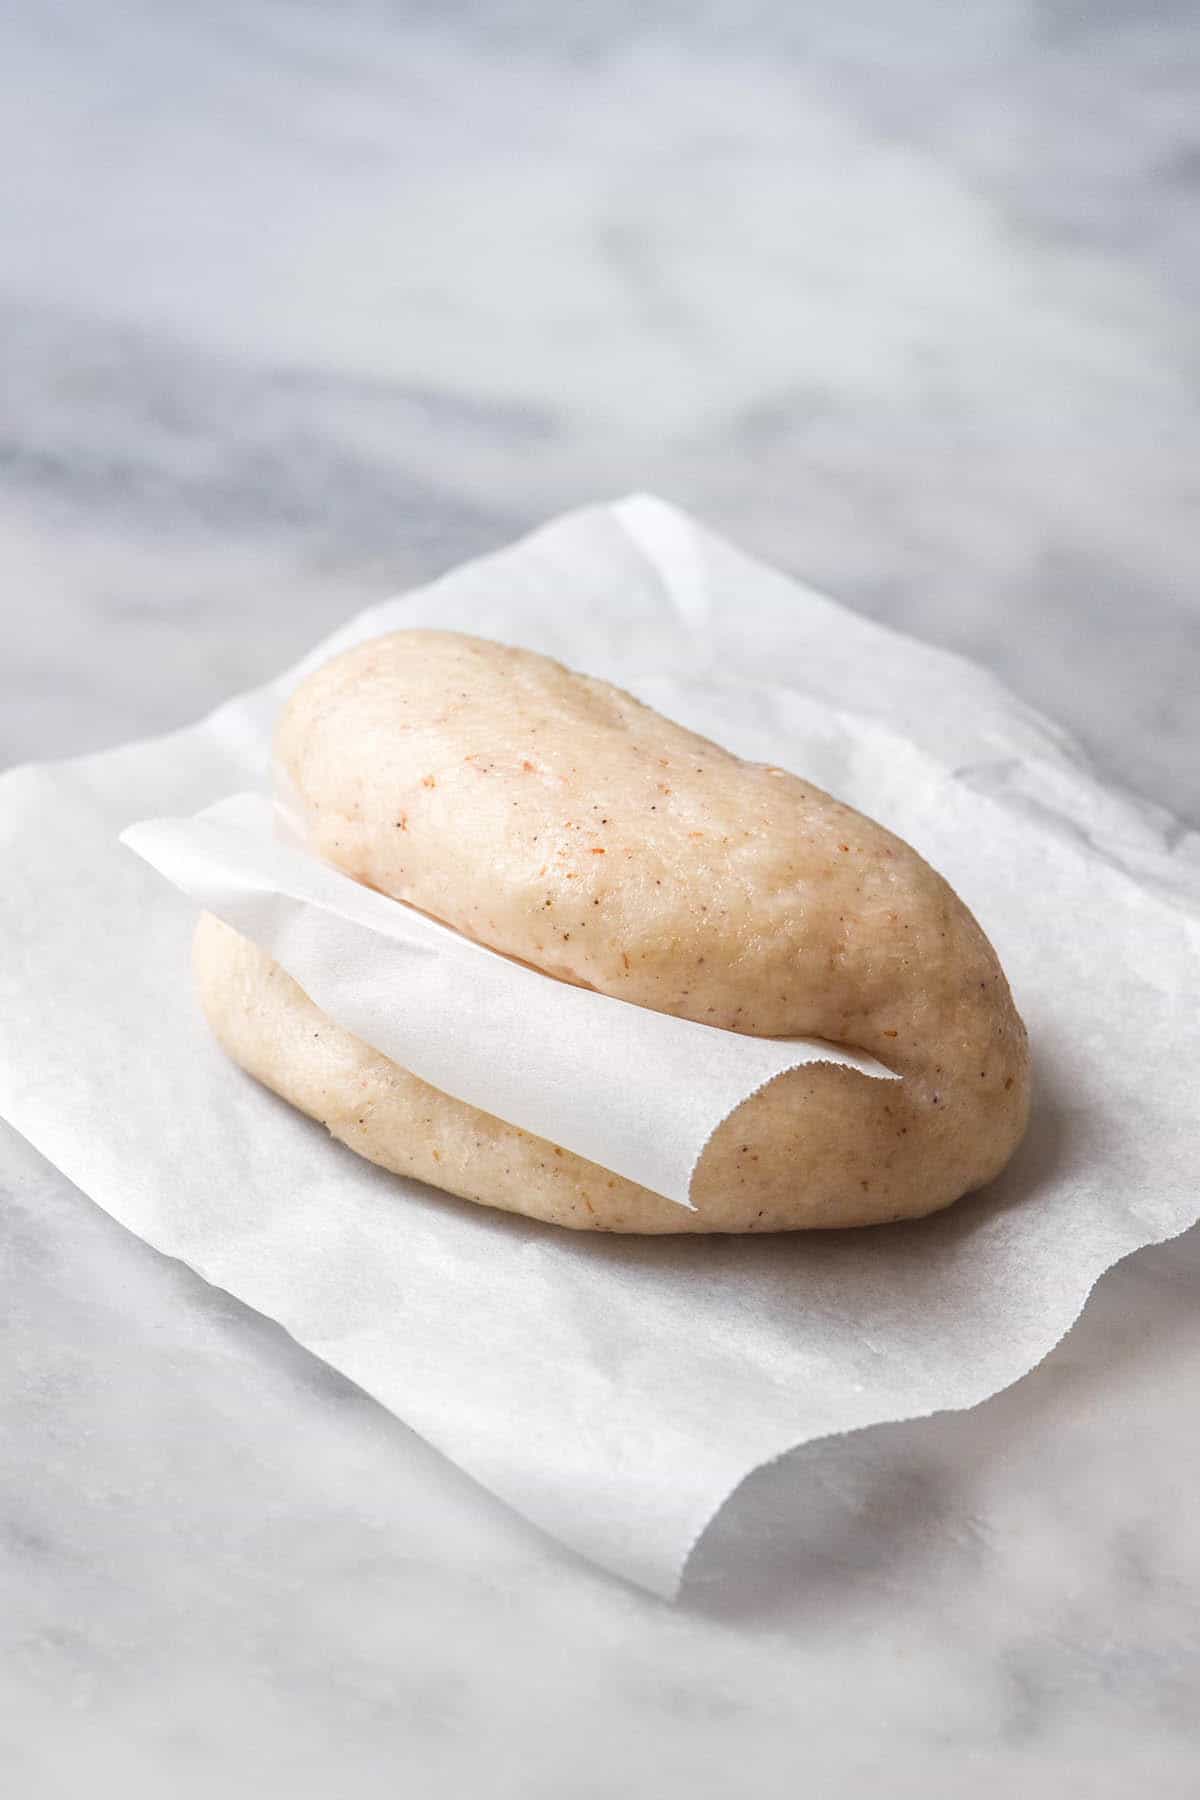
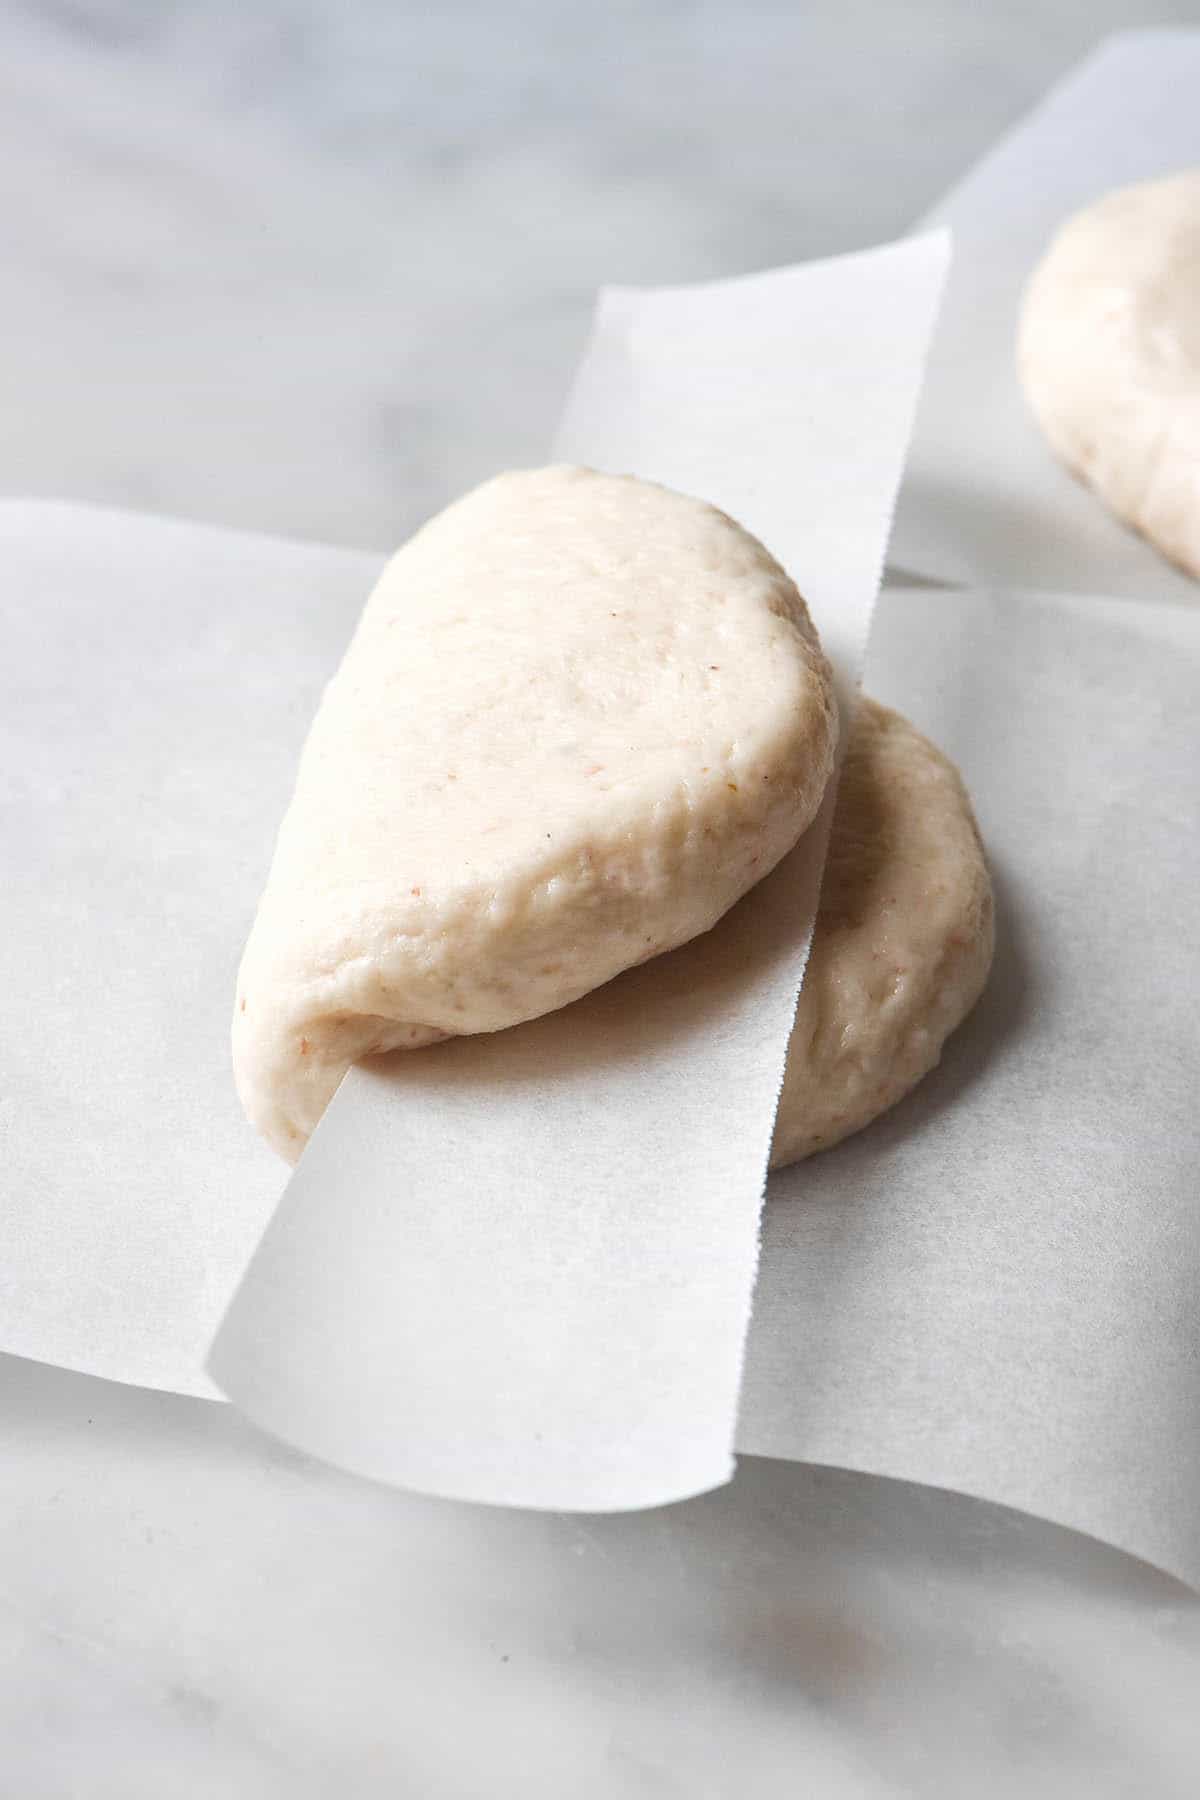
Secondly, I find the best method for ensuring the two sides of the bao don’t stick together is to place a little baking paper slip on one half of the bun before folding it over. The slip should be larger than the bun (pictured below) and cover half one side of the bun.
When the buns are cooked, you can simply pull the paper out. This little step allows you to open and stuff your bao with ease. I have tried oiling the bao before folding, but found it didn’t do much.
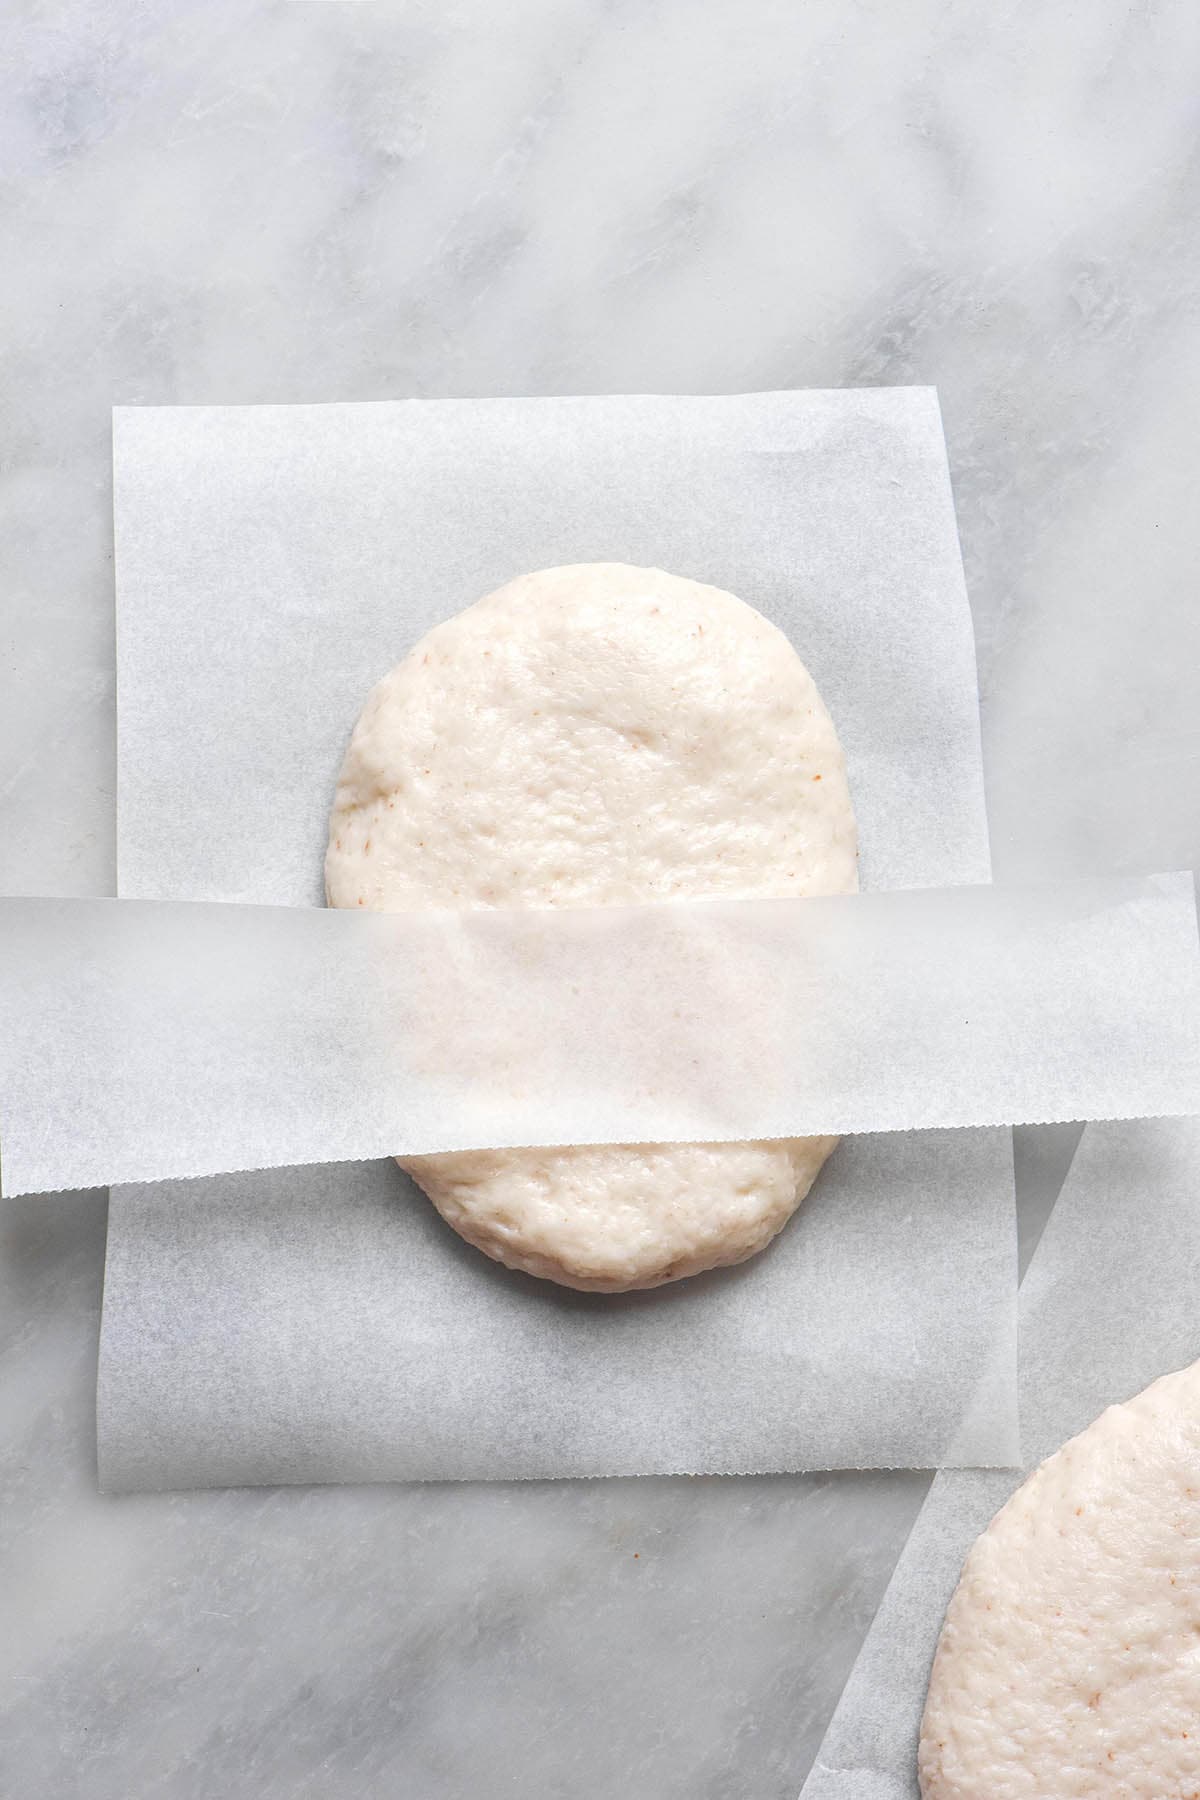
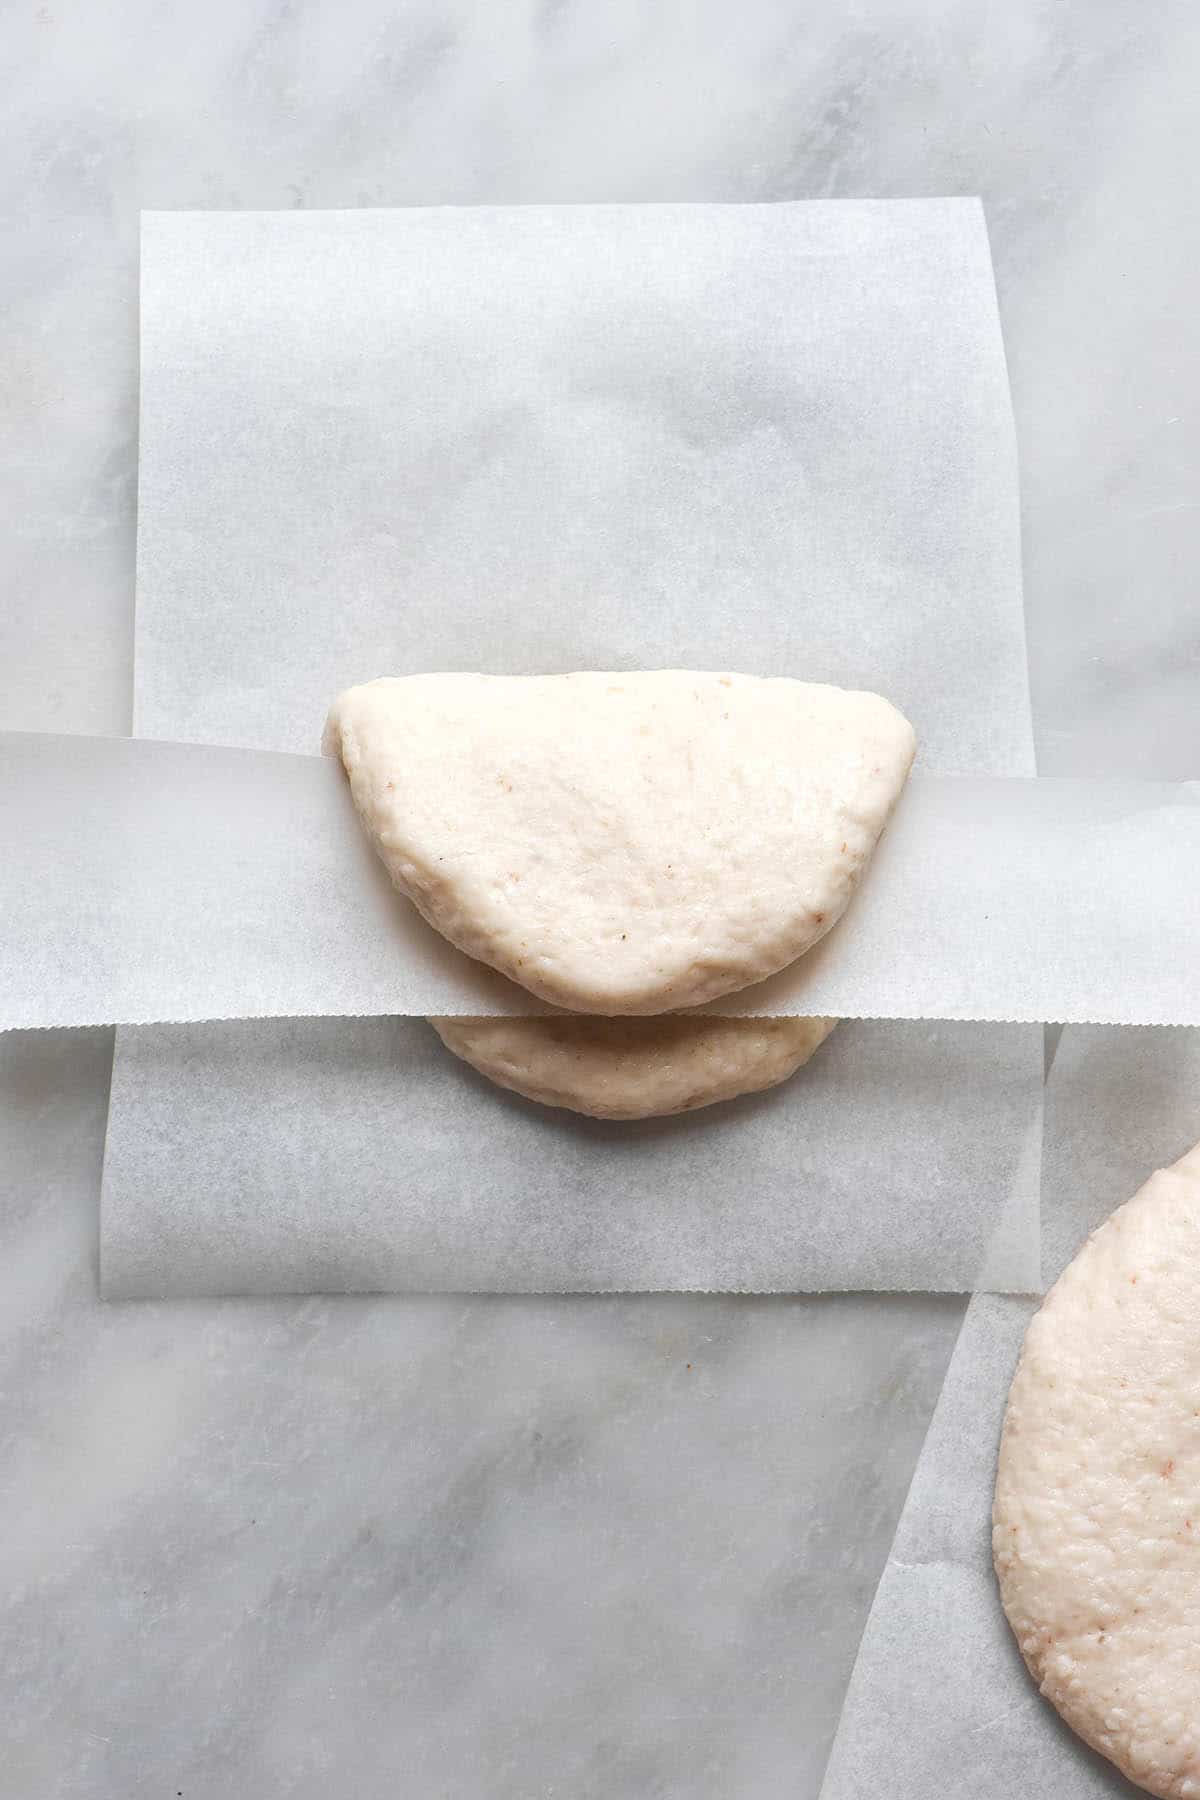
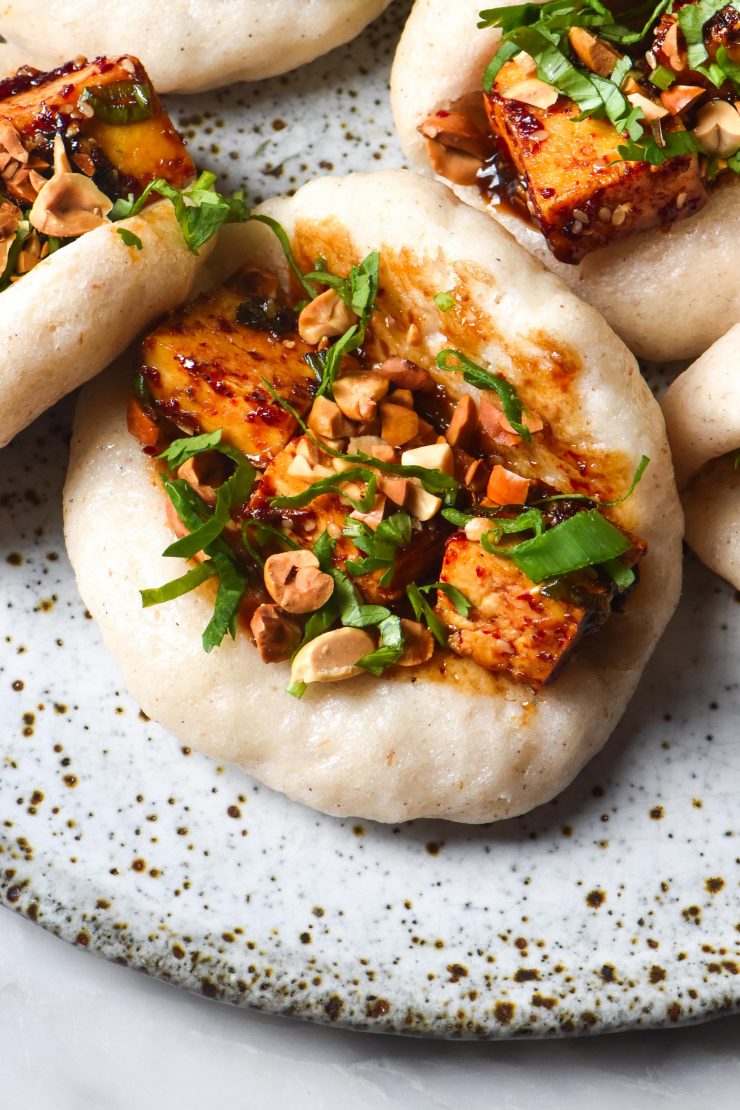
Shaping the bao themselves is easy. Simply divide the dough into 7 or 8 and roll each piece into a smooth, round ball with no lumpy edges or cracks. Use tapioca flour if need be.
Next, press the dough out into an oval shape, about the size of your palm (or a bit smaller). Place your baking paper slip across one half of the bao, on a short side of the oval. Fold the other half up over to create your bao (think of a taco shape). Place the bao on it’s sheet of baking paper and repeat with the remaining dough.
Tips for cooking your gluten free bao buns
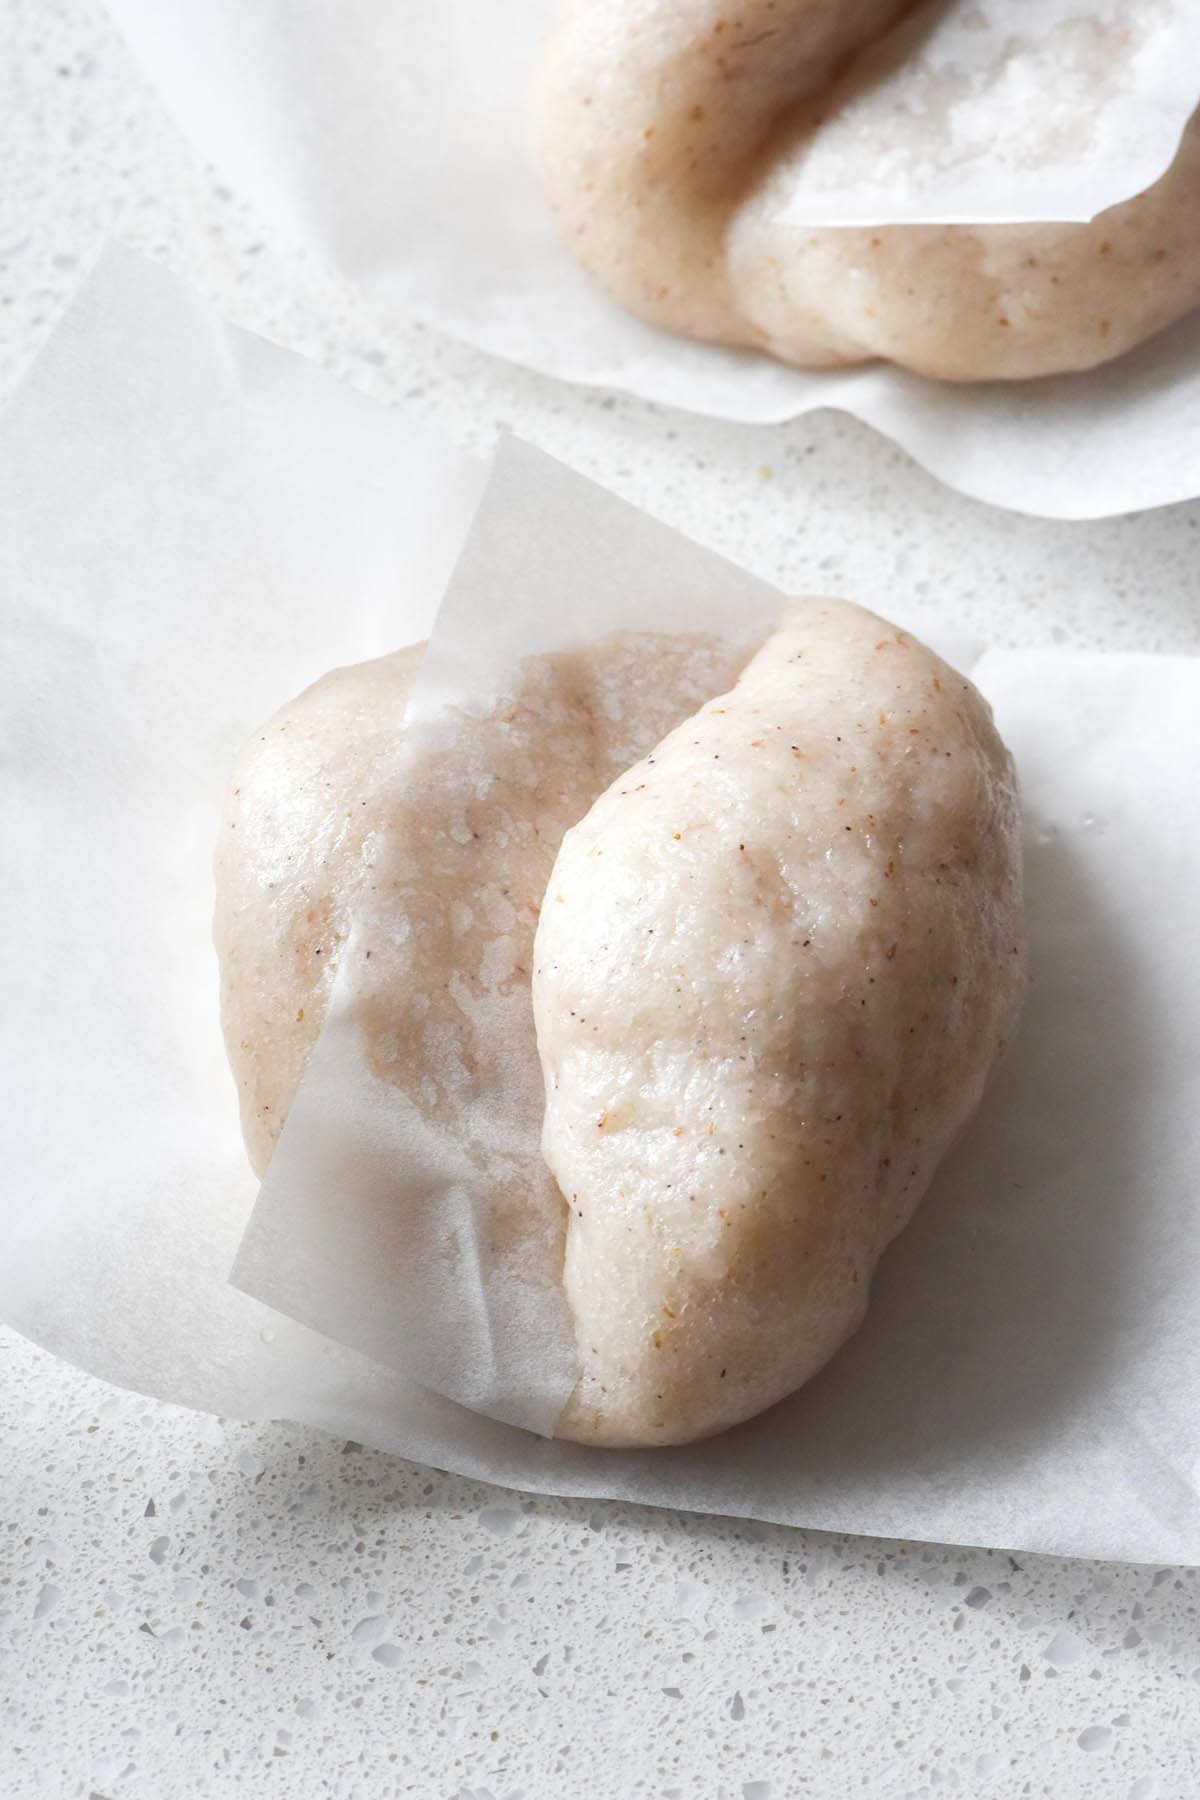
The cooking time for bao buns will vary based on how thick you made them, how high the heat is and what method of steaming you are using. With that in mind, I wanted to include the below photos so that you know what visual cues you’re looking for.
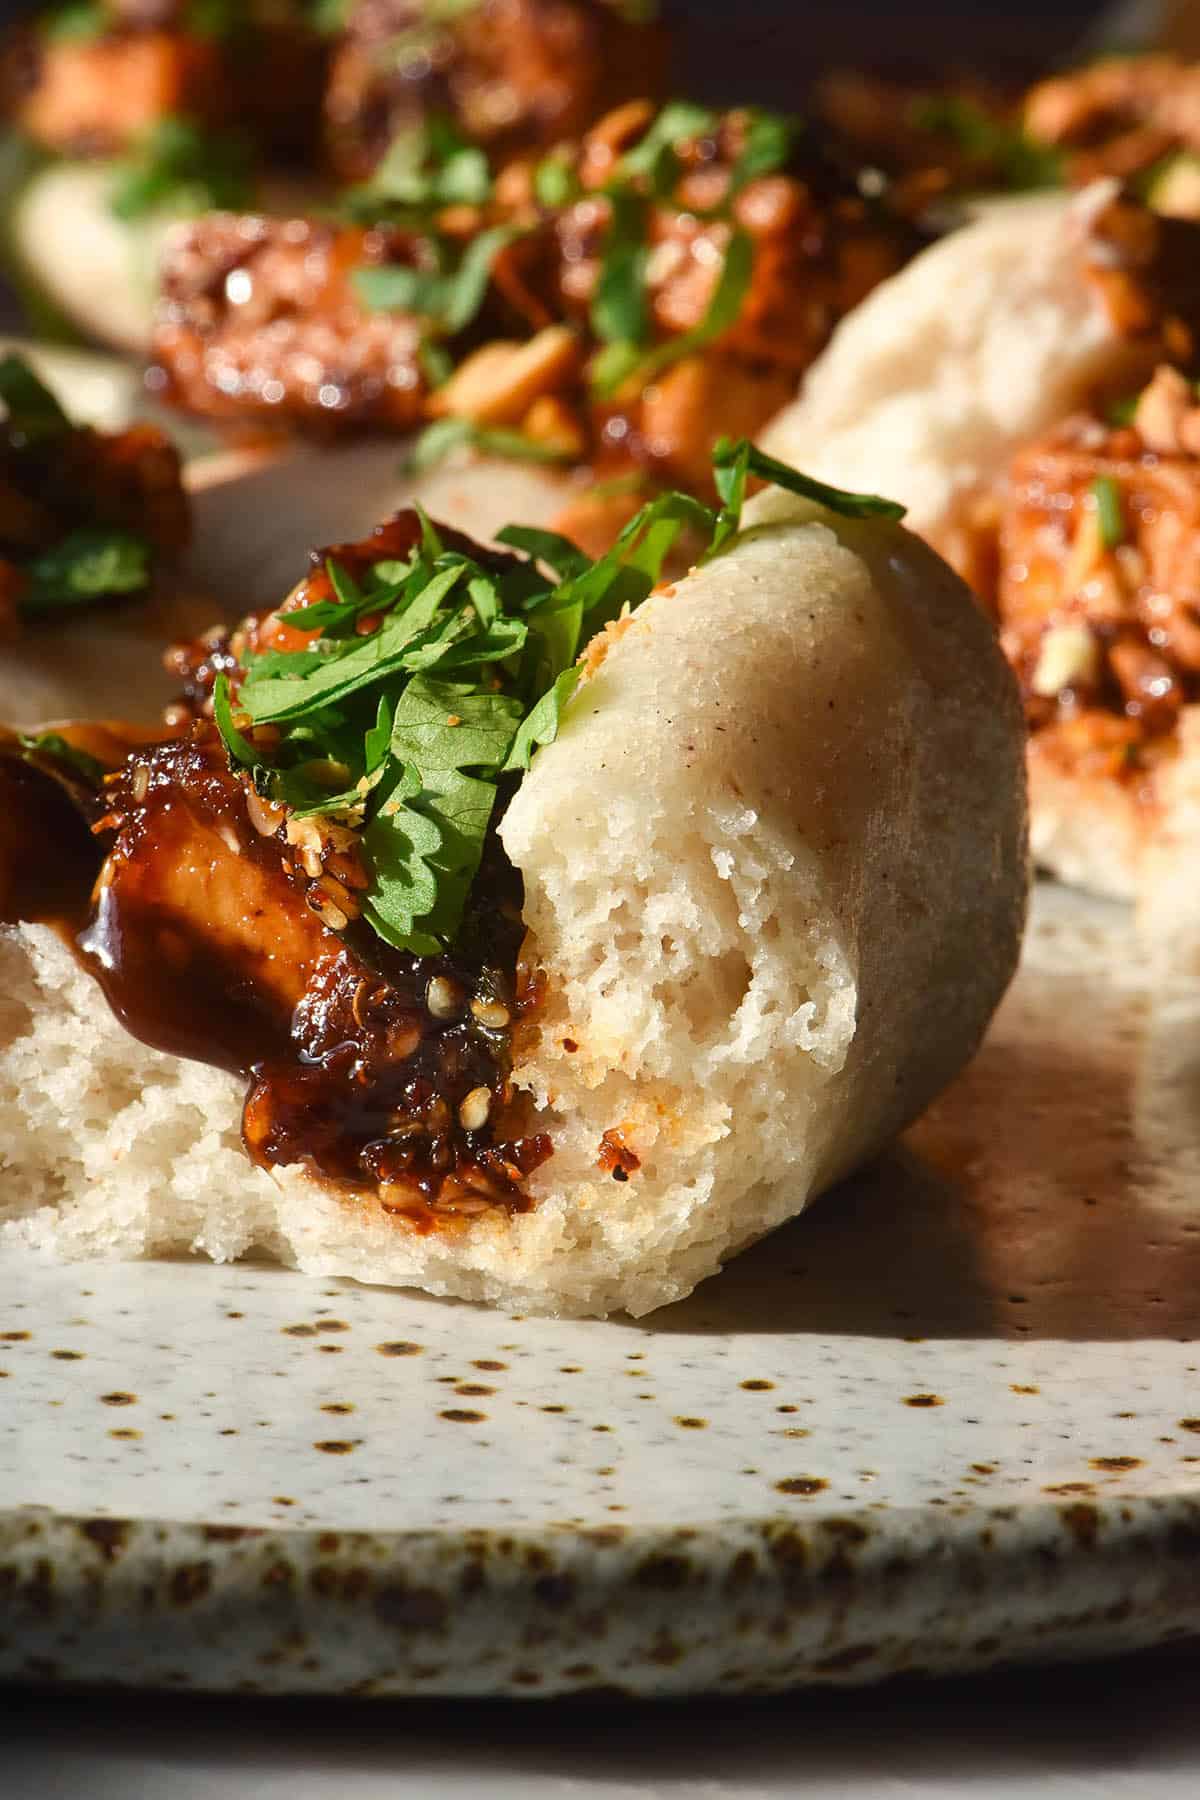
Bao buns that remain uncooked will have a white and pasty matte look. If they are really undercooked, the dough might stick to your finger if you touch one. See the below: this picture was taken after 15 minutes of steaming.
Can I freeze these gluten free bao buns?
I have successfully frozen and defrosted cooked bao buns. They’re best reheated in a microwave or back in the steamer basket over a very gentle heat.
I haven’t tested and probably don’t recommend freezing raw dough. If you end up with more buns than you need, simply cook them all and freeze the leftovers.
What did you serve with these bao buns?
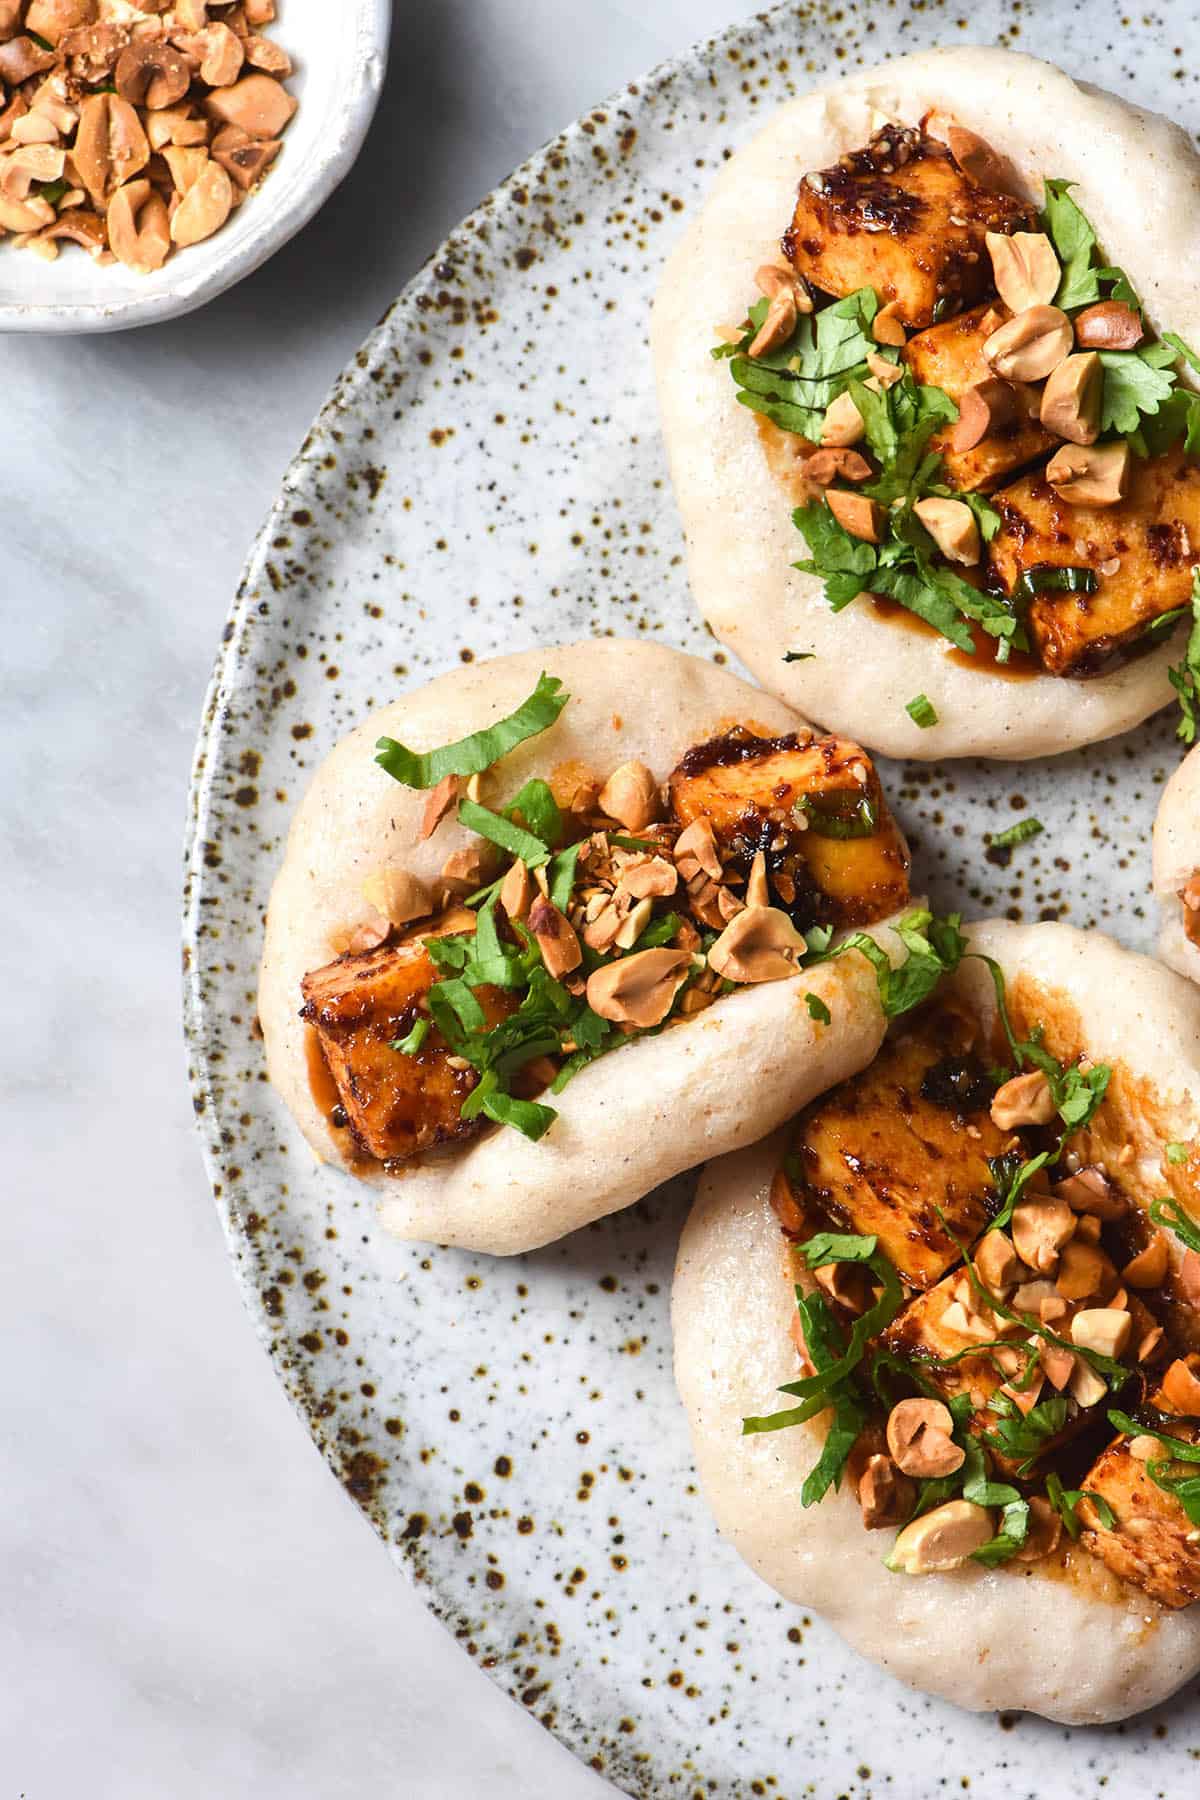
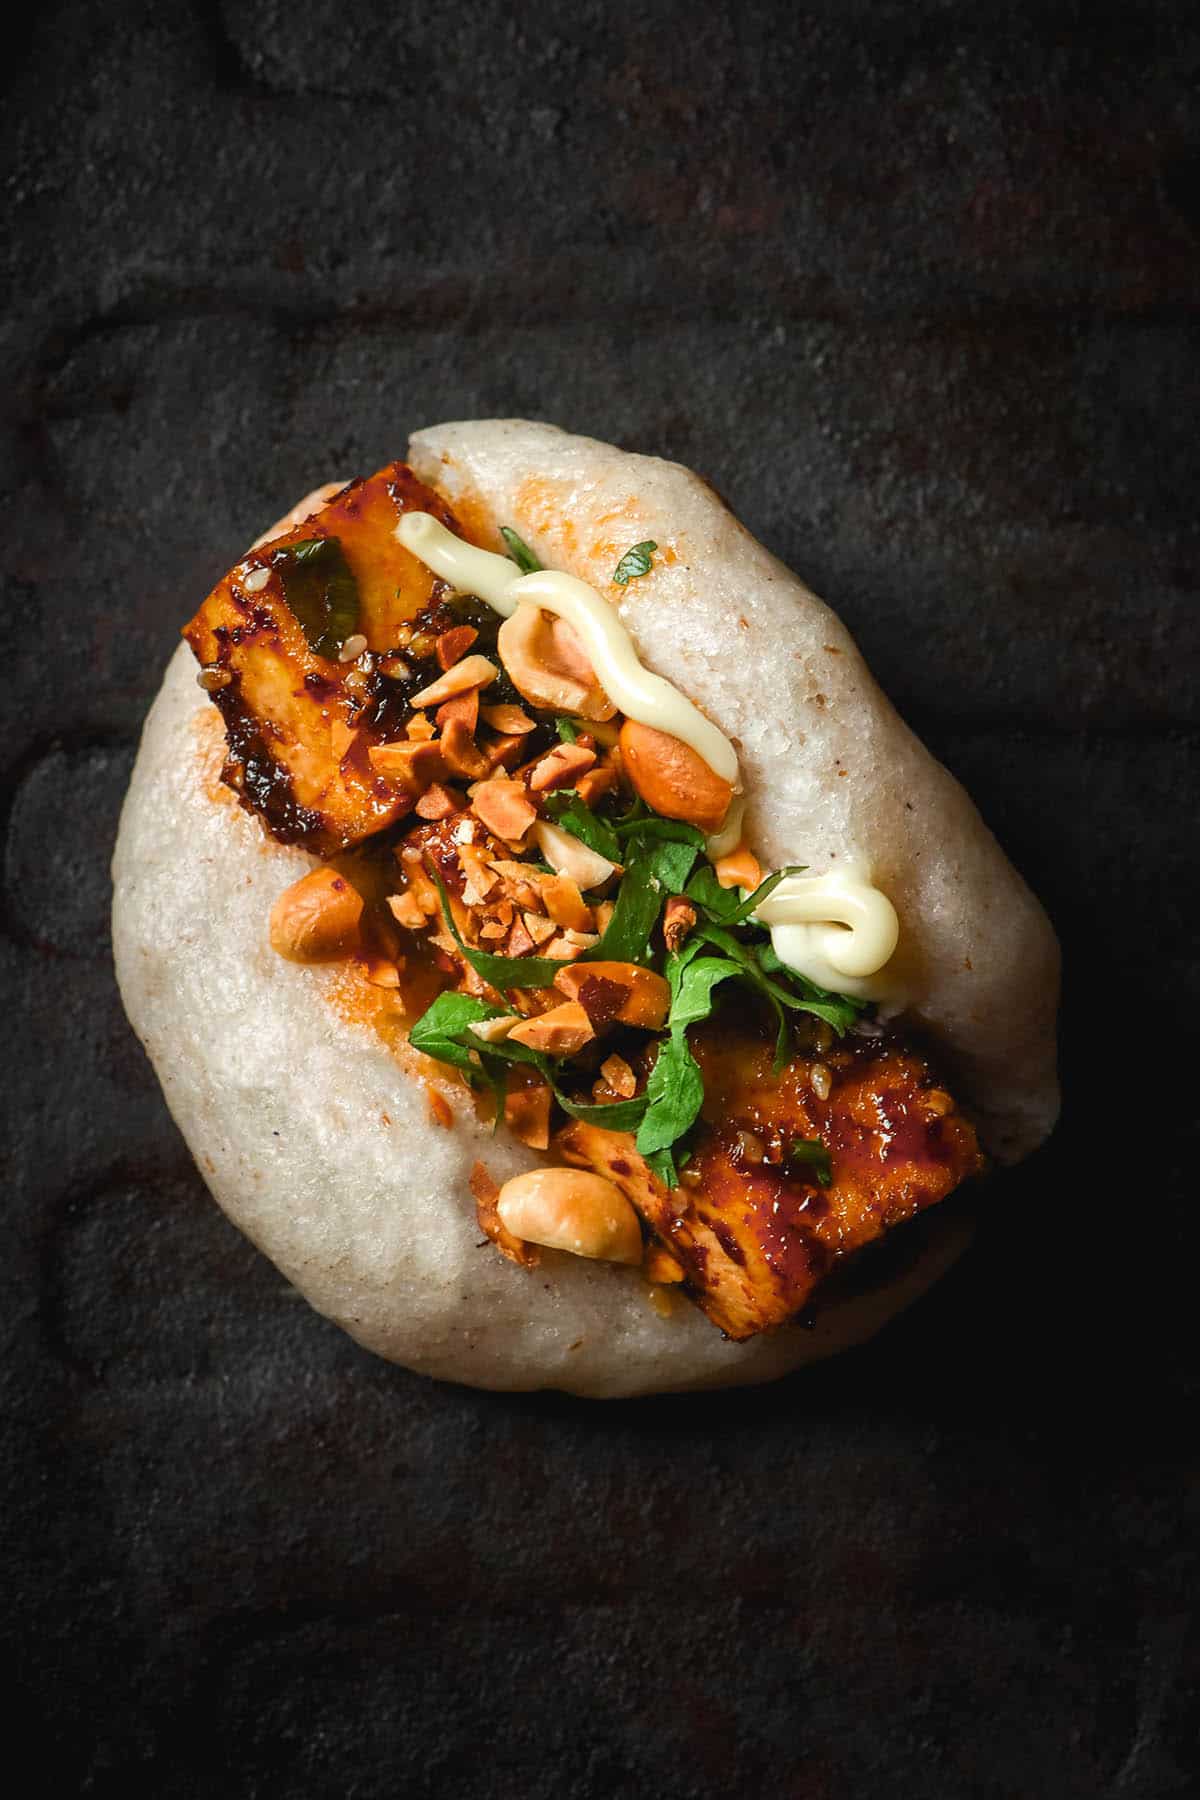
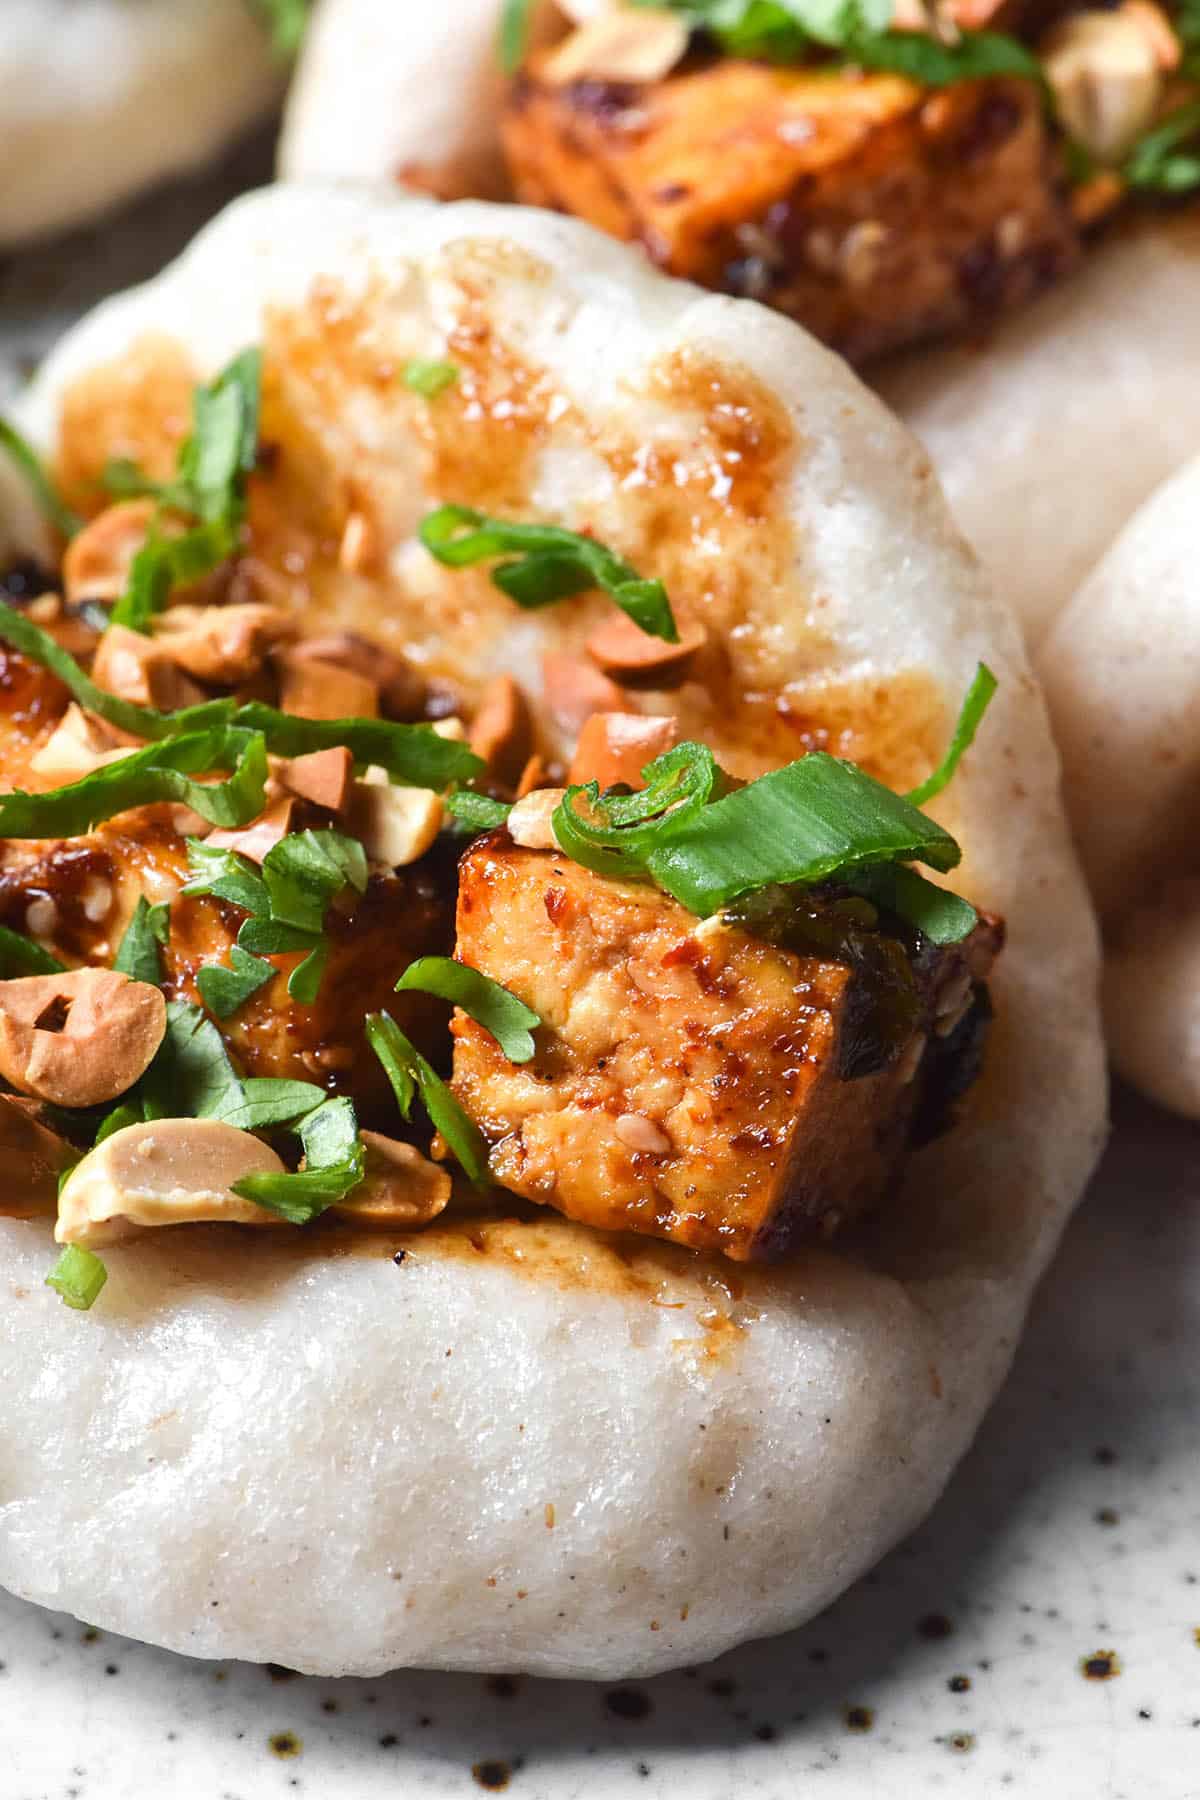
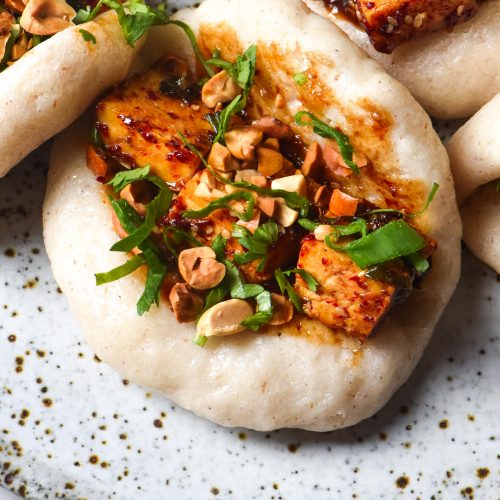
I didn’t want to include another recipe here as I think the bao bun needs to be the focus. It’s a long enough recipe as it is! I used my low FODMAP chilli oil tofu, kewpie, hoisin sauce (which is low FODMAP in 20g/1 tablespoon serves) coriander, peanuts and cucumber. I will absolutely develop a vegetarian bao filling recipe, but this is what I used in the meantime.
More gluten free recipes
- Gluten free dumpling wrappers
- Low FODMAP, gluten free Varenyky (Ukrainian dumplings)
- Gluten free empanadas from Intolerance Friendly Kitchen
- Gluten free pierogi
Gluten free bao buns
Ingredients
- 160 g (1 cup)* white rice flour
- 60 g (1/2 cup)* tapioca flour (or 30g tapioca flour and 30g glutinous rice flour)
- 25 g white sugar
- 7.5 g psyllium husk powder
- 4 g baking powder
- 3.5 g half sachet instant yeast
- 40 ml (2 tablespoons)* vegetable oil
- 125 ml (1/2 cup)* hot milk of choice (I used full cream regular milk)
- 125 ml (1/2 cup)* water
Instructions
- Whisk together the dry ingredients in a medium non-reactive (glass or plastic) bowl. Add the wet ingredients and whisk until a smooth batter forms. It will be thin but don’t panic! The psyllium husk powder will absorb the excess liquid as it proofs.
- Set aside for one hour or until the dough is puffy and able to be picked up and moulded into a ball.
- While you’re waiting, cut 8 square pieces of baking paper out. They need to be big enough to hold each bao without it spilling off the paper. Cut 8 smaller strips to wedge in the bao as it steams to prevent it from fusing shut (see pictures above).
- Take a large pot and fill the base of it with water. Place a steel colander over the water, ensuring the water doesn’t touch the colander. Have the lid ready to pop on top. Obviously, if you have a steamer basket or a preferred way of steaming, you’re welcome to use that. Set aside.
- When the dough is ready and proofed, sprinkle it with tapioca flour to enable easy shaping. How much depends on how wet your dough is, but try to use as little as possible so the bao don’t become dry.
- Divide the dough into 8 even sized balls. Roll the first ball of dough in your hands until it is smooth, round and crack free. Gently press the ball out into a flat circle/slight oval. The bao will puff up considerably as it steams, so make the dough circle thinner than you want your bao to end up. I recommend under 1cm thick.
- Place the dough onto one of the pieces of baking paper, then place the smaller strip across one half of the dough. Fold the other side of the dough up over the paper to create the bao shape (imagine a taco shell). The sheet of paper will help stop the bao fusing together as it cooks. Repeat with the remaining bao.
- Place as many bao as will comfortably fit inside your steamer basket without touching. I have to cook mine in two batches. Try to place them in such a way as to allow the open seam to face upwards (like a taco). This will make them a little easier to fill.
- Steam for 10-15 minutes or until they are slightly translucent but soft. See pictures above for a visual guide on when they are ready.
- Repeat with the remaining bao and stuff with the filling of your choice before serving. Leftovers can be stored in an airtight container and frozen then defrosted.
Notes
- Cooking time might vary depending on the heat you’re cooking at and the steamer vessel you’re using. Take the cooking time with a grain of salt and watch the dough to see when it becomes shiny and translucent (see photos in the body of the post.
- Read the body of the post for tips and substitutions.
Awesome recipe. So I used this recipe to make beef dumplings with left over pulled roast beef. Went great with barbeque sauce or sweet soy sauce. Thank you. This recipe is a keeper.
Thank you for this recipe! It looks delicious.
Why do you mention the non use of xantham gum. Is this ingrediënt someone should avoid?
Hi MJ! Absolutely no need to avoid it if it agrees with you but some people with digestive challenges find it gives them issues.
Most gluten free recipes contain it which is why I specify where mine don’t use it. It just makes it easier for people who need to avoid it to find the recipes 🙂
Amazing! They worked perfectly! So thrilled with how they turned out- I haven’t had Bao in so long!
I’m so glad you enjoyed them Fiona! 🙂
Absolutely delicious!!! Made it 5 times already and it was a hit every single time. Thank you very much for developing this recipe!!! My 8 year old twins loved them as well!!
So glad you all enjoyed them Natalia! 🙂
Was looking for a great Baozi recipe for Mom and stumbled upon this one. It is perfect. Rolled them out into rounds and put them in a muffin tin, stuffed them, folded the edges, and steamed them. Mom is addicted, thank you so much for this recipe!
I am so happy you and your Mum enjoyed them Lorne! Thank you for the lovely feedback and the clever tip about using the muffin tin 🙂
hi! so excited to try these for my Mums birthday, thankyou. I was just wondering if I can make the dough up the night before and leave in fridge overnight then steam in the morning? thankyou so much for such a great recipe ????
Hi Allara!
I wouldn’t recommend making the dough the night before. Because it is quite high in starch based flours (which are easy food for the yeast) it tends to get that alcohol over-proof taste when you leave the dough for too long.
I recommend making it just when you need it for best results 🙂
This is the best dough I’ve made gluten free that had no hiccups first time round. Perfect taste, texture, direction and explanation. Such a quick recipe to whip up as long as you prepare ahead but not a lot of technique required! You’ve restored my faith in gluten free dough work!
They turned out good. Although my dough was very wet. I had to use a bit of flour to mould them. For some reason they had a light purple colour ? Is that maybe the psyllium husk?
Delicious none the less.
Hi AJ! Glad you enjoyed the recipe 🙂
If your dough was very wet then your rice flour is probably less absorbent than the brands I tried. If you make them again with the same flour, add a little less liquid to suit.
Yes, the purple colour comes from the psyllium husk powder. Really hard to tell which brand will turn things purple and which won’t (annoying!)
Not sure where you are based but if you live in Australia I have been having luck with BonVit brand at the moment. I used to like Coles but then it started turning things grey
I made these tonight and they came out great! Thanks for an amazing recipe! Unfortunately I never ate a bao before going GF so I can’t compare… But I enjoyed these a lot – regardless – so that’s a win in my book!
BTW I used ultrafine sorghum flour bc I was out of rice and they were great!
This looks so good! What could I replace psyllium husk with though? I don’t have that on hand :-/
Nothing I have tested unfortunately! They need the psyllium to hold everything together and hold the liquid in.
You’re welcome to experiment but I can’t offer any advice on that front, psyllium is my go-to gf binder so I don’t have much experience with others 🙂
These Bao buns would have you saying OH MY GOD in the best way possible. They were fantastic to the point where even my non-gf friends were impressed with the texture and the flavour. Bravo!
Whole family loved them! Coeliac and non-coeliac. So happy I came across your Bao Bun recipe. Will definitely try some more of your recipes. Thank you for the fabulous recipe!
I’m so glad you all enjoyed them Niome 🙂
They turned out absolutely delicious, surpassing my expectations! Inspired by my own gluten-free journey, I decided to give those Buns a try and was thrilled with the results.
So glad you enjoyed them Caroline 🙂