I have been trying to get more fibre into my diet as of late. I love eating toast in the morning (specifically, my gluten free buckwheat bread) so I figured; why not make seeded buckwheat bread?
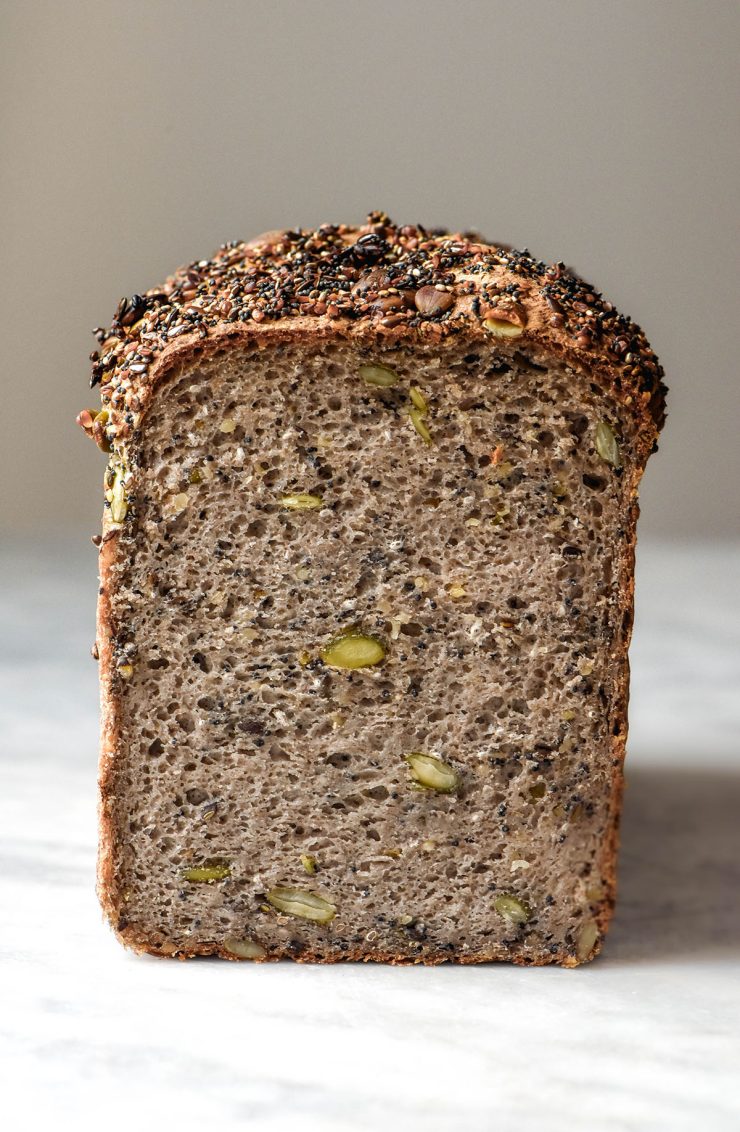
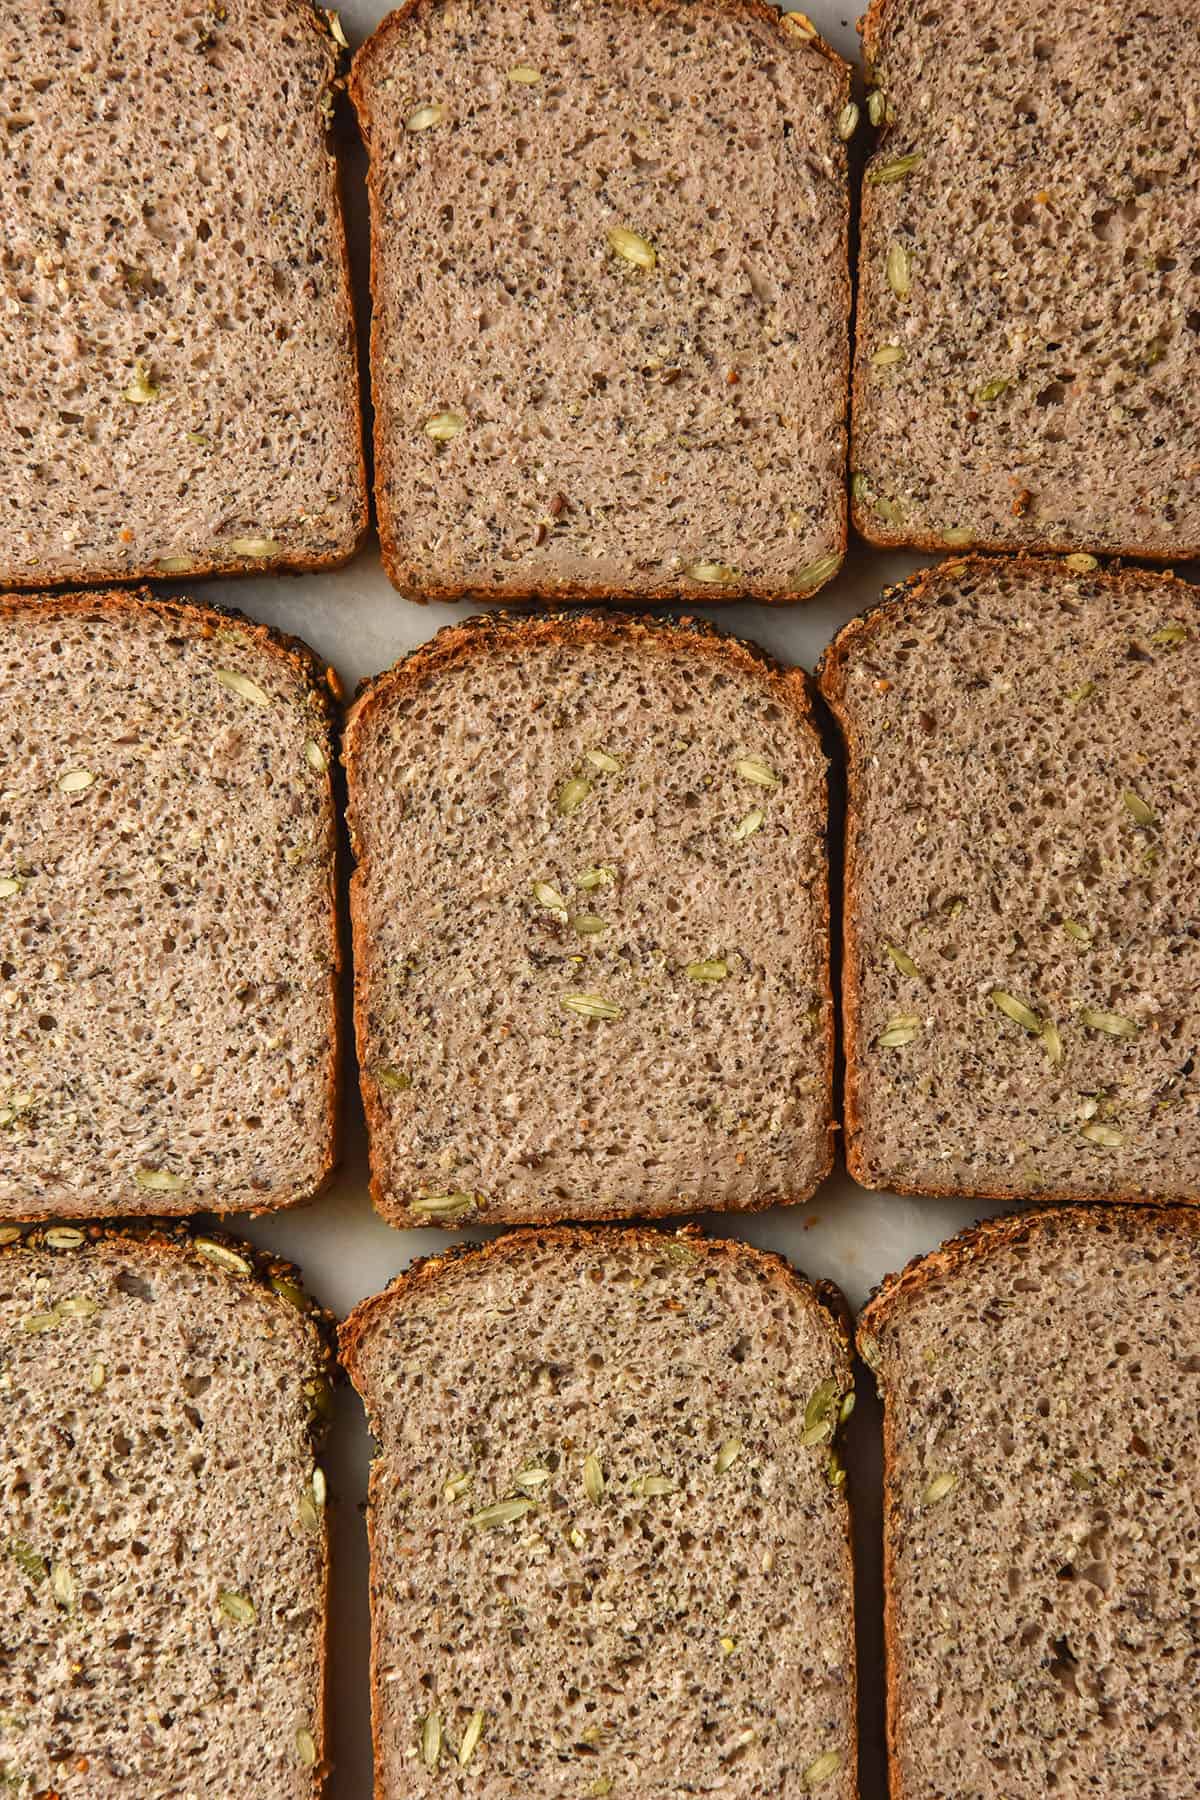
Seeded buckwheat bread
This easy gluten free buckwheat bread is a close relative to my original buckwheat bread recipe. It uses a majority buckwheat flour with a small amount of tapioca or cassava flour for a chewy crumb. A tablespoon of oil helps add crumb texture, too.
The loaf is bound with psyllium husk powder and plenty of water. It is risen with instant yeast, which gets a bit of a boost from a tablespoon of maple syrup.
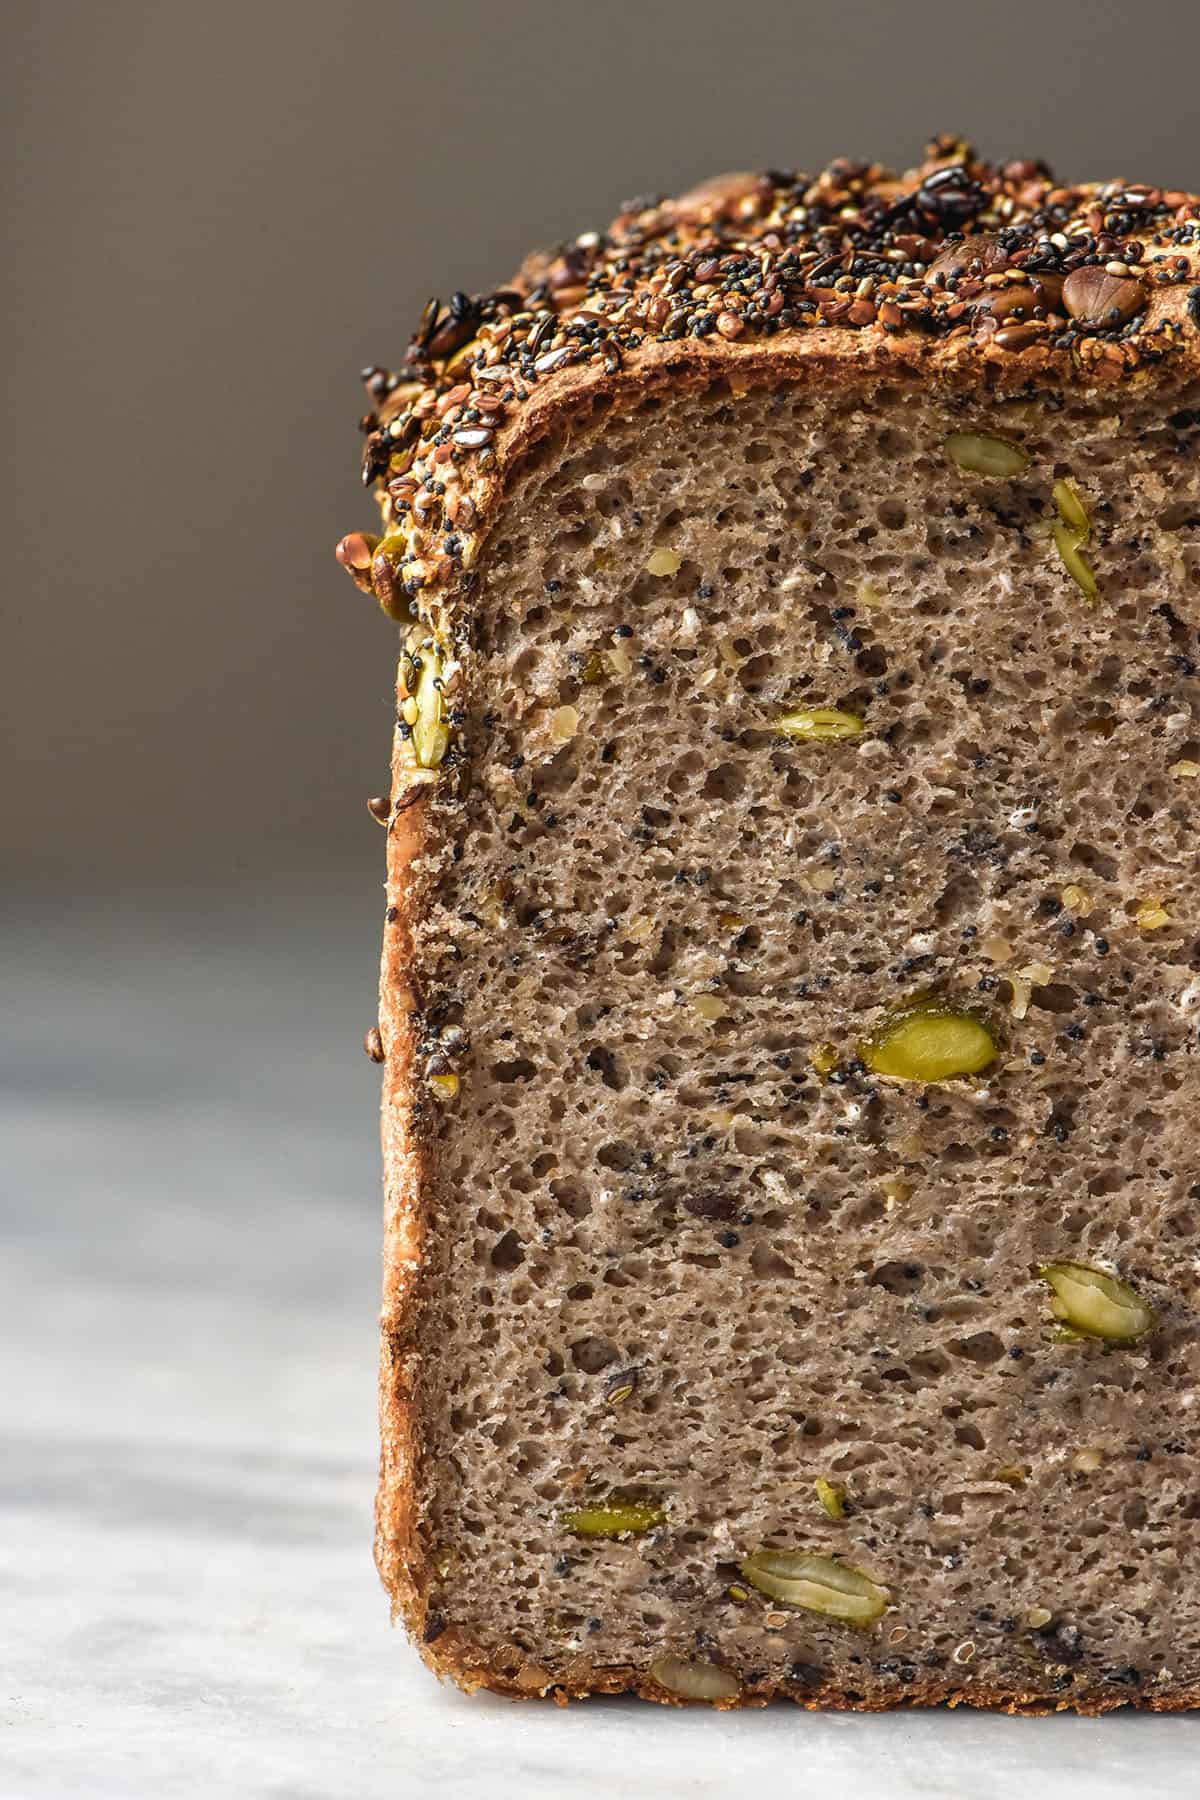
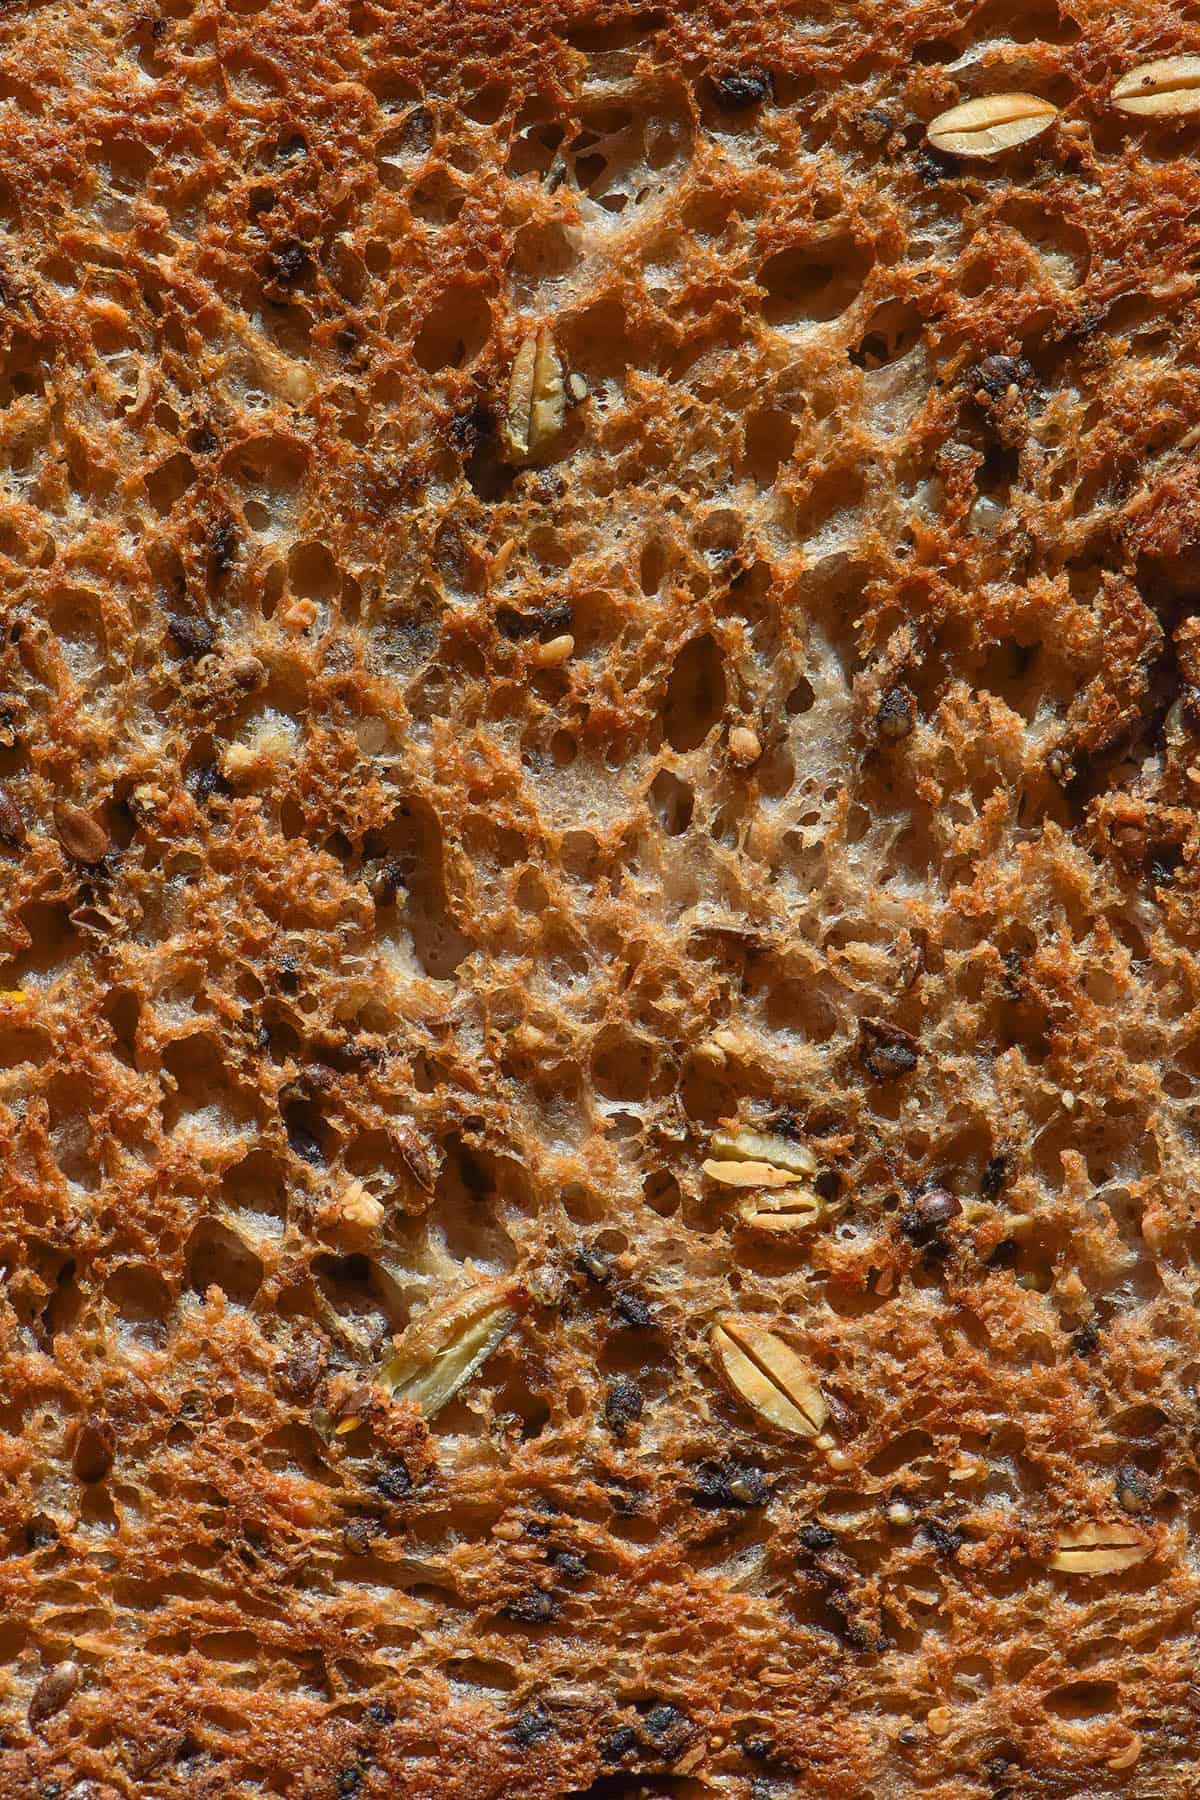
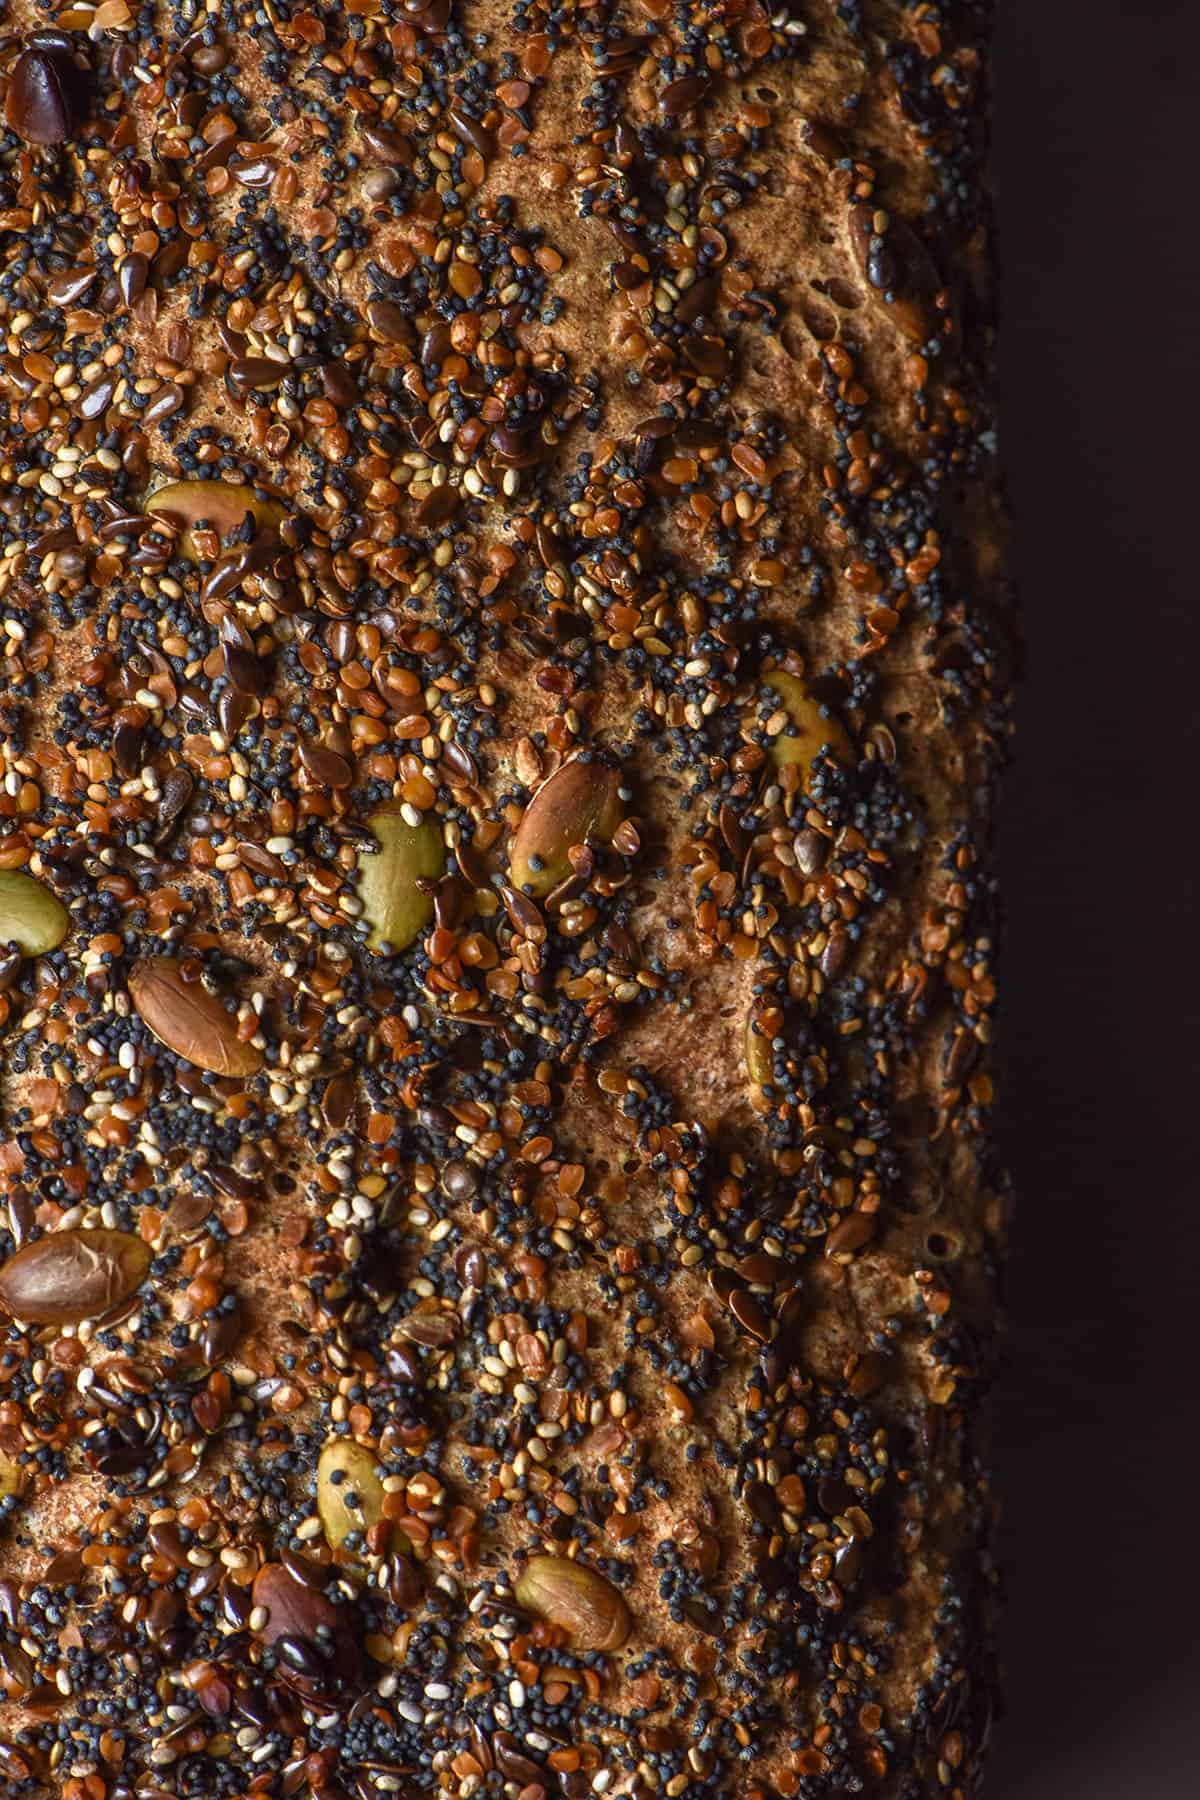
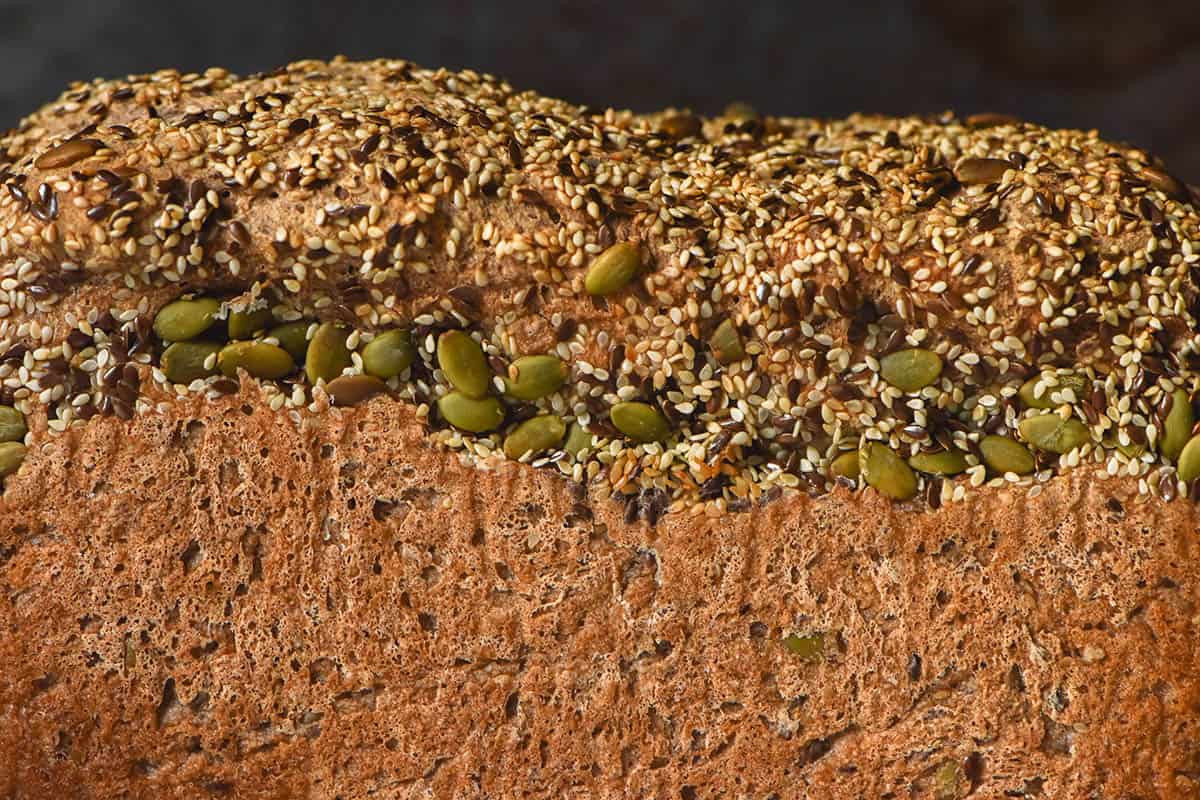
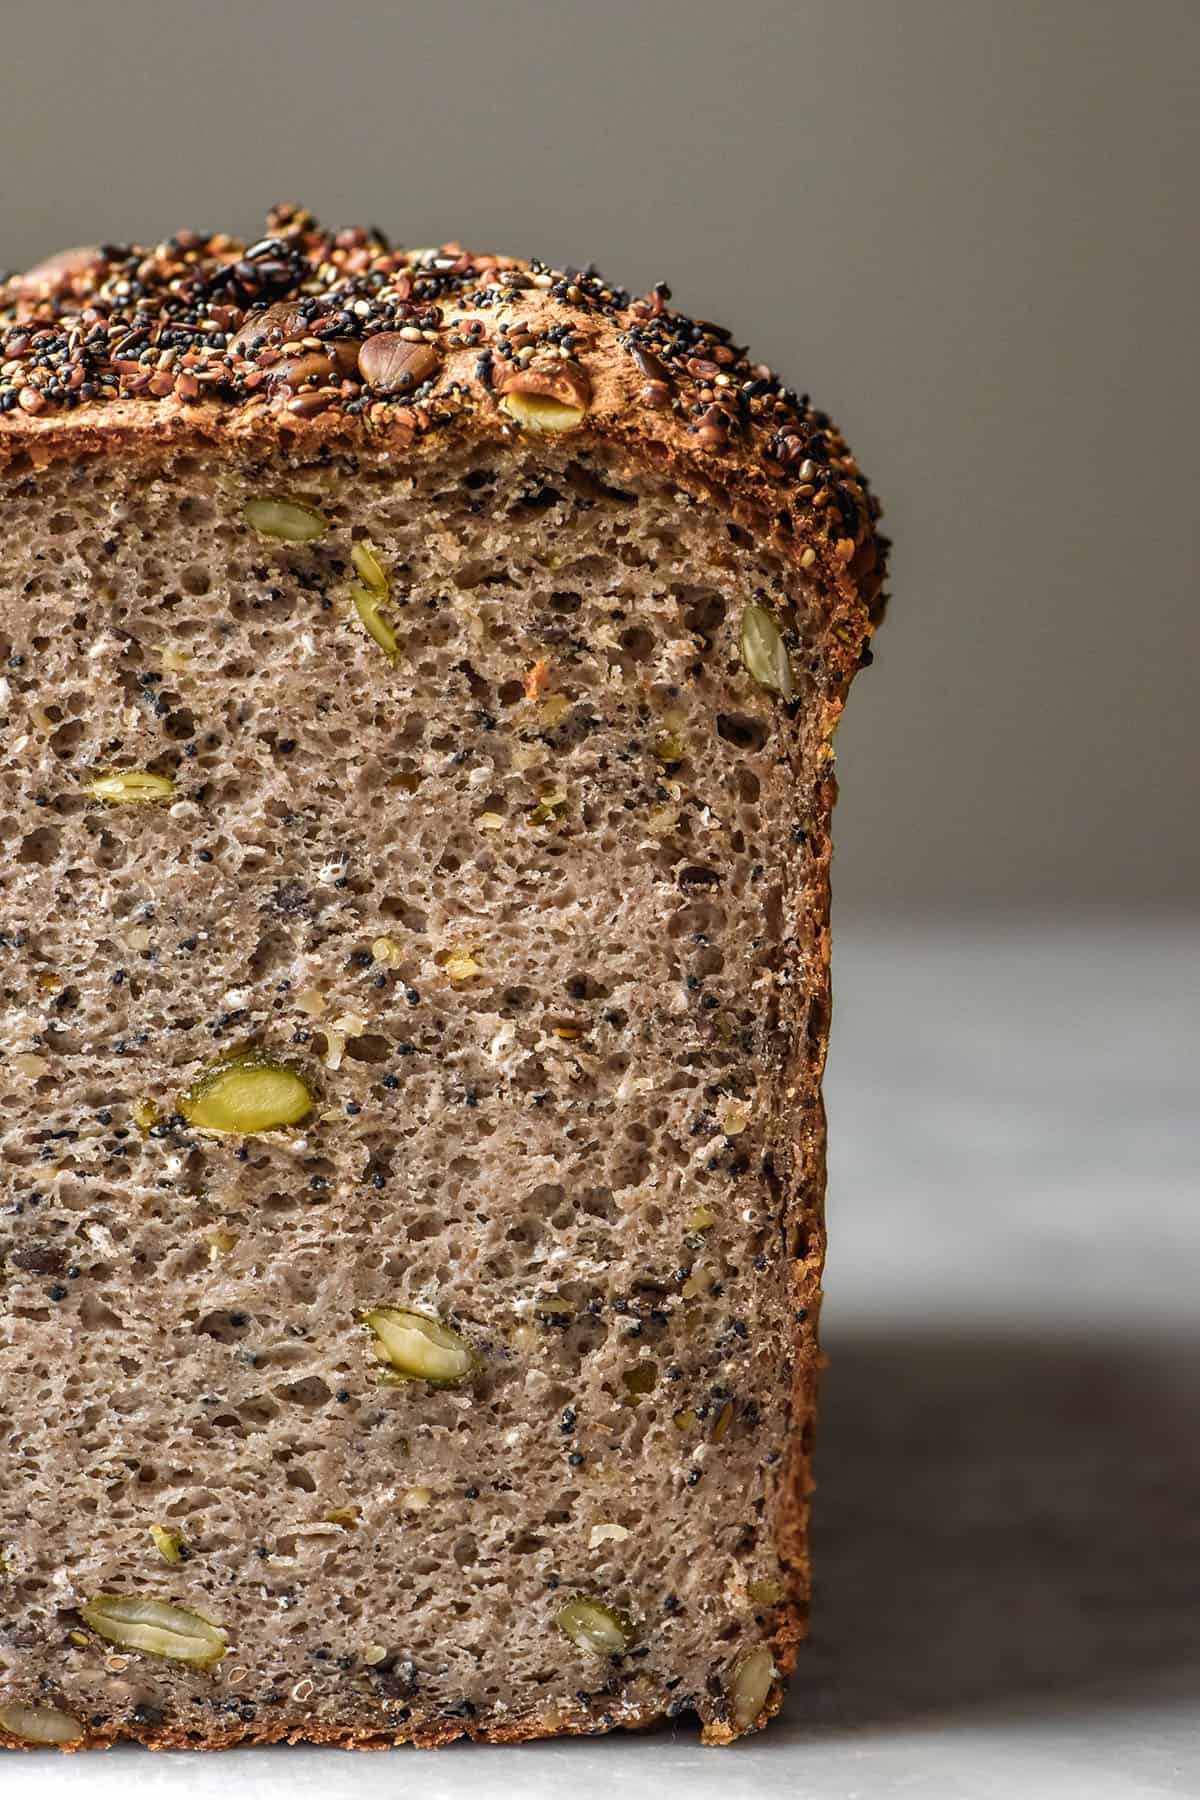
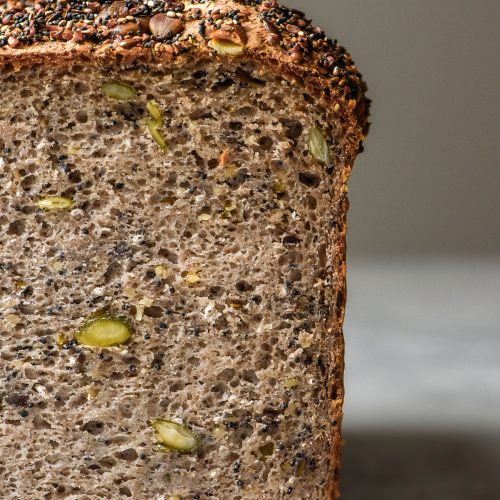
Finally, the seeds! This seeded bread contains 150-200g seeds of your choice. I like to use a mix of different seeds for colour, texture, interest and nutrition. Most of the seeds are added to the dough itself, while the rest adorn the top and create a deliciously crunchy crumb.
That’s all there is to it! A simple and beautiful loaf that is packed full of seeds and absolutely delicious.
Ingredient notes
This recipe uses light buckwheat flour and tapioca flour as the flour mix. I haven’t tested dark buckwheat flour in this recipe, but I have tested it in my original gluten free buckwheat bread. I found it lacked a bit of elasticity when compared to light buckwheat flour, which can make it harder to slice. Personally, I think that with all the seeds in this recipe, you might struggle to get clean slices if you use dark buckwheat flour.
I have also tested cassava flour in place of tapioca flour in my original buckwheat bread recipe.
Psyllium husk powder is integral for holding this loaf together and allowing it to absorb sufficient water. I buy psyllium husk flakes at the supermarket and grind them to a powder myself using a spice grinder. Store bought psyllium husk powder always goes grey on me when baked. Plus, I find it clumps together and leaves unpleasant little beads of psyllium husk in the baked product.
Unfortunately, there is no substitute for instant yeast in this recipe as of yet. I do have a yeast free buckwheat bread recipe in Intolerance Friendly Kitchen, and a yeast free buckwheat bread recipe here.
You can use any sort of oil and any liquid sweetener. The oil adds a bit of elasticity and flavour to the crumb. The sweetener gives the yeast a bit of a boost as well as aiding in flavour and browning.
Which seeds can I use?
Any! Personally, I love using hemp seeds and sesame seeds no matter the loaf. I love that hemp seeds boost the protein content and toasted sesame seeds just taste unreal.
If you are new to making gluten free bread and are worried you might have added too much liquid to the dough, I recommend adding some chia seeds or flaxseeds. Both of these soak up liquid which make them a great fallback for an overly hydrated loaf.
You can use 100-200g seeds of any mix and any combination. You can also leave the seeds out entirely for a slightly taller version of my buckwheat bread recipe. Really, anything goes. However, I do recommend capping chia seeds and flaxseeds to 50g max (not 50g for each variety). This is because they soak up water and might affect the final texture of the loaf.
I recommend all but 1-2 tablespoons of the seeds in the loaf. After wetting the top, sprinkle the remaining seeds over the loaf prior to proofing.
Generally speaking, you will lose lots of seeds when you put them on top of a loaf. It’s just the nature of a seeded loaf. This is why I suggest using most of them in the loaf itself. The toasted seeds on top add loads of flavour, but more isn’t better in this case.
Another option is to sprinkle some seeds in the base of the tin prior to baking (as I do with my gluten free seeded loaf). This will add a nice crunch on the base. Bonus? Because they’re squashed down as the loaf bakes, they will be very well adhered to the loaf.
Can I use a silicon loaf pan?
No. You cannot use a silicon loaf pan or even a steel cake pan to make gluten free bread. This is because the dough needs to be held in and supported to rise upwards. Gluten free dough can’t hold itself together (relatable) without the strength that comes from gluten. If you put it in a large tin, it will spread.
I use a USA Pullman pan size small (23cm length X 10cm width X 10cm height or 9 X 4 X 4 inches). This is the pan I use for all my gluten free bread recipes and I think it is the perfect size for gluten free loaves. If you use a different bread pan, you might not get the result you want. Note: this is not sponsored and I have no affiliation with the brand. It is simply the best tin for the job.
Proofing notes
I find that gluten free yeasted bread recipes almost always benefit from two rises. The first in the bowl and the second in the Pullman pan.
Another thing I have noticed when working with seeds is that adding them after the first proof seems to help with the crumb structure. Loaves that have had the seeds added before the first proof seem to be slightly more dense than loaves where the seeds were added after.
As we have discussed many times, proofing is highly dependent on the environment you’re baking in. Yeast proofs faster in hot or humid climates and slower in cool climates. Watch the bread closely to ensure it proofs properly. When fully proofed, it should dome over the top of the tin.
Another thing to keep in mind is the hydration. This loaf is quite high hydration so it shouldn’t be an issue, but yeast cannot proof in a dry environment. If your dough is dry before adding the seeds, your bread will not rise as expected.
Troubleshooting
Let’s do some quick fire trouble shooting:
- My bread is too wet? – Add less water next time. Every bag of flour will have a different absorbency level and what works for me might not work for you. You can help counter this by adding 50g of chia seeds and flaxseeds to the seed mix, as they will address any mild over hydration issues.
- My bread is too moist? Make sure you leave the bread to cool 100% before cutting. Damp feeling slices are often just slices that have been cut before the loaf cools and sets. Keep in mind, though, that gluten free bread is necessarily more moist than regular bread.
- My bread never proofed? This is an issue with your yeast, the temperature of your kitchen, how much liquid you added and/or your patience. A warm kitchen and well hydrated loaf should proof with ease. Proofing takes how long it takes, so don’t rush it. Sometimes my bread takes 90 minutes in the tin instead of 60 minutes. Observe the loaf and act accordingly.
- My seeds fell off? As we discussed, this is bound to happen. It is the nature of a seeded loaf. If you want to minimise seed loss, put all but 1-2 tablespoons of seeds in the dough itself.
More gluten free bread recipes
- Gluten free seeded loaf
- Gluten free focaccia
- Grain free vegan bread (nut free)
- Gluten free teff bread
- Gluten free quinoa bread
Seeded buckwheat bread
Equipment
- small USA pan steel Pullman pan – 23cm length X 10cm width X 10cm height (9 X 4 X 4 inches)
Ingredients
For the bread:
- 500 g light buckwheat flour
- 100 g tapioca flour or cassava flour
- 10-12 g fine salt
- 25 g psyllium husk powder see notes
- 7.5 g instant yeast
- 20 ml (1 tablespoon)* maple syrup or other liquid sugar
- 20 ml (1 tablespoon)* oil of choice
- 750-800 g water
For the seed mixture:
- 150-200 g seeds of choice maximum total 50g of chia seeds and/or flaxseeds as they absorb liquid and may alter the texture of the loaf (see notes for combination suggestions)
Instructions
To make the dough:
- Add the dry ingredients for the bread into a large non reactive mixing bowl (glass or plastic). Whisk to combine, then whisk in the wet ingredients. Ensure all of the flour is incorporated into the mixture from the sides and bottom of the bowl. Your dough should be the consistency of a thicker cake batter. If you lift up your whisk, the dough should fall off in ribbons of medium thickness.
- Cover the bowl and set to proof for one hour in a warm place with no draught.
- While you are waiting for the bread to proof, combine your seed mixture in a small bowl. Grease and line your 23cm length X 10cm width X 10cm height (9 X 4 X 4 inches) steel Pullman pan. Arrange your oven so there is plenty of space for a loaf – I normally take my top rack out.
To assemble:
- After the loaf has proofed, it should have a flat top in the bowl. If you run a spoon through the mixture, there should be air bubbles and signs of proofing. It should also smell nice and yeasty.
- Pour all but 1-2 tablespoons of the seed mixture into the dough. Use a spoon or your hand to thoroughly incorporate the seeds into the dough, distributing them evenly.
- Decant the dough into the greased and lined pan and use a wet hand to smooth the top of the bread down. Sprinkle over the remaining seeds and spritz the top with a bit more water to encourage the seeds to stick.
- Cover the loaf in an airtight manner without touching it. I use an inverted plastic produce bag which sits snugly around the Pullman pan but gives the loaf space to rise.
- Set the bread in a warm spot to proof for 1 hour or until the bread domes over the top of the Pullman pan by about ½ – 1 centimetre.
To bake:
- About 30 minutes before your loaf finishes proofing, preheat your oven to 220C/430F.
- When the loaf is fully proofed, place it on a sturdy oven tray to catch any seeds and pop it into the oven for 20 minutes.
- Turn the heat down to 180C/356F and bake for an additional 20-30 minutes or until the top is golden brown and sounds hollow if you tap it.
- Remove the bread from the oven and allow it to cool for 15-20 minutes before carefully removing from the pan. Allow the loaf to cool completely (ideally overnight) before slicing.
- Keep the slices in an airtight container in the fridge. You can also freeze slices (lay them on a baking tray so they don’t stick together) and toast them straight from frozen.
Notes
- I buy psyllium husk flakes and grind them to a powder using a spice grinder. I find store bought psyllium husk powder often turns my breads grey or purple. It also clumps up too easily for my liking.
- I have tested equal parts sesame seeds, hemp seeds, pepitas and a mix of flax and chia seeds in this loaf. I have also tested using some poppyseeds.
- Personally, I recommend using a maximum of 50g liquid absorbing seeds here (chia seeds and flaxseeds). Because they absorb liquid, using more may alter the texture of the loaf.
- Read the notes in the body of the post for tips, tricks and troubleshooting.
I’ve made this loaf a few times now and absolutely love it. However, I just have a few questions. I live in Australia and am using the Tandaco dried yeast, which says every sachet is 7g. Yet when I sprinkle it out on my scales it shows 10g. Your recipe calls for 7 1/2 g so it’s left me a little unsure. Today I have a loaf proving and I just put one sachet in and I’ll see how that goes.
Also I wonder how this dough would mix up in a Thermomix, maybe using the dough setting? Has anyone tried this and did it work ok?
Many thanks. Janet.
Hi Janet,
That is so interesting! I could have sworn on my life that Tandaco sachets used to be 7.5g because that’s what it is in all of my recipes. I do weigh sachets for half batches and when baking so I suppose they must have more per sachet than they specify.
A few grams of extra yeast shouldn’t be an issue unless you are in a super humid and hot climate. How did your loaf go?
I haven’t tested this in a thermomix but I think from memory some people have used bread makers so that might offer you some clues (I am not very familiar with thermomixes).
People have been very helpful in the comments offering their successes so you might find a hint or two in there 🙂
I have tried many gluten free loaves over the years without much success – until I tried this one! It was a big success. Thank you, for all the useful tips you give throughout your recipes – the one about sprinkling some seeds on the bottom to bake into the loaf was great and worked a treat. My tin was a different size to yours – just slightly bigger at 10 x 4 x 3″ – I thought I would still give it a go as my tin is totally non-stick and doesn’t even need baking paper – it just slips out, even without oiling so I wanted it to work, and it did! The only difference is that it didn’t rise over the top of the tin on the second rise, but that was ok as it makes a more square loaf that fits nicely into my toaster. I know I should have left it to go cold, but couldn’t resist and hubby and I had a slice while it was still a little bit warm. It was really nice. I sliced and froze it as you instructed (great tip!) and find one slice toasted with nut butter and sliced banana keeps me satisfied until lunchtime easily. The only thing I find is that it doesn’t brown like other toast does, but it’s still great. It was easy to make and this is going to be a regular in my house. Thanks so much for sharing your recipe.
I’ve made this bread twice now and I absolutely love it! I plan on making it my main bread if choice and will make it each week.
It works exactly as you’ve explained and is easy to do. I’m also trying a preferment in my next batch.
Thank you so much!
2nd time making this bread, love it so much…thank you for your amazing recipe…🌈🙏⭐️
I am so glad you enjoyed it Valerie! 🙂
Hi. I don’t have a Pullman pan, only a 10 x 4 x 3 loaf pan. (Stainless steel)Do you think that this bread might work using this one, at least not too bad? I don’t think I have the money to invest in a Pullman pan at this point.
Hi Alison! Unfortunately I have only ever tested my breads with the pan listed. You are welcome to try, but I can’t say for sure how it will work. My concern is that the volume of ‘dough’ will be too much for a shorter or smaller pan and that it will spill out as it rises. Using a lower hydration will give you a smaller loaf volume, but this will come at the expense of a nice open crumb
It sounds like this may be the same loaf tin that I have – and yes, it is slightly bigger than the Pullman, but it worked fine with this loaf for me. Only thing I noticed was that it didn’t rise over the top on the second rise, but it turned out as a square slice that fits nicely in my toaster. Hope this helps.
I love this recipe and have made it multiple times. I’ve also used the dough as pizza dough and it comes out really well. I find using honey instead of maple syrup provides the best flavor.
One thing I’ve found is the dough will not rise if using cassava flour. I’ve used Bob’s Red Mill Cassava Flour and something in it prevents the yeast from rising. Bob’s red mill tapioca flour seems to give the best effect. Perhaps something in the extraction process.
Re: the cassava flour – that’s interesting Rose! Do you find that the dough is very dry when using cassava flour?
In my experience some brands of cassava create a much drier dough as they are very absorbent. A super dry dough won’t wise as the yeast needs moisture to multiply. I wonder if this is the cause? It may well be something else, I just thought I’d mention it.
Either way, glad you love the recipe! 🙂 Amazing to know it works as a pizza base too, thank you!
Yes, cassava flour does seem to dry it out which is the problem. Perhaps another brand wouldn’t have the same effect. Thanks for sharing your experience!
Oh my word! Thank you so much for this. I just finished making it now . I didn’t have the right loaf pan but the texture is amazing! When I can, I will try get a similar pan to yours. I can now make any of your buckwheat recipes with confidence!!
So glad to hear you enjoyed it Pat! Great to know it worked in a similar pan as well 🙂
Really good! I will make this again. And again.