I have had a gluten free pumpernickel bread on the agenda forever now. Naturally, the recipe development mood struck abruptly and one week before I leave on a trip to Kenya. Luckily for me, this pumpernickel was a dream to develop and I am thrilled with the result.
Gluten free pumpernickel bread
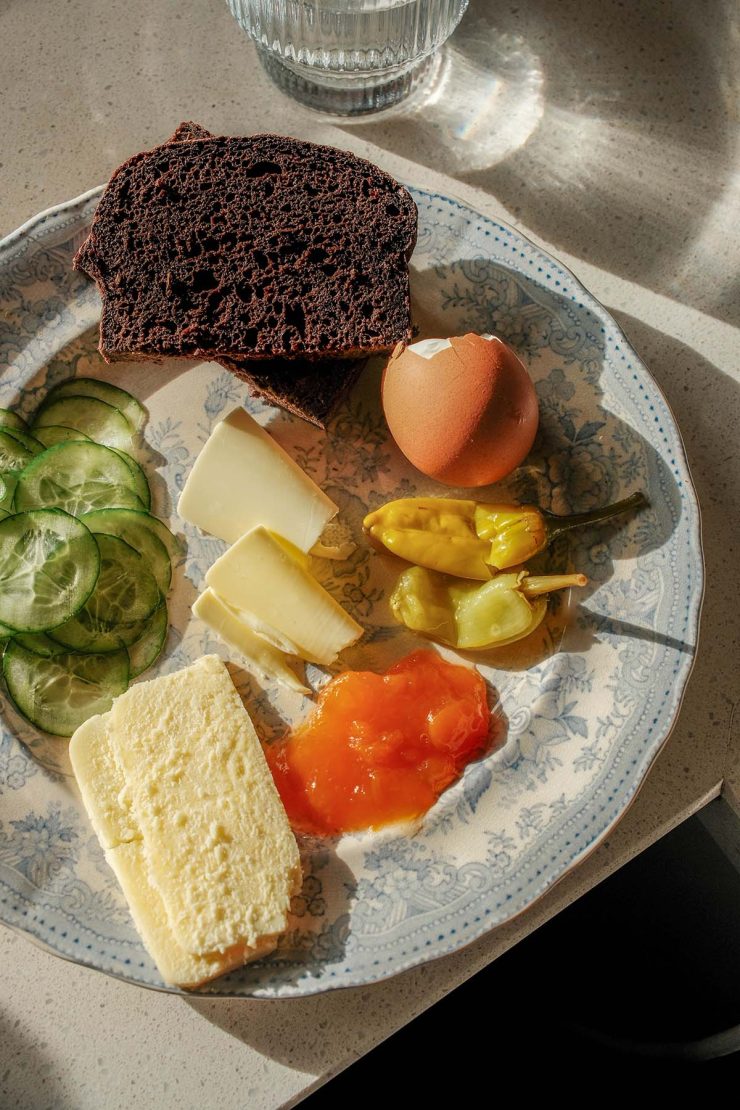
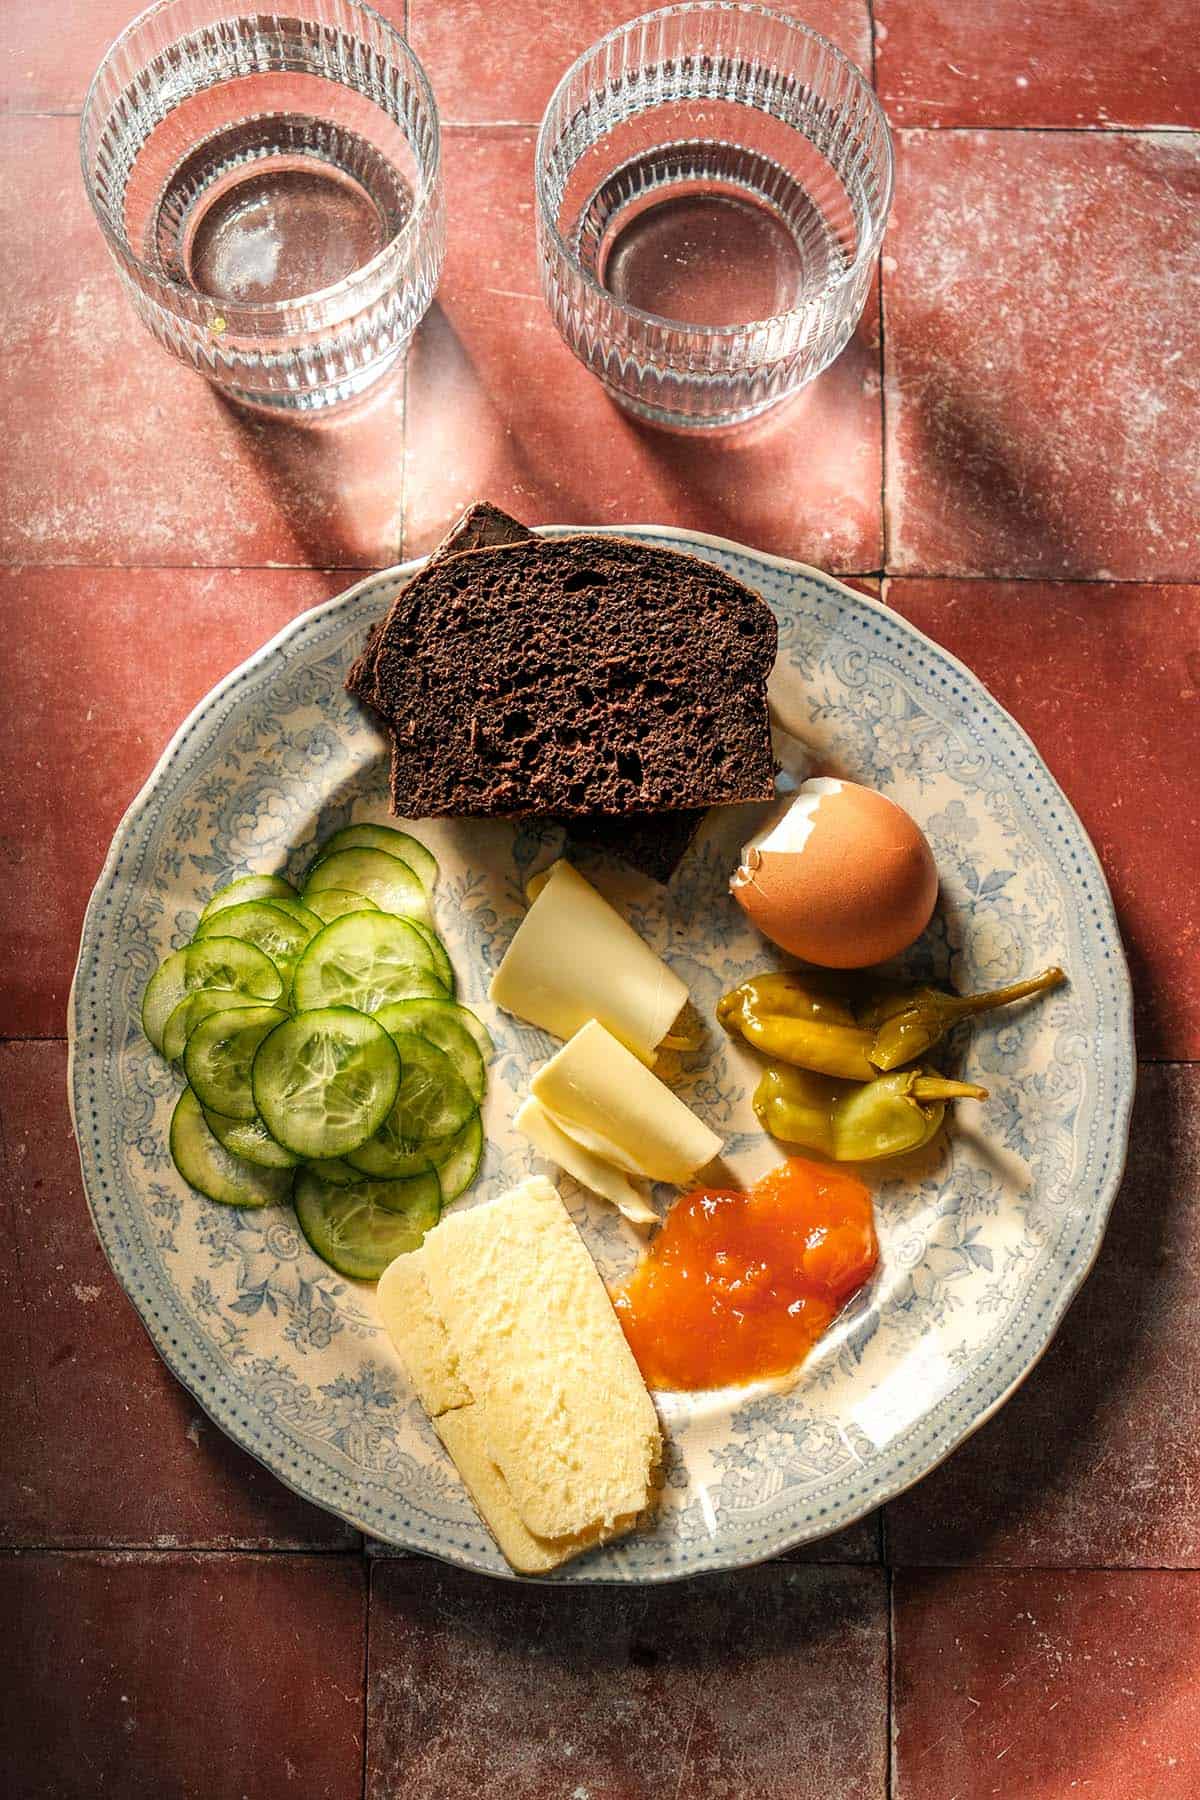
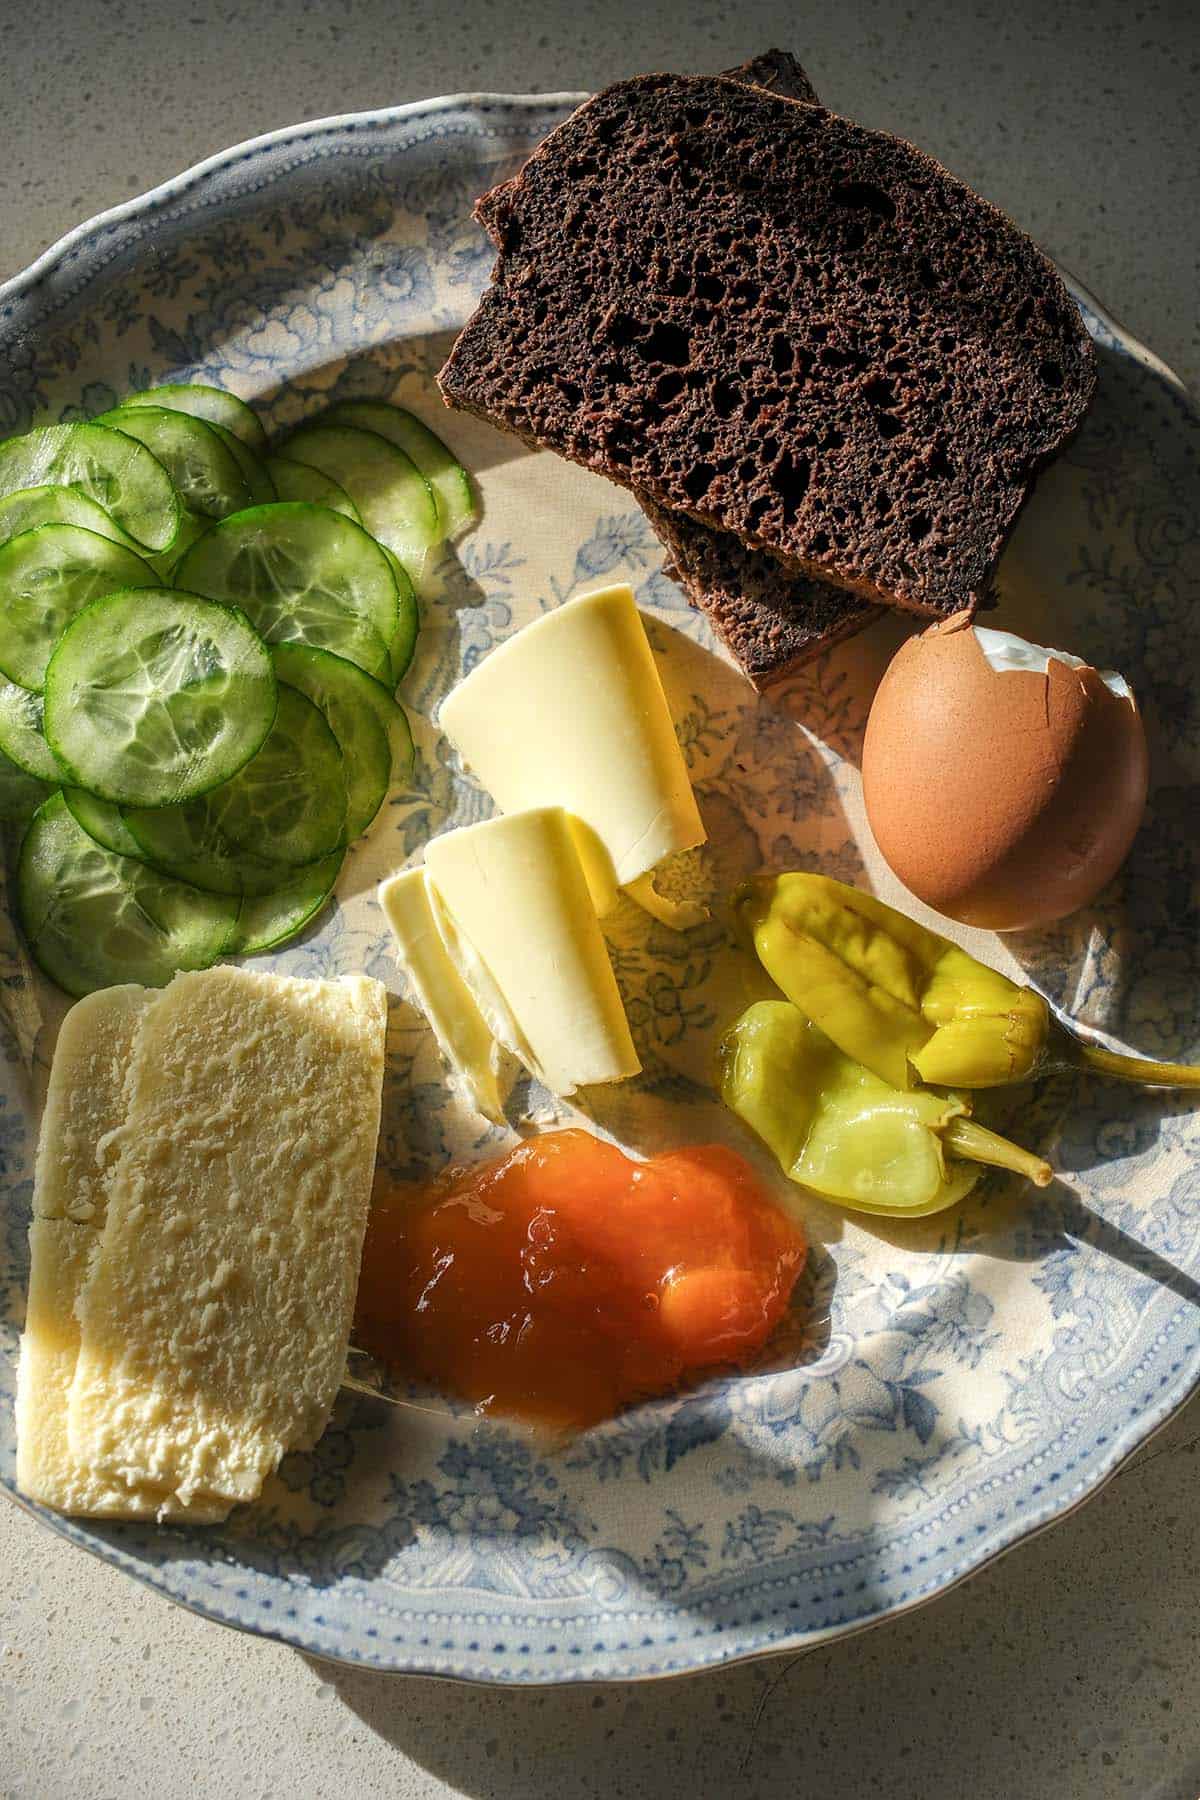
This bread is gluten free, dairy free, egg free, vegan, nut free and xanthan gum free. It uses a simple mix of light buckwheat flour and a very small amount of tapioca flour as the base. Dutch processed cocoa gives the bread an earthy, mildly chocolate flavour as well as the deep gorgeous colour.
Yeast and psyllium husk powder are the classic ingredients in all of my bread recipes. Yeast leavens the loaf, while psyllium husk powder holds sufficient liquid in and gives the bread shape.
Molasses, maple syrup and caraway seeds aid in flavour development and creating that classic dark rye flavour.
This recipe is a little fluffier than a super dense pumpernickel, but you can play around with the proofing and hydration to achieve your perfect crumb.
It’s a simple gluten free vegan pumpernickel loaf that I love and I hope you’ll enjoy it too.
Ingredient notes
I haven’t tested any wholegrain flour other than buckwheat flour in this recipe. See the notes in the ‘using dark buckwheat flour’ section to use dark buckwheat flour.
You can use either tapioca or cassava flour for the starch component. Keep in mind that cassava flour can often be a lot thirstier than tapioca flour, so you need to be adaptable in terms of the hydration.
Another thing I haven’t tested? Using regular cocoa instead of Dutch processed cocoa. Dutch processed cocoa contributes a lovely dark colour to the loaf and a slightly earthy flavour. Regular cocoa has a redder, terracotta colour and might not work in the same way. Cocoa is also quite absorbent and I can’t say if there is a difference between the two styles in terms of how much liquid they absorb. You are welcome to experiment but I can’t guarantee the result.
Molasses adds a deep, rich and earthy flavour to the bread. I haven’t tested an alternative but I daresay 20ml (1 tablespoon) maple syrup would be fine. It might lack some of that pumpernickel flavour but it is an option.
Finally, the caraway seeds. Personally I think these are what give the loaf so much flavour and I highly recommend including them. If you can, crushing, chopping or blitzing the seeds would be my preference because they are quite long. With that said, the crumb is soft so you don’t notice too much.
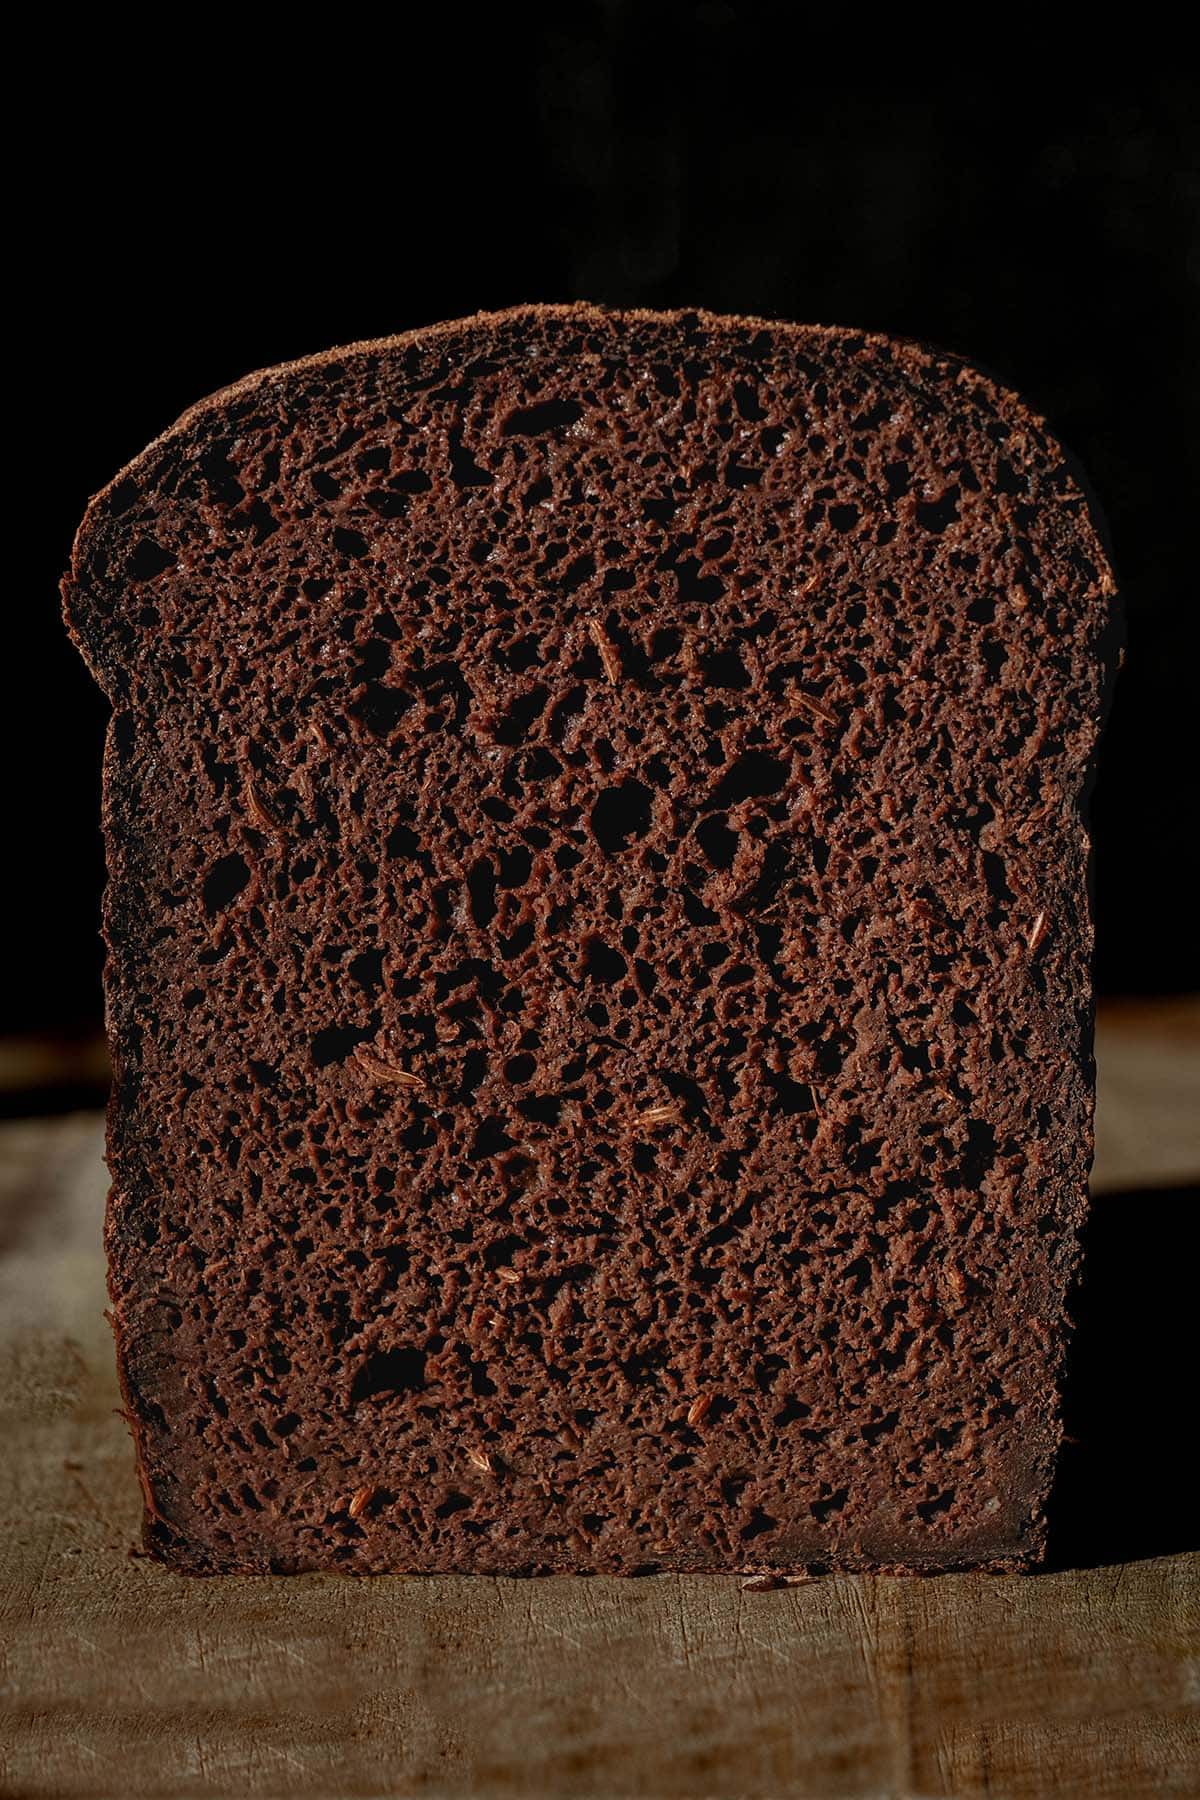
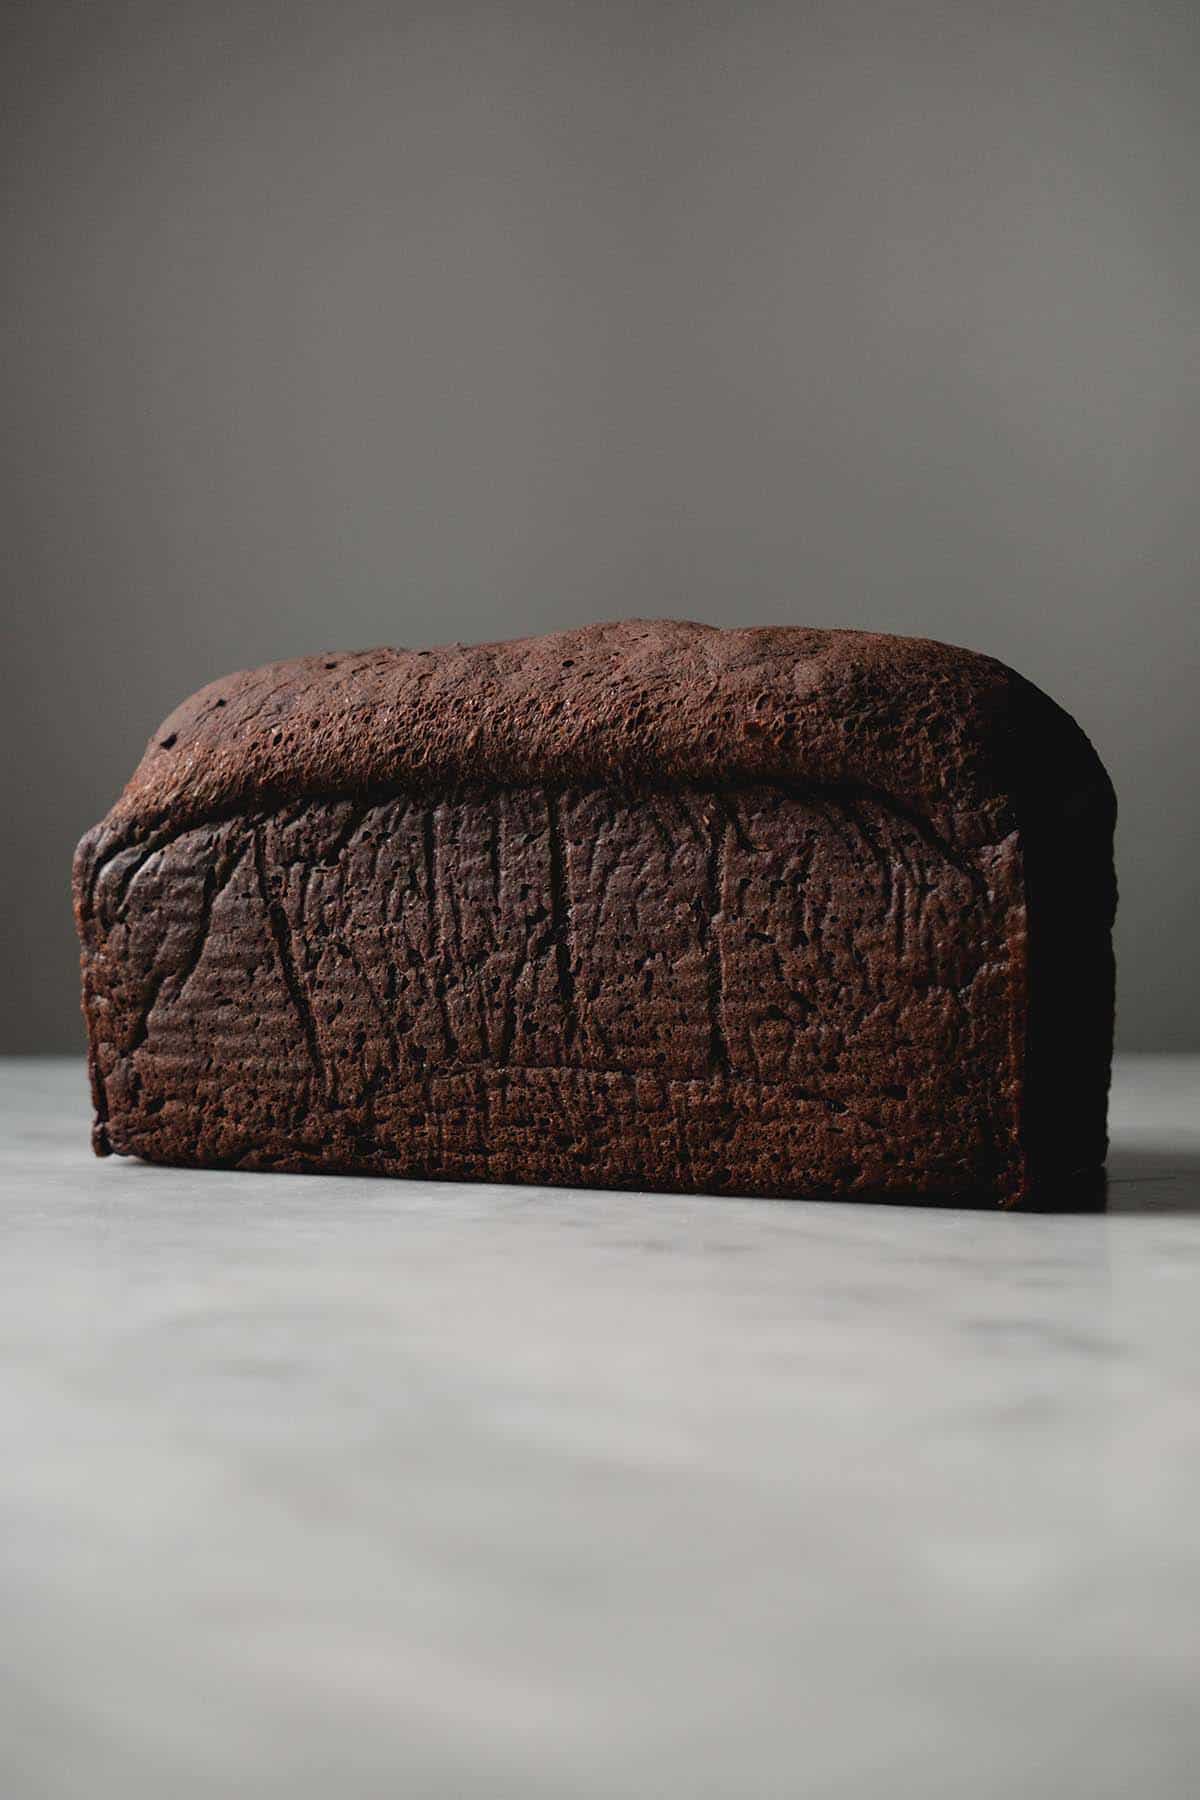
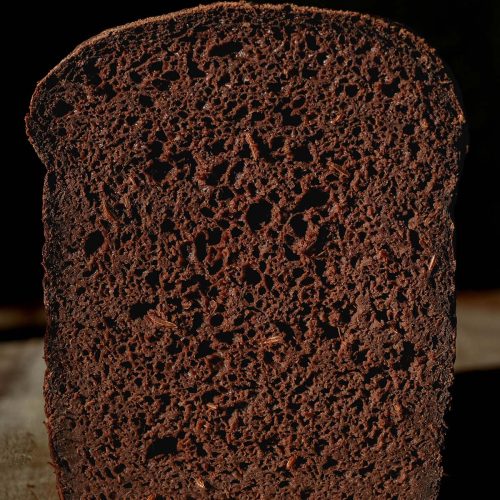
A note on the texture
As you can see above, this recipe is less dense than a traditional pumpernickel bread. I made it based on my buckwheat seeded bread recipe which is quite a lofty loaf.
If you really want a dense pumpernickel bread, you have a few options. Firstly, you can experiment with proofing the dough straight in the tin or proofing it in shorter increments. There is a fine balance between under-proofing and simply creating a denser loaf, though, so be careful.
Secondly, you can add less water. The bread in the photos had quite a decent hydration and a higher hydrated loaf proofs more dramatically. Oftentimes when people are producing squat loaves they are simply not adding enough water for their flours. So, you can try and add less water to create a more dense crumb.
Finally, you can experiment with a cold proof. Proof the dough in the fridge in the prepared loaf pan. A colder and longer fermentation helps develop flavour, but it also tempers an exuberant proof.
Substitution notes
- See the notes below on using dark buckwheat flour in this recipe.
- I have only tested Dutch processed cocoa in this recipe.
- While I have only tested tapioca flour in this recipe, you can use cassava flour in place of the tapioca flour. It is a thirstier flour so you may need to add more water to suit.
- I haven’t tested a version of this bread without yeast, nor have I tested a gluten free sourdough version. Stay tuned.
- I haven’t tested substituting the molasses because I am searching for funky flavour. However, you can probably use 20-40ml (1-2 Australian tablespoons) maple syrup instead.
- This bread uses 20ml extra oil compared to my other bread recipes. This aids in giving the bread a softer crumb, as a pumpernickel loaf has. It also helps soften the edges of the cocoa and ensures the bread isn’t too dry.
- Similarly, I find this bread needs 12-15g fine salt (I use table salt) as opposed to 10-12g. I assume this is because it contains quite bold flavours.
- People get quite experimental in adding a faux rye flavour to their bread. I have seen onion powder (asafoetida might be a low FODMAP alternative) and espresso as flavour builders.
Using dark buckwheat flour in this gluten free pumpernickel loaf
Dark buckwheat flour contains both the groat and husk and is naturally a lot darker and earthier than light buckwheat flour. Light buckwheat flour is the common variety available in Australia (where I live) while dark buckwheat flour is the common variety in America.
Dark buckwheat flour lacks the elasticity that light buckwheat flour has because of the husk/fibre content. While light buckwheat is quite sticky and stretchy, dark buckwheat flour needs some help from starches to achieve an elastic crumb.
Dark buckwheat flour (I tested Bob’s Red Mill brand) does work in this recipe. However, we need to make a new little tweaks.
- Use 400g of dark buckwheat flour and 150g tapioca flour (I have not tested cassava flour for this substitution).
- Keep the remaining dry ingredients the same.
- Add the water gradually as this mixture can be less absorbent than the recipe card. I used 700g water and found this to be a good amount for my dough.
- Proceed with the recipe, proofing and baking as per the recipe card.
Hydration notes for your bread
This pumpernickel recipe is a close relative to my seeded buckwheat bread recipe. I used the hydration quantities in that loaf, but chose to add the higher quantity of water. This is to account for the fact that cocoa is quite an absorbent ingredient.
In the loaf where I used 900g water, I found that the bread had just a slight gummy layer along the bottom. In the second loaf, I also had a thin gummy layer. Next time, I intend to use 800g water to see where that places me.
- The same tips for hydration apply as always. Every loaf of bread will have a different level of perfect hydration. Your flours might be more or less absorbent than mine and this will impact how much water you need.
- How long your loaf takes to proof depends on how much water you have added and the season/climate you are baking in. Yeast needs a moist environment to thrive, so a higher hydrated loaf will proof a lot quicker than a bread dough with less liquid.
- Similarly, yeast requires heat to proof. Proofing is much quicker in a summer kitchen or humid climate when compared to a winter kitchen or cold climate.
- Bread is proofed when bread is proofed. You can’t rush the process.
Gluten free bread troubleshooting
- My bread is too wet? – Add less water next time. Every bag of flour will have a different absorbency level and what works for me might not work for you.
- My bread is too moist? Make sure you leave the bread to cool 100% before cutting. Damp feeling slices are often just slices that have been cut before the loaf cools and sets. Keep in mind, though, that gluten free bread is necessarily more moist than regular bread.
- My bread never proofed? This is an issue with your yeast, the temperature of your kitchen, how much liquid you added and/or your patience. A warm kitchen and well hydrated loaf should proof with ease. Proofing takes how long it takes, so don’t rush it. Sometimes my bread takes 90 minutes in the tin instead of 60 minutes. Observe the loaf and act accordingly.
More gluten free bread recipes
- Gluten free millet bread
- Gluten free teff bread
- Gluten free quinoa bread
- Gluten free seeded buckwheat bread
- Gluten free sorghum bread
Gluten free pumpernickel bread (vegan)
Equipment
- USA Pan Pullman steel loaf tin – 23cm length X 10cm width X 10cm height or 9 X 4 X 4 inches
Ingredients
- 500 g light buckwheat flour (see notes)
- 50 g tapioca flour
- 50 g Dutch processed cocoa
- 25 g psyllium husk powder (see notes)
- 12-15 g fine salt (I used table salt)
- 15 g caraway seeds (see notes)
- 7.5 g (1 sachet) instant yeast
- 750-850 g water (see hydration notes in body of post)
- 40ml (2 tablespoons)* neutral oil of choice
- 40ml (2 tablespoons)* maple syrup or sweetener of choice
- 20-40ml (1-2 tablespoons)* molasses (see notes)
Instructions
To mix and proof your dough:
- Whisk the dry ingredients together in a large, non-reactive (glass or plastic) mixing bowl. Add the wet ingredients and whisk thoroughly to combine.
- I like to start whisking in the centre of the bowl and work my way out so I don't splash any ingredients out of the bowl. Continue whisking until there is no dry flour or lumps of flour in the bowl. Make sure to scrape the bottom to be sure.
- Initially the dough will look far too wet. Give it a minute or two, though, and it should start to thicken significantly under your whisk.
- Cover the bowl thoroughly (I use an inverted produce bag) and proof for 1 hour. In summer or a humid kitchen, proof it anywhere you like. In winter, proof it in a warm or sunny spot. Yeast requires heat and liquid to multiply.
- While you're waiting, grease and line the 23cm length X 10cm width X 10cm height (9 X 4 X 4 inch) steel loaf pan. I like to hold the baking paper in place with bulldog clips.
For the second proof:
- Preheat your oven to 220C/428F.
- After 1 hour, the dough should have some air bubbles when you stir. It should be thick enough to sit on a spoon, but too sticky and thin to roll out on a bench.
- Use a silicon spatula to scrape all of the dough into the prepared loaf tin. Use a moistened hand to smooth down the top of the dough and distribute it evenly in the tin.
- Cover the loaf again (again, I use an inverted produce bag). Proof for anywhere from 20-60 minutes, depending on the climate you're baking in. It takes less time in a humid climate than a cold one, so just go by when the loaf reaches the top of the tin. Also have a read of the notes on making this a denser bread, if that's your preferred pumpernickel style.
To bake:
- When the bread has reached the top of the tin, it is ready to bake. Place it into the oven for 15 minutes, then turn down the heat to 200C/400F and bake for 25 minutes more (a total of 40 minutes).
- The loaf should be lofty and just slightly browned on top (if you can tell).
- Allow it to cool in the tin for about 15-20 minutes before transferring it to a wire rack to cool. With higher hydration loaves, it can help to cool them on their side (and alternate the side) to ensure the crumb isn't squashed by the weight of the loaf.
- Allow to cool completely. This bread keeps well on the bench for a number of days and can also be sliced and refrigerated in an airtight container. It can also be frozen and defrosted – I recommend freezing slices on a lined baking tray with space between them and moving them to a container once frozen. This just means they are frozen as separate pieces of bread rather than one giant piece stuck together.
Notes
- Light buckwheat flour is the variety most commonly available in Australia. To use dark buckwheat flour (I tested Bob’s Red Mill brand) see the notes in the body of the post.
- I grind my psyllium husk powder myself in a cheap spice grinder. I find store bought psyllium husk powder is way too fine and tends to clump up.
- If you have a spice grinder, I recommend grinding the caraway seeds. They are fine whole but a bit annoying when they’re poking out. Personally, I prefer having them ground but either way will work.
- As with all my bread recipes, you cannot use a silicone loaf pan and I have no advice to offer on different sized bread tins. I test all my gluten free loaves the USA Pan Pullman pan to make it easy if you intend to use my recipes. Using a larger or smaller tin may result in a different outcome than intended.
- If you leave your dough uncovered to proof, it will form a hardened skin that will prevent it from proofing further. Make sure it is covered in an airtight way but with room to proof.
- Proofing takes longer in summer and less time in winter. Rushing the proofing process only deprives you of the best possible loaf.
- I haven’t tested a loaf without molasses. It adds a nice funkiness so I recommend using it. I have tested using 2 tablespoons molasses and I found it a bit too molasses-y, but you might like that.
I am going to try this with dark buckwheat flour (I can readily get it at my local Indian Grocer, where it is called Kuttu flour), but I might use a little less of the buckwheat and try doubling the tapioca to get it to stick together better. Thanks for the recipe!
Nic
I hope you enjoy! Let me know how it goes, I’d be keen to hear. I don’t have great access to dark buckwheat flour here but I feel like it would add to the pumpernickel vibe here
I was impressed by the texture and the taste of this GF Bread! Best recipe I have tried in the last 2 years.
I am so glad you enjoyed it! 🙂
Hi, finally got to bake your bread! I did use the Indian dark buckwheat flour I mentioned, did a few tweaks with less cacao, upped the tapioca flour, and did a few other things as well. Holy moly, I ended up with a perfect tall loaf like your photo! I was really evil and cut it while still quite warm (wow! yummy with melted butter!) and it held together exceptionally – just like a light buckwheat loaf. I am happy to share pictures of the loaf and the tweaks I made if you are interested (email me). Thanks for a brilliant (as usual) recipe!!!
Nic
Great minds! I actually ended up testing it with dark buckwheat and adding it to the post. So glad it worked for you though! I will have to hunt down some Indian dark buckwheat, it would be interesting to compare.
How did you find the colour when using less cocoa? I used 150g tapioca, 400g dark buckwheat (Bob’s Red Mill) and the same amount of cocoa.
I noticed that the colour was still dark but not as dark as the version in the recipe card. You can only tell when comparing them side by side and I happened to have some in the freezer but I did think it was interesting!
Haha I have cut many a loaf warm so I don’t even take my own advice lol
I don’t know how dark Bob’s Red Mill buckwheat flour is, but the Kuttu flour from my local Indian market is DARK as (will give you the brand name next time I shop there). I only used 1 1/2 tbsp of cocoa and it was as dark as your loaf. I used the same amount of tapioca as you did too, but I put 2 tsp of baking powder in the mix and only did one rise in the tin. The RA in me hates wasting time. …. next experiment is marble rye, now I know the dark rye analog will play nice! Am also going to play with ube and pandan colour/flavour marbling like my local Asian bakery!