Low FODMAP 'apple' pie (gluten free)
Gluten free, nut free, low fructose*Cups and measures are in Australian cups and measures. Use gram weights for international accuracy.See notes in recipe and in post for FODMAP.
Equipment
- 1 X 1.2 litre capacity pie dish (24cm inside the flared rim, 21cm at the base)
Ingredients
For the apple filling:
- 1 kg jicama peeled and mandolined very finely (I buy about 1.3kg jicama to account for the volume loss from peeling)
- 1/2 teaspoon baking soda
- 75 g butter salted or unsalted
- 125 ml (1/2 cup)* lemon juice
- 220 g (1 cup)* white sugar
- 2 teaspoons cinnamon powder
- 20 g corn starch
- Pinch of salt
For the pastry:
- 240 g (1 1/2 cups)* fine white rice flour
- 90 g (3/4 cup)* tapioca flour see notes
- 50 g-75g icing sugar see notes
- Pinch of fine salt
- 2.5g – 5g (1/2 - 1 teaspoon) xanthan gum
- 175 g butter cold and cubed (salted or unsalted)
- 100 g lactose free sour cream
- 60 ml (1/4 cup)* Ice water to bring the dough together I needed
- 60 ml (1/4 cup)* water
For rolling and baking:
- Tapioca flour, for rolling
- 1 large egg, for egg wash
- Raw sugar, to sprinkle over the pastry (optional)
Instructions
To make the apple filling:
- Peel the jicama and use a mandoline on the finest or second finest second to slice the jicama into very thin pieces. Each slice should be slightly translucent but still whole – this is how thin you want it.
- Bring a large pot of water about 2/3 full to the boil. Once it is boiling, add the sliced jicama and stir to ensure all the jicama is submerged.
- Sprinkle over the baking soda, keeping in mind that it will bubble a little. Stir to combine. The baking soda helps tenderise the jicama and also gives it a cooked apple colour. Any baking soda flavour should be neutralised by the lemon in the next stage.
- Continue to cook for 15-20 minutes or until the jicama looks visibly softened. Don’t worry too much if jicama slices break up – I promise it won’t turn into puree even if they do.
- Once the jicama is cooked, strain it over the sink.
- Return the pot to a low medium heat. Add the butter and allow it to melt, then add the lemon juice, sugar and cinnamon. Stir to combine, then add the jicama back into the pot.
- Cook for around 5 minutes or until it starts to bubble. Taste the sauce and adjust according to your preferences.
- Mix the water and corn starch together in a small bowl until it becomes a smooth milky liquid. Pour this mixture over the jicama and stir to combine. The mixture should become glossy, slightly opaque and thicken up quickly. Allow it to cook for a minute or two until it reaches your desired thickness. Keep in mind that it will thicken as it cools. Set aside to cool.
To make the pastry:
- Start by ensuring that all your liquid ingredients are cold.
- Mix the flours, icing sugar, salt and xanthan gum together in a large mixing bowl. Add the cubes of cold butter and coat them with the flour mix. Use your fingertips to gently rub the butter into the flour mixture until it resembles wet sand.
- Add the sour cream in dollops and stir to combine. Add half the ice water and get your hands in there to gently incorporate the water and form a ball of dough. Add the remaining water if needed, and extra if required. The dough should just come together in a ball without any dry bits on the bottom of the bowl.
- Tightly wrap the dough in a beeswax wrap or cling film and place in the fridge for 30 minutes (longer in hot climates). Your pastry is then ready to roll out and use.
To assemble the pie:
- Preheat the oven to 180C/356F. Place one oven rack near the bottom of the oven and one right at the top. This top rack will house a piece of foil to stop the pastry from over baking.
- Take half the block of pastry and place it on a liberally floured sheet of baking paper. I use tapioca flour.
- Gently roll the dough out with a rolling pin, stopping every couple of rolls to flour both sides of the dough. ‘Turn’ the dough regularly (pick it up and flip it over) to prevent it from sticking. If at any point the dough becomes soft and difficult to work with, place it flat in the fridge or freezer for a few minutes.
- Once you have rolled it out to a couple of sizes larger than the pie plate, invert the pie plate gently in the centre of the pastry dough in whatever position maximises pastry overhang.
- Use one hand to pull a corner of the baking paper towards you, and slide the other underneath the baking paper directly in the centre of the pie dish. Flip the dish, letting the pastry fall into it.
- Don’t stretch the pastry into the dish – be generous with letting it fall into the dish. Patch up any tears as necessary, and then trim excessive overhang, redistributing it to places that may have none.
- Once you’re happy with how the pie dough is sitting, fold the tops of the pastry over themselves (outwards towards the pie dish) to create a smooth pie edge. This will create a flat and even pie edge, which is helpful when you’re putting the pastry lid on. It also just looks neater.
- Scrunch up a piece of large baking paper and place it into the pie dish. Ideally, some paper will hang over the edges – this will protect them from over browning during the blind baking time.
- Gently fill the pie with your pie weights. I really recommend using enough weights to go right up the edges of the pastry – this pastry easily buckles in. I use dried chickpeas and rice for my pie weights and they go right up to the edge of the pie dish.
- Place a large piece of foil flat on the top rack of the oven, then place the pie in the oven on the bottom rack. Bake for 30 minutes. Take the pie out of the oven and very gently remove the pie weights and baking paper, noting that they will be extremely hot (don’t put them in something ceramic, and don’t handle the bowl while they cool).
- Gently brush the pie crust (sides, base and top) with egg wash and return to the oven for 10 minutes. Set aside to cool.
- Roll out the second half of the pastry using the same method as you did for the pastry base.
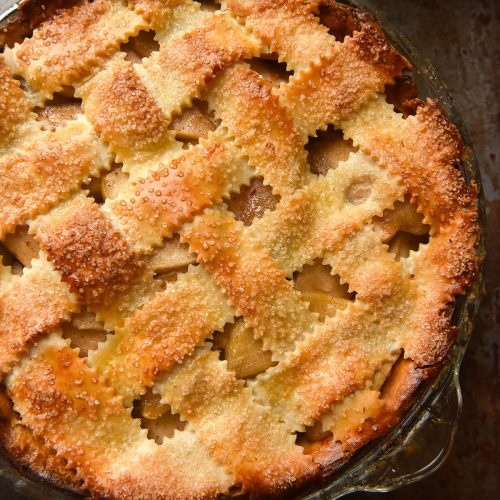
- You can either make a complete lid to cover the whole pie or create a lattice top. There is a link in the body of the post to a visual demonstration on latticing.
- If you’re making them, make the pastry decorations while you’re at it.
- Gently pour the apple filling into the pie and flatten the top. Lightly brush the cooked edges with egg wash, and begin placing the pastry on top, pressing gently to adhere. Trim any excessive pieces and press them down onto the cooked pastry base to adhere. Brush the top with egg wash, then sprinkle over a little raw sugar if you want to.
- Return to the oven for 30 minutes, finishing with the grill function for extra colour if necessary.
- You can serve this pie hot or cold and it keeps well in the fridge for at least a few days.
Notes
- If you slice the pie into 8 serves, each serve contains 125g jicama. This is more than the minimum threshold that Monash has, but still within a low FODMAP range up to 244g. If jicama works well for you, you could have 2 slices (or slightly less) before the jicama becomes moderate in fructans.
- If you're being extra cautious, 1/2 a slice contains approximately 62.5g jicama. This is a holiday dish, though, and it's still a far better option than an apple pie for those who malabsorb fructose.
- On that note, it is worth noting that apples and jicama contain different FODMAPs. Larger serves of apple contain fructose and sorbitol, whereas larger serves of jicama contain fructans. Consider which FODMAPs are an issue for you (post elimination phase) and adjust accordingly. It might even end up that a traditional apple pie is better for you personally.
- This recipe has enough pastry to make the base, a top and generous decorations. You can freeze leftovers or bake them up as little biscuits. I spray mine with oil and bake for 6-10 minutes.
- Use sugar to taste in both the pastry and the 'apples'. I used regular icing sugar in the pastry, which is cut with tapioca flour. If you use pure icing sugar (which is 100% sugar) you might need less.
Tried this recipe?Let us know how it was!