Gluten free yeast free cinnamon rolls
Nut free, egg free, xanthan gum free*Cups and measures are in Australian cups and measures. Use gram and ml for international accuracy.
Ingredients
For the binder:
- 250-375ml (1 - 1 1/2 cups)* full fat milk, lactose free or regular
- 50 - 75g butter (salted or unsalted) melted
- 20 g psyllium husk powder (see notes)
For the scald:
- 80 g (1/2 cup)* fine white rice flour or sorghum flour
- 125 g /ml (1/2 cup)* boiling water
For the dough:
- 160 g (1 cup)* fine white rice flour
- 120 g (1 cup)* glutinous rice flour or tapioca flour
- 150 g caster (superfine) sugar
- 15 g (3 teaspoons)* gluten free baking powder
For the cinnamon filling:
- 100 g light brown sugar
- 4 teaspoons ground cinnamon
- 20 ml (1 tablespoon)* extra milk
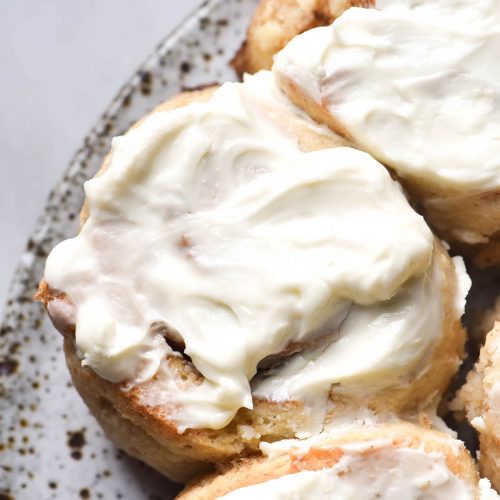
For the cream cheese icing:
- 150 g cream cheese room temperature (lactose free or regular)
- 25-35 g icing sugar sieved
- Vanilla and/or a pinch of salt to taste
- Milk to thin I prefer a thicker icing without added milk but that’s me
Instructions
To make the dough:
- Preheat the oven to 180C/356F.
- In a medium mixing bowl, whisk together the milk and melted butter for the binder. Sprinkle over the psyllium husk powder, then whisk vigorously until it is fully incorporated and no clumps remain. Set aside for 10-15 minutes to form a gel.
- Next, make the scald by whisking the flour and boiling water together. They should form a paste like consistency quite quickly. Set aside to cool a little.
- Combine the ingredients for the dough in the bowl of your stand mixer. Use the paddle attachment to combine everything, then add the scald. Mix on a medium speed for 1-2 minutes or until the scald has ‘dissolved’ into the flour.
- Add the binder to the mixer, turn the mixer up and beat until completely combined into a smooth dough. There should be no flour left on the bottom of the bowl. The dough should feel smooth rather little a little dry or spiky – see notes in the hydration section of the post for tips.
- The dough might be too wet to handle. If it is, place the bowl into the fridge for 15 minutes to firm up. The psyllium husk should work magic in that time.
- Before we roll out the dough, we need our filling ready to go. Combine the cinnamon and sugar in a medium bowl. We’ll use the milk later to adhere the sugar to the dough.
- Very lightly oil a large piece of baking paper, roughly 40 cm long. Place the scroll dough on the paper and very lightly oil the top of the dough, then roll the dough out into a long, thin rectangle about the size of the baking paper.
- The size of the rectangle isn’t super important, though. The longer and wider you roll it, the more ‘rings’ your scroll will have. Make sure the dough is reasonably thin (roughly ½–1 cm) but without any holes.
- Splash a very small amount of milk onto the surface of the dough, just to moisten it. Evenly sprinkle the cinnamon sugar across the dough, leaving a small border cinnamon sugar free along the long edges.
- Beginning on one long side of the dough rectangle, use your fingers to fold the 1cm border of the dough up onto itself. You want to create a tight roll, so try and make this first notch as small as possible. Continue rolling the dough up until you can use the baking paper to roll the dough onto itself. Take it about 80% of the way, then take the far side of the dough and bring it up over the log. You should have a log of dough with the seam facing upwards. Press the seam to adhere it to the log of dough.
- Line your baking dish with baking paper or grease it with butter. Gently thread your piece of string underneath the log. Eyeball one eighth of the dough log and think of the string as your knife. Holding one end of the string in each hand, pull in opposing directions to slice through one-eighth of the dough. Gently flip that first cinnamon scroll upright and use your hands to gently cup and mould it. Press it down a little so that it has a solid base, then place it into the prepared baking dish. Repeat with the remaining dough and scrolls.
- If your tin is large and there is space after you have added all the cinnamon rolls, use small heatproof tins to tuck the rolls in. They will spread if they aren't supported in the dish.
- Place a baking dish filled with boiling water at the bottom of the oven to create a steamy environment. This will help keep them nice and moist during baking.
- Bake the scrolls for 25-30 minutes or until they feel firm to the touch and are lightly golden on top.
To make the cream cheese icing:
- Use hand beaters or a stand mixer and beat your icing until smooth, light and creamy. Add flavourings to your tastes and milk if you find the consistency too thick.
To finish:
- Spread the cream cheese atop each cinnamon roll, warm or cooled. Serve immediately and keep leftovers in an airtight container in the fridge. Reheat in the microwave or a steamy oven on a low heat to restore them to their former glory.
Notes
- Read the body of the post to make the best scrolls possible.
- The absorbency of gluten free flours varies greatly from brand to brand, country to country. If you find your buns are too dry/wet, adjust the liquid to suit and make a note.
- I buy psyllium husk flakes and grind them to a powder myself. I find a lot of store bought powders turn people or grey when baked. They can also be so fine that they clump up as soon as they hit the hot milk. This is why I prefer to grind my own - I use a little spice grinder.
- Anecdotally, I found that using rice flour in the scald can make the buns taste a little ‘rice floury’. It’s a distinct taste that gluten free people will probably be aware of. I found that the cooled buns lose that taste, though.
Tried this recipe?Let us know how it was!