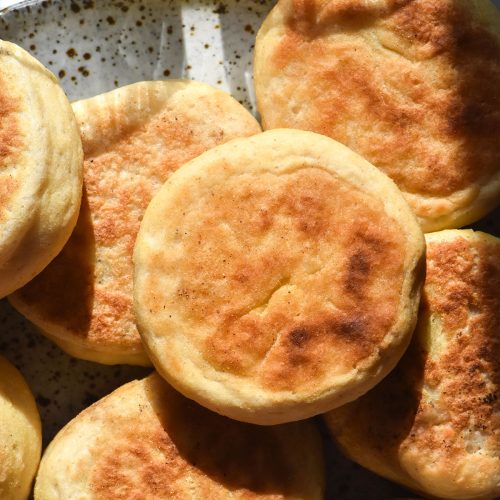
Gluten free English muffins (egg free, vegan option)
Egg free, xanthan gum free, dairy free option, vegan option
Ingredients
For the binder:
- 10 g psyllium husk powder
- 50 g melted butter (regular or plant based)
- 250 ml boiling water
- 1-2 teaspoons neutral oil to grease the container
For the dough:
- 250 g white rice flour
- 100 g tapioca flour
- 7.5 g fine salt
- 10 g (2 teaspoons) gluten free baking powder
- 5 g (1 teaspoon) sugar
- 3.5 g (1 teaspoon) instant yeast
- 125 ml milk of choice (I used lactose free full fat milk)
To finish:
- Corn meal or rice flour to coat the muffins (optional)
- Butter or oil for greasing the pan
Instructions
The night before:
- Boil your kettle and measure the psyllium husk into a heatproof bowl on a tea towel to stop it from moving as you whisk.
- Melt your butter in a medium heat-proof bowl, ideally with a pouring lip. When the water has boiled, pour it into the bowl with the melted butter.
- Have your whisk ready and whisk constantly as you add the hot water to the psyllium husk powder. This ensures there are no clumps of psyllium husk which are unpleasant to eat. Once the mixture is combined and smooth, set aside to firm up slightly for 10 minutes.
- Measure your dry ingredients out for the dough and place them in the bowl of your stand mixer with the paddle attachment. I daresay you could also make these muffins with your hands but it will require a fair bit of elbow grease to fully combine the psyllium husk gel into the dough.
- Add the psyllium husk binder and start mixing on low. As the ingredients incorporate and less flour is flying around, turn the speed of the machine up. Continue until the mixture starts to look like a dry dough in clumps – most of the flour should be gone. If there is a lump of psyllium husk around the paddle, stop and scrape it down before continuing.
- Add the milk to the machine while it is on a medium speed. I like to add it gradually to watch the dough absorb it. Once you have added the milk, the mixture should be a thick batter consistency and totally smooth – no lumps of flour or psyllium husk. It should be just too wet to shape with your hands – more of a thick pancake batter consistency.
- Oil a glass or plastic airtight container with a lid. Scrape the dough into the container and pop the lid on, then place it in the fridge overnight.
The next day:
- When you are ready to bake (there is no immediate rush) take the dough out of the fridge. Line a large baking tray with baking paper.
- Use lightly moistened hands to divide the dough into 6-8 balls. 8 balls look small but they puff up a lot as they cook – I actually prefer making the 8 normal sized muffins instead of 6 very large ones. Do whatever you prefer.
- Once you have divided the dough, it’s time to shape the muffins. Take the first muffin and flatten it out into a disk about the size of your palm. Make sure the bottom side is smooth as this will be the top of your muffin. Pinch a corner of the dough and bring it up onto the centre like you are wrapping a round present. Continue all the way around until you have a muffin shape. Flip the muffin over so the seam is on the table, then use your hands to gently spin the muffin on the bench to close the seams. Alternatively, you can just roll the dough into a ball and then flatten it down into an English muffin shape.
- Once you have shaped the muffin, dust it with corn flour or rice flour or simply place it on your lined baking tray. Repeat with the remaining muffins.
- Cover the muffins in an airtight fashion - I use a large piece of cling film topped with a damp tea towel that I have moistened with hot water. Allow the muffins to proof for 30-60 minutes. They should feel fluffy and light.
- Preheat a large skillet over a medium heat. Once hot, grease it with butter or oil. Turn the heat right down and add 2-3 muffins – leave plenty of room for flipping them. I find it easier to pick these muffins up with my hands to put them in the pan as opposed to using a spatula. I subsequently use a metal spatula to flip them, but hands are more gentle on the raw dough to start with.
- Place a lid over the pan (I like using my clear soup pot lid so I can see the muffins as they cook) and cook for 6 minutes. If you are worried they are over-browning (or not getting enough heat) flip a muffin to check and adjust the heat as necessary.
- After the 6 minutes, gently flip any remaining muffins and place the lid back on then cook for another 3 minutes. We don't want to be too rough during the flip as this can deflate your muffins. Transfer cooked muffins to a wire cooling rack and repeat with the remaining muffins.
- Store the cooled muffins in an airtight container on the bench. You can also freeze and defrost the muffins. I recommend reheating them with steam (ie a microwave or a pan with a splash of water and a lid) to ensure they remain soft yet fluffy. To get a muffin with plenty of nooks and crannies, use a fork to slice the muffin by poking fork holes all around the edge of the muffin (think cutting it but with fork prongs).
Notes
- See the body of the post for tips, tricks and ingredient substitutions.
- Use a good quality plant based butter and milk to keep this recipe vegan.
- Use lactose free milk or a low FODMAP plant milk (like Macadamia or rice milk) to keep these English muffins low FODMAP.
- Use rice flour or simply omit the coating for a corn free English muffin.
- There is no rush to get up early and proof the muffins - you could make the dough the next before and bake them in the afternoon or evening the next day, for example.
- Yeasted dough can keep for a few days in the fridge. You can play around and see what works for you (it will vary a little depending on your fridge temperature, how thirsty your flours are and where you live).
Tried this recipe?Let us know how it was!