Gluten free chocolate pastry
Gluten free, nut free *Tablespoons are in Australian tablespoons which are 20ml as opposed to the more common 15ml. Use ml for international accuracy.
Ingredients
For the chocolate pastry:
- 150 g white rice flour
- 25 g tapioca flour
- 75-150 g light brown sugar see notes
- 30 g Dutch processed cocoa powder
- 5 g xanthan gum
- 2.5 g (1/4 teaspoon) fine salt
- 125 g butter cubed (I use salted but both work well)
- 40-60 ml/g (2-3 tablespoons)* ice water, as needed (see notes)
To finish:
- Extra cocoa powder for rolling the dough out (I use Dutch processed again here)
Instructions
To make the pastry:
- Whisk the dry ingredients together in a medium mixing bowl.
- Add the cubed butter and use your fingers to rub the butter into the flour until it becomes a cocoa coloured meal.
- Add the water tablespoon by tablespoon and use one hand to agitate the dough in the bowl. Gently squeeze it in your hands to see it if comes together into a ball. The more sugar you add, the less water you will likely need. My batch of dough with 150g sugar only needed 40ml (2 tablespoons) ice water, whereas batches with less sugar needed 60ml (3 tablespoons).
- Wait and mix the dough with your hand for a little before adding the next tablespoon of water. Sugar is a wet ingredient so as the sugar dissolves in the dough, it will become more moist. If it still doesn’t soften, add the next tablespoon of water.
- Watch the dough – there should be no dry flour in the bowl and it should come together in a dark brown, smooth and elastic feeling dough. It shouldn’t be too wet that you can’t handle it easily, nor too dry that it crumbles if you squeeze it in your hand.
- When you are happy with the consistency, arrange the dough in a large piece of clingfilm. Cover it and then flatten it into a medium rectangle to allow it to chill efficiently. Place it into the fridge for 1 hour or overnight until you ready to use it.
To laminate the pastry:
- When you are ready to roll the dough, take it out of the fridge to come to temperature. Dough that is too cold will crack as you roll, whereas dough that is too warm will stick to the baking paper and rolling pin.
- Preheat the oven to 180C/356F.
- Sprinkle a large piece of baking paper with extra cocoa powder (I use Dutch processed because of the lovely dark colour).
- Roll the dough out into a rectangle approximately 20cm long (the length doesn’t matter too much). With the short sides of the rectangle facing you, fold the top third of the pastry down onto the middle third of the pastry. Fold the bottom third of the pastry up onto the middle third of the pastry. Turn the dough so that the short sides face you. Repeat this process of rolling and folding 2-3 more times until the pastry is smooth, pliable and doesn’t crack when you bend it.
- If it any time it starts to soften or become sticky, return it to the fridge to firm up.
To blind bake the pastry:
- Preheat the oven to 180C/356F.
- On a cocoa powdered sheet of baking paper, roll the pastry out to 2-3cm larger than the dish you are using to blind bake it in. I have tested a 24cm/9.5 inch fluted tart tin and a 1 X 1.2 litre capacity pie dish (24cm inside the flared rim, 21cm at the base) (40 ounce capacity pie dish, 9.5 inch inside the flared top rim, 8 inch at the base) pie plate and had a bit of leftover pastry in both cases.
- Place the inverted tin or plate in the centre of the pastry. Slide one hand underneath the baking paper in the centre of the dish, and place the other on top of the dish. Gently flip the dish and allow the pastry to fall into the dish. Gently peel off the baking paper.
- Be generous in allowing the pastry to fall into the tin – don’t pull or stretch it. Use scissors to trim off any areas of excess overhang.
- Make sure the pastry is flush with the base before you begin to gently adhere it to the edges. If you are using a fluted tart tin, gently press the pastry up against the edges of the dish and then press against the fluted edges to break off any excess pastry. I like to use a down and outwards motion so the top of the pastry is vertical with the other pastry and neatly trimmed.
- If you are using a pie plate, leave enough pastry to fold the top of the raw pastry edge over itself on the pie plate side. This creates neater, thicker pie top edges that don’t burn as easily and taste better. Do this the whole way around the pie.
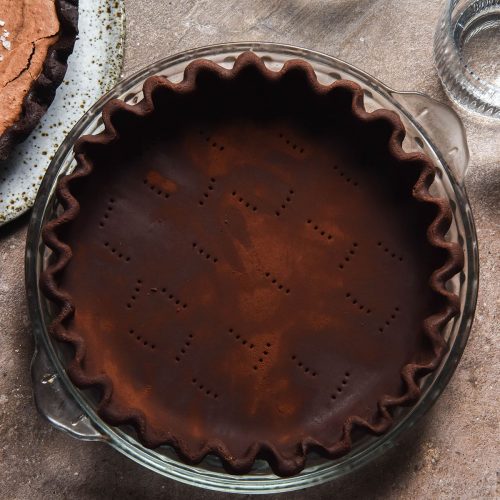
- Dock the base of the pastry thoroughly with a fork.
- Take two long pieces of baking paper and scrunch them up in your hands. Unfold them then place the first one carefully into the dish. The two longer sides of the baking paper should be hanging over two sides of the pastry edges, protecting them from over-baking.
- Place the second piece of baking paper inside the first with the overhang protecting the other two sides of pastry edge.
- Pour your pie weights into the baking paper. Work gently but thoroughly to ensure the baking paper and pie weights are right up against the pastry without crushing it. This will help hold the pastry in place during baking. My pie weights are an old bag of rice and lentils. You will need plenty of pie weights to hold the pastry in place – ideally they will fill the pie plate.
- If your pastry is soft and warm after shaping, place it into the fridge or freezer for 10-15 minutes to allow the butter to firm up. You may need more time if you live in a humid or hot climate.
- When it is ready, place the dish in the oven for 30 minutes to bake.
- After the 30 minutes, carefully remove the dish from the oven. Gently and carefully lift the pie weights out (they will be HOT) and place them in the baking paper on a heatproof surface (I use an oven tray or large cast iron).
- Very gently peel away the second piece of baking paper. It may have stuck to the pastry and will be enmeshed in grooves if you have crimped the pie edge. Peel very slowly and try it from a different angle if you notice that you are pulling up pastry.
- Once you have removed the pie weights and paper, return the pie base to the oven for 5-10 minutes. The chocolate pastry is now blind baked and you can fill it with whatever your heart desires!
Notes
- See ingredient notes in the body of the post.
- I have tested this pastry with 75g, 100g, 125g and 150g sugar. Add the sugar according to your preferences for sweetness. Read the notes in the body of the post about the varying sugar content and the impacts before you start.
- How much water you need depends on how thirsty your flours are, how much sugar you have added (more sugar = less water needed) and how much you have rubbed the butter into the dough, among other things. Add it gradually - an ideal pastry has just enough water to bring it together but no more than that.