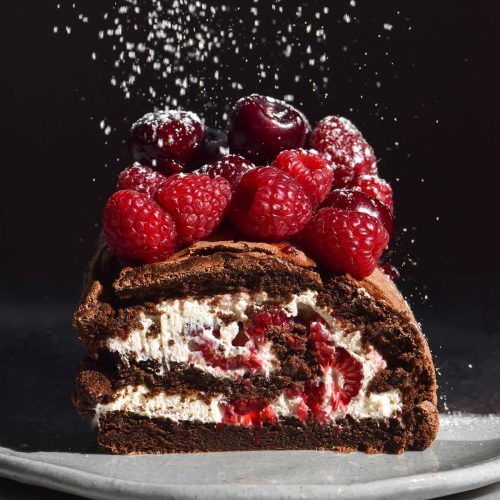
Chocolate berry roulade
Gluten free, nut free option, low FODMAP option*Tablespoons are in Australian tablespoons which are 20ml as opposed to the more common 15ml. 4 teaspoons = 1 Australian tablespoon
Equipment
- 33cm x 23cm rectangular Swiss roll tin or cake tin
Ingredients
For the fudgy chocolate sponge:
- 200 g light brown sugar split into 50g and 150g
- 180 g 70% dark chocolate see notes
- 5 extra large eggs 45-55g, weighed out of shell
- 20 g (2 tablespoons)* Dutch processed cocoa powder
- 2.5 g heaped ¼ teaspoon fine salt
For the whipped cream option:
- 250 g whipping cream regular or lactose free
- 25 g icing sugar
- ½ teaspoon vanilla bean paste or extract
For the chocolate hazelnut mascarpone option:
- 250 g mascarpone well refrigerated before use
- 75 g Nutella
- Pinch of fine salt
- ½ teaspoon vanilla bean paste
To finish:
- 2-3 tablespoons* raspberry jam optional
- 250 g raspberries use divided
- Cocoa powder or icing sugar to roll the roulade in (optional)
- 20 g+ extra jam or Nutella to adhere the berries to the roulade
- Other summer berries to decorate (I used cherries)
Instructions
To make the chocolate sponge:
- Preheat the oven to 170C/338F. Very lightly grease a 33cm x 23cm rectangular Swiss roll tin or cake tin then line it with baking paper.
- Weigh your light brown sugar into two bowls – 50g in one bowl and 150g in the other bowl.
- Place the chocolate in a medium heatproof bowl over a small pot 1/3 filled with water. Ensure the water doesn’t touch the bowl. Turn the heat to a low-medium and stir intermittently until the chocolate has melted. Take the bowl off the pot and set aside to cool a little.
- Separate your first egg into two clean, dry bowls. If the first egg white comes out cleanly (with no traces of broken egg yolk) transfer it into your clean, dry stand mixer bowl. Egg whites can’t whip when fat is present, so it’s important to ensure there is no fat in the egg whites. Repeat with the remaining eggs.
- Use the whisk attachment to whisk your egg whites on a medium speed until they are light and frothy. The whisk should leave tracks in the top of the foam. Take your 50g bowl of sugar and add it to the egg whites in tablespoon increments. Allow the sugar to briefly dissolve in between additions. Scrape down the bowl once to ensure the sugar is not sitting on the bottom. When the egg whites are ready, you should be able to invert the bowl without them slipping.
- Use a silicon spatula to scrape all the egg whites into a large mixing bowl and set aside.
- Add the egg yolks and 150g sugar to your stand mixer. Beat on medium speed for about 3 minutes or until the sugar has dissolved and the egg yolks are much paler and airy in consistency. Scrape the bowl down to ensure no sugar is on the bottom of the bowl.
- Once the egg yolks are whipped, remove the bowl from the mixer and add the cooled chocolate. Use a spatula to start folding the chocolate into the egg yolk mixture. Once it is about halfway combined, add the cocoa and salt. Fold just to combine until you have a uniformly chocolate coloured paste about the consistency of a thick nut butter.
- Take about ½ a cup of whipped egg whites and begin folding them into the chocolate mixture. You will encounter some resistance at first, but it should loosen up once these egg whites are folded in. Try not to roughly stir and knock all the air out of the egg white, but take comfort in the fact that this first half cup is sacrificial.
- Add the remaining egg whites and carefully fold them into the mixture. The air is what makes the sponge light, so fold with intention to avoid flattening the egg white. Continue until the batter is a smooth, fluffy consistency and uniform chocolate brown in colour.
To bake and assemble:
- Pour the mixture into the prepared baking tin. Bake for 15-20 minutes or until the sponge is cooked through. The sponge should spring back a little if you press on it but shouldn’t feel too crispy. Cooked through in the least amount of time possible is the aim of the game for a sponge that is easy enough to roll but still moist and fudgy.
- Once you're happy, remove the tray from the oven. Cover the tray with a lightly dampened clean tea towel then allow to cool completely in the baking tin. I like to leave it for 1 hour.
- To make the whipped cream filling, whip the cream until medium peaks form and then add the sugar and vanilla. Continue to whip until combined and stiff peaks form.
- To make the Nutella mascarpone filling, ensure your mascarpone is thoroughly chilled (it splits easily when warmer). Whip the mascarpone just until it starts to look a bit fluffy (maybe a minute or so) then add the remaining ingredients. Beat on a lower speed until just combined, then return to the fridge until you are ready to use. Mascarpone is a bit finnicky so if in doubt, under-whip it.
- Place a clean piece of cling film on a flat surface. You can sprinkle it with cocoa, icing sugar or leave it plain. Carefully invert the cooled sponge onto the cling film, so that the bottom of the sponge faces upwards. Gently peel off the bottom piece of baking paper.
- If you are using the jam, spread a thin layer across the sponge leaving a small border around the edges. Carefully top the jam with your cream filling of choice and use an offset spatula or the back of a spoon to gently spread it without pulling at the sponge.
- Top the cream evenly with 125g of fresh raspberries. The roulade can be easier to roll if you slice the raspberries in half or gently press them into the cream.
- Use a knife to gently score the sponge about 1cm in from a short edge of the sponge. This will help you create a tight first roll, which is important to get a good swirly roulade. Flick or break this small scored sponge up over the rest of the roulade to start the first swirl. Use the cling film to help you as you continue rolling the roulade up over itself, maintaining a bit of pressure to keep a tighter swirl. Continue rolling all the way up and allow the roulade to rest on the bottom seam to keep everything together. Cracks are 100% expected here, so don’t be discouraged!
- You can serve the roulade straight away, but I prefer to refrigerate it for at least a few hours, if not overnight. To refrigerate overnight, wrap the roulade up firmly in the cling film and gently twist in the open edges of clingfilm to form a sausage shape. Carefully lift it onto a flat board and then place in the fridge until you are ready to decorate. I like to slice and remove the end pieces of the roulade before serving to expose some of the berries and remove the slightly drier edge pieces, but you don’t have to.
- To decorate, dip each piece of fruit in a bit of jam or Nutella and use it adhere the fruit to the top of the roulade. You might need to press down a little bit to secure. Sprinkle with some extra icing sugar or serve as is.
- Leftovers keep well in an airtight container in the fridge. They can also be frozen in an airtight container and defrosted.
Notes
- See the tips and tricks in the body of the post.
- See the dietary notes in the body of the post.
Tried this recipe?Let us know how it was!