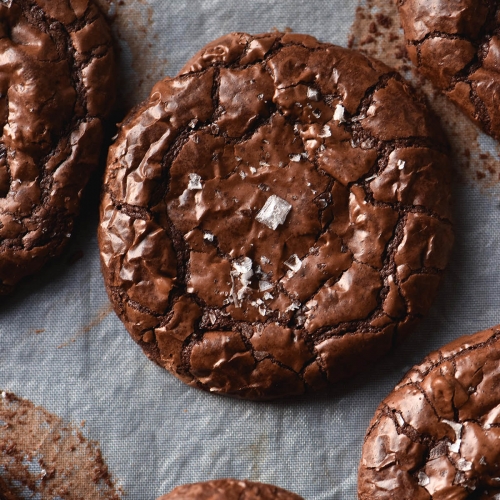
Small-batch gluten-free brownie cookies
Ingredients
For the brownie cookies:
- 50 g butter becomes 40-43g after browning
- 1 1/2 - 2 tablespoons 40-50g quinoa flour (toasted is delicious)
- 1 tablespoon cocoa powder both Dutch processed and regular are fine
- 1/4 teaspoon fine salt
- 100 g dark chocolate I used 70% sweetened cooking chocolate
- 75 g caster sugar
- 1 extra large egg
- 1/2 teaspoon vanilla bean paste optional
- Sea salt flakes to finish optional
For the brown butter buttercream (optional)
- 100 g butter browned
- 50 g icing sugar sieved
- Pinch of salt
- 2-3 teaspoons milk to make your preferred consistency (optional)
- 1 teaspoon smooth natural peanut butter (optional)
Instructions
- Preheat the oven to 180 degrees Celsius or 356 Fahrenheit.
- If you are making the brown butter buttercream, brown the 100g of butter as per the instructions below. Once browned, pour it into a silicon loaf tin and place in the fridge or freezer until firm.
To brown the butter:
- Place the butter in a medium saucepan over a low-medium heat. Stir intermittently for a few minutes – the butter should start to bubble and then flecks of brown appear on the surface. Keep going until the flecks are dark brown before removing from the heat.
- Weigh the melted browned butter to ensure you’ve cooked off enough liquid – it should weigh 40-43g or thereabouts. A number a little over is fine, but if it’s significantly under, add a little fresh butter to make up the number.
- Place the brown butter in the bowl of your kitchen mixer or a mixing bowl. I prefer to use my hand beaters for small batch, but both will work.
To make the cookie batter:
- Whisk together the cocoa, quinoa flour and salt in a small bowl. Set aside.
- Half fill the small saucepan you used for the brown butter with water and place it on a medium heat. Put a metal or heatproof bowl on top of the saucepan, ensuring the water doesn’t touch the bottom of the bowl.
- Add the chocolate to the saucepan and stir intermittently until it is completely melted. Remove from the heat and set aside.
- While the chocolate is melting, add the caster sugar and eggs to the bowl with the butter. Using the whisk attachment or hand beaters, beat for 1-2 minutes on a medium-high speed until light in colour and kind of fluffy. This helps create lift and a shiny meringue-like top.
- Once the egg mixture is sufficiently lightened in colour, pour in the melted chocolate. Use a spatula to get every last bit. It shouldn’t be hot, but it shouldn’t be completely cool either. Lukewarm but molten is the aim of the game.
- Once the chocolate has fully incorporated, spoon in the flour mixture and mix on low until combined. Stop and scrape down the sides of the bowl with a spatula as necessary.
- Once the flour has been incorporated, turn the mixer off briefly to add the vanilla bean paste. If you don’t turn it off, the vanilla paste tends to get tangled in the whisk attachment. Continue mixing until combined.
- The batter should fall off the whisk attachment in thick ribbons. It is thick, but still slightly thinner than a traditional cookie dough – you’ll need to use spoons to assemble.
To bake:
- Very lightly grease two large baking trays and line them with baking paper. The grease will stop the paper slipping around while you're scooping the cookie batter onto the tray.
- Using two spoons, scoop roughly 1 tablespoons of batter per cookie onto a lined baking tray for a total of 6 cookies. Leave space between them for spread.
- Sprinkle each cookie with the (optional) sea salt and place into the oven. Cook for 7-10 minutes or until the tops are crackly but the cookies are still soft.
- Once cooked to your liking, remove from the oven and allow to cool and firm up on the baking tray.
- For best, chewiest results, allow the cookies to cool completely before eating.
- Sugar draws moisture from the air, so for best results store uneaten cookies in an airtight container in the fridge.
To make the (optional) brown butter buttercream sandwiches:
- Break the solid brown butter into small pieces and use your hand beaters to beat on high until the butter is light in colour and airy in texture. You might need to let your butter warm up for a while if it’s particularly cold. I promise – it will whip up, even if it seems to be staunchly remaining in small chunks.
- Once the butter has whipped, add the sifted icing sugar and beat until light, fluffy and mostly smooth. It will look a little grainy because of the brown butter flecks. Add milk to reach your desired consistency.
- Pair the cookies up based on similar sizing. Pipe or spoon the buttercream (about a tablespoon) onto one cookies, then sandwich the other on top. I like to twist one of them to evenly distribute the buttercream. Repeat with the remaining cookies. Leftovers keep well in the fridge in an airtight container.
Tried this recipe?Let us know how it was!