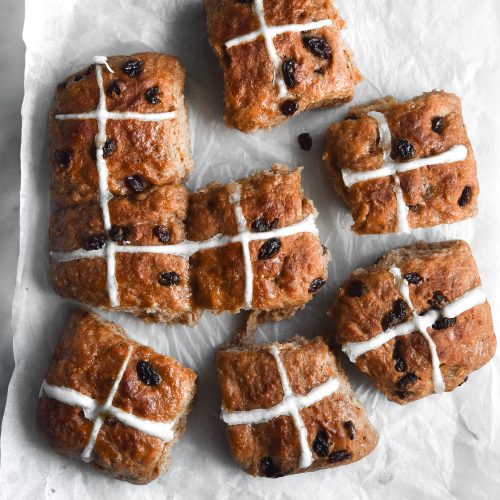
Vegan, gluten free hot cross buns
FODMAP friendly, gum free, no added nuts, egg free
Ingredients
For the binder:
- 2 cups (500ml) hot plant based milk of choice (see notes)
- 75 g vegan butter melted
- 20 g psyllium husk powder
For the dough:
- 240 g (1 1/2 cups) fine white rice flour
- 120 g (1 cup) glutinous rice flour (also called sweet rice flour)
- 150 g caster sugar
- 1 tablespoon cinnamon
- 1 teaspoon nutmeg
- 1-2 teaspoons orange zest
- 7.5g (1 sachet) instant yeast
- 2 teaspoons gluten free baking powder
- 1/8 teaspoon baking soda for browning
- 50-75 g raisins or dark chocolate chips
- Extra plant based milk or vegan butter to brush the buns
For the crosses (optional):
- 1 tablespoon glutinous rice flour
- 1/2 tablespoon white rice flour
- 1 teaspoon plain oil I used vegetable oil
- Water to form a smooth but cohesive paste (2-3 teaspoons as a rough guide)
To finish:
- Maple syrup or marmalade for glazing the buns
Instructions
To make the dough:
- Line a 30 x 20cm baking dish with baking paper.
- Combine the hot milk and melted butter in a bowl. Add the psyllium husk and whisk vigorously until there are no lumps remaining. Set aside for 15 minutes to form a gel. Check on it half way through – the husk might have formed a layer on the top – whisk it through again if it has.
- In a large mixing bowl, whisk together the remaining ingredients.
- Once the gel is ready, pour it into the dry ingredient bowl. Use a spoon to combine most of the way, then get your hands in and squelch the dough through until all the flour has been picked off up the bottom of the bowl. Depending on how much milk you have added, it might look like a scone dough but feel moist to the touch, or it might look and feel moist. It should never feel dry – add a little extra milk if it does.
- Add the mix ins, if you are using them. Use your hands to distribute them through the dough.
- Wash and oil your hands, then divide the dough into 9 balls. Use pressure when rolling the dough between both hands (it will become a disk shape) to create a smooth surface for the top. Once you have the smooth top, fold the edges under to form a bun. Place each bun in the baking tray, then repeat until you have 9 buns.
- If there's plenty of space left in your baking dish, use something ovenproof (I use mini cake pans) to tuck the buns in. They will spread if left to their own devices. If you have a smaller baking dish than the one specified, feel free to use it. When they're all tucked in, you can cover the buns and proof them for an hour or two on the bench, or cover and place them in the fridge overnight.
- When the buns are nearly proofed, preheat the oven to 200C/400F. Place an oven proof pan at the base of the oven and fill it with boiling water. The steam will create light and fluffy buns. Once all the buns are in the tray, brush them with plant based milk or vegan butter.
To make the crosses:
- Combine all the ingredients in a small bowl and whisk to combine. Add water until you have a smooth but pipe-able consistency. If you overshoot it, add equal parts of each flour until you’re back in the game.
- Use a piping bag or small sandwich bag with the corner cut off to pipe crosses onto the buns. Place the buns in the oven for 20-30 minutes or until golden brown and firm to the touch. If you’ve added the higher amount of milk, cook them for at least 25 minutes.
- As soon as the buns come out of the oven, brush them with maple syrup or marmalade (ideally strained) so they have a glossy and delicious finish. Allow them to cool for 15-20 minutes at least before eating.
Notes
Initially, I specified that you could use 1 1/2 cups (375ml) or up to 2 cups. As I make these buns more, though, I recommend using the full two cups. I found that buns with less liquid were (interestingly) more gluey than buns with more liquid.
Tried this recipe?Let us know how it was!