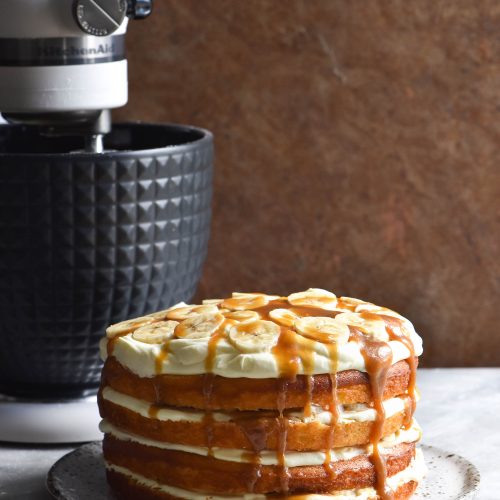
Gluten free Banoffee cake
No added nuts, gum free
Equipment
- 2 X 20cm cake tins
Ingredients
For the cakes (makes 2 X 20cm cakes)
- 350 g (2 1/4 cups minus 1 tablespoon) fine white rice flour
- 300 g caster/superfine sugar
- 1 teaspoon baking powder
- 1 teaspoon baking soda
- Pinch of salt
- 400 g full fat thick lactose free yoghurt see notes
- 1 cup (250ml) milk of choice (I used lactose free full cream milk)
- 1 tablespoon white vinegar or lemon juice
- 2/3 cup (170ml) vegetable or sunflower oil
- 4 extra-large eggs
- 2 teaspoons vanilla bean paste
For the caramel:
- 200 g light brown sugar
- 100 g salted butter
- 100 ml cream
For the cake soak:
- 1/4 cup (60ml) milk of choice (I used lactose free full cream)
- 1 teaspoon vanilla bean paste optional
- 2 tablespoons caramel from the caramel recipe above
For the sweetened whipped cream)
- 400 ml lactose free full cream
- 50-80 g icing sugar
- 3 tablespoons milk powder see notes
To finish:
- 3-4 bananas use just ripe or slightly unripe for a FODMAP friendly option sliced into coins.
Instructions
To make the cakes:
- Preheat the oven to 180C/356F. Place an ovenproof dish or cake tin half filled with boiling water in the base of your oven. This will create a steamy environment to keep the cakes moist and prevent them browning too much.
- Grease two 20cm cake pans (not spring form) with a small amount of oil and line them with baking paper.
- Combine the flour, sugar, baking powder, baking soda and salt in the bowl of your KitchenAid. Use the paddle or whisk attachment on a low speed to combine.
- In another medium mixing bowl, whisk together the yoghurt, milk and vinegar or lemon juice. The mixture should become smooth and thicker quite quickly.
- Add the yoghurt mixture, eggs and vanilla bean paste to your KitchenAid. Beat the mixture on a low smooth until you have a smooth and fluffy batter, free of any lumps.
- Divide the mixture between the two cake tins, then place them into the oven. Bake for 15 minutes, then swap them around in the oven (to account for any heat spots that might cook one cake more quickly) and bake for an additional 15-25 minutes. A baked cake should be well browned and not wobbly if you shake the cake tin. A skewer should come out clean.
- Set the cakes aside to cool completely.
To make the caramel:
- Combine the light brown sugar, butter and cream in a medium saucepan. Place it over a medium heat and whisk continuously for about 5 minutes. The mixture will first become smooth, then darken in colour. It should bubble up all over a couple of times. You can dip a small spoon in and allow to cool before rubbing a little between your fingers – there should be no undissolved sugar. If there is, put it back on the heat. If there isn’t, remove from the heat and allow to cool. If the caramel becomes grainy at any point after cooling, simply cook it again until smooth.
To make the cake soak:
- Whisk all the ingredients together and set aside.
To make the whipped cream:
- Place the cream, sugar and milk powder (if you’re using it) in the bowl of your KitchenAid. Use the whisk attachment to beat the mixture on speed 4-6 until medium peaks form. You can overbeat cream easily, so I find a medium speed and a watchful eye best.
To assemble:
- Take your cooled cakes and place them on a flat surface. Get down to eye level with your cake and use a long knife to cut each cake evenly in half. I find it easiest to stick the knife in, then cut around in a clock-like motion. Trim the top of each cake so it will sit flat (the trimmings are the chef’s spoils).
- Paint each piece of exposed cake with the cake soak. This will add flavour and keep it nice and moist.
- Place the bottom piece of the bottom cake on your serving plate. Top it with 1/4 of the whipped cream, 1/4 of the caramel and 1/4 of the banana. Place the top of that cake on top (aligned with it’s bottom piece) and then repeat. Repeat again for the second layer of cake.
- If it’s hot out, transfer the cake to the fridge for 10-15 minutes to set the cream a little.
- Top the cake with the remainder of the banana coins and caramel and serve. Cake keeps well in an airtight container in the fridge for a day or two.
Notes
You can easily halve this recipe for a more modest, single layer banoffee cake.
Milk powder is added to the whipped cream to stabilise it. This allows it to set a little, which is really helpful in a layer cake, or if the cake will be sitting out for any length of time. You can buy lactose free milk powder online. Other options for a cream stabiliser are cornstarch, gelatin or agar agar powder. I really recommend stabilising the cream for layer cake purposes.
For a FODMAP friendlier option, use unripe bananas. Slice the banana thinly, too, so that you get less fructose per serving. Although it defeats the concept, you could also use berries to keep the FODMAP content low.
Make sure you buy good quality, fresh and finely milled white rice flour. Supermarket white rice flour is often gritty and rancid, which will make your cake taste terrible. I recommend buying it at the bulk food store if you can. If you need the flour to be coeliac friendly, I recommend Tonkah Foods brand at the supermarket or Erawan Foods.
Tried this recipe?Let us know how it was!