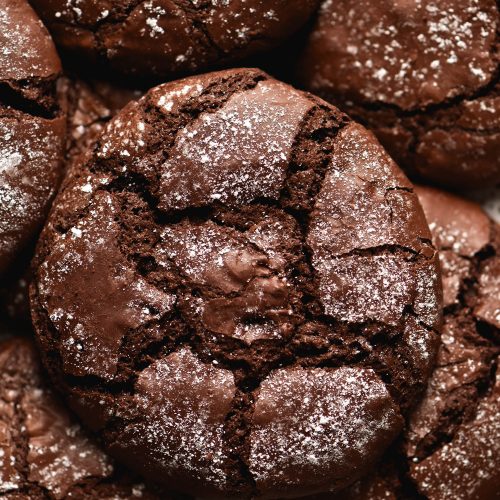
Gluten free crinkle brownie cookies
FODMAP friendly, low lactose, nut freeMakes 10-12
Ingredients
- 200 g dark chocolate I used 70% sweetened cooking chocolate
- 75 g butter browned becomes 60g after browning
- 3/4 cup (150g) caster sugar
- 2 extra large eggs
- 3-4 tablespoons 40-50g quinoa flour (toasted is delicious) See notes for alternatives
- 2 tablespoons cocoa powder both Dutch processed and regular are fine
- 1/4 teaspoon baking powder
- 1/4-1/2 teaspoon fine salt
- 1 teaspoon vanilla bean paste optional
- Pure icing sugar sieved, to finish
Instructions
- Preheat the oven to 180 degrees Celsius or 320 Fahrenheit.
TO BROWN THE BUTTER:
- Place the butter in a small saucepan over a low-medium heat. Stir intermittently for a few minutes – the butter should start to bubble and then flecks of brown appear on the surface. Keep going until the flecks are dark brown before removing from the heat.
- Weigh the melted browned butter to ensure you’ve cooked off enough liquid – it should weigh 60g or thereabouts. A number a little over is fine, but if it’s significantly under, add a little fresh butter to make up the number.
- Place the brown butter in the bowl of your kitchen mixer.
TO MAKE THE BATTER:
- Half fill the small saucepan you used for the brown butter with water and place it on a medium heat. Put a metal or heatproof bowl on top of the saucepan, ensuring the water doesn’t touch the bottom of the bowl.
- Add the chocolate to the saucepan and stir intermittently until it is completely melted. Remove from the heat and set aside.
- While the chocolate is melting, add the caster sugar and eggs to the bowl of the kitchen mixer. Using the whisk attachment, beat for 7-10 minutes on a medium-high speed until light and kind of fluffy. This helps create lift and a shiny meringue-like top.
- While this is happening, whisk together the cocoa, quinoa flour, baking powder and salt in a small bowl.
- Once the egg mixture is sufficiently lightened in colour, lower the speed of the mixer and pour in the melted chocolate while the motor is still running. Use a spatula to get every last bit. It shouldn’t be hot, but it shouldn’t be completely cool either. Lukewarm but molten is the aim of the game.
- Once the chocolate has fully incorporated, spoon in the flour mixture (while the mixer is on a very low speed), letting each spoon mix in before adding more. Stop and scrape down the sides of the bowl with a spatula as necessary.
- Once the flour has been incorporated, turn the mixer off briefly to add the vanilla bean paste. If you don’t turn it off, the vanilla paste tends to get tangled in the whisk attachment. Continue mixing until combined.
- The batter should fall off the whisk attachment in thick ribbons. It is thick, but still slightly thinner than a traditional cookie dough – you’ll need to use spoons to assemble.
TO BAKE:
- Very lightly grease two large baking trays and line them with baking paper. The grease will stop the paper slipping around while you're scooping the cookie batter onto the tray.
- Using two spoons, scoop roughly 1 1/2 tablespoons of batter per cookie onto a lined baking tray, leaving a little space for spread. Use less for smaller cookies. I like to spoon six medium – large cookies per sheet. Set aside for 10 minutes – the cookies will form a skin during this time which will help create a flakey, shiny top.
- Dust each cookie with pure icing sugar and place both trays into the oven. Cook for 7-10 minutes or until the tops are crackly but the cookies are still soft. Swap the trays, and continue to cook for an additional 7-12 minutes. All up, the cookies should be in the oven around 15-20 minutes, depending on how done you like them. You can judge this by how done you like traditional brownies.
- Once cooked to your liking, remove from the oven and allow to cool and firm up on the baking tray. You won’t be able to pick them up instantly – they solidify as they cool.
- For best, chewiest results, allow the cookies to cool completely before eating.
- Sugar draws moisture from the air, so for best results store uneaten cookies in an airtight container in the fridge.
Tried this recipe?Let us know how it was!