Low FODMAP pumpkin pie (gluten free)
*Cups and measures are mostly in Australian cups and measures. Use gram weights where specified for international accuracy.
Equipment
- 1 X 1.2 litre capacity pie dish (24cm inside the flared rim, 21cm at the base)
- OR 8.5 - 9 inch pie dish
Ingredients
For the pastry:
- 160 g (1 cup)* fine white rice flour
- 60 g (1/2 cup)* tapioca flour or potato starch
- 30 - 50 g icing sugar powdered sugar
- Pinch of fine salt
- 5 g (1 teaspoon) xanthan gum see notes
- 175 - 200 g butter cold and cubed salted or unsalted
- 60 - 80 ml (1/4 – 1/3 Aus cup, 2oz - 2.7oz)* ice water to bring the dough together, as needed
- Lactose free milk or egg wash (if it doesn't need to be egg free) for brushing the pastry
For the pumpkin pie filling:
- 425 g (15oz) pumpkin puree (see notes)
- 225 g (8oz) lactose free cream cheese (see notes and body of post for alternatives)
- 200 g (7oz, 1 US cup) light brown sugar
- 30 g (3 Aus tablespoons, 4 US tablespoons) gluten free corn starch
- 1 teaspoon ground cinnamon
- 1/2 teaspoon ground nutmeg use less if it’s freshly ground
- 4-5 cracks of finely ground black pepper
- Grated fresh ginger to taste (you can also use powdered)
- Pinch of fine salt
- 60 ml (1/4 Aus cup or 2oz) lactose free milk, if needed (this is for the cream cheese option, omit for the heavy cream or coconut cream option)
Instructions
To make the pie dough:
- Start by ensuring that all your liquid ingredients are cold.
- Mix the flours, icing sugar, salt and xanthan gum together in a large mixing bowl. Add the cubes of cold butter and coat them with the flour mix. Use your fingertips to gently rub the butter into the flour mixture until it resembles wet sand.
- Add half the ice water and get your hands in there to gently incorporate the water and form a ball of dough. Add the remaining water if needed, and extra if required. The dough should just come together in a smooth ball without any dry bits on the bottom of the bowl.
- Tightly wrap the dough in a beeswax wrap or cling film and place in the fridge for 30 minutes (longer in hot climates). Your pastry is then ready to roll out and use.
To bake the pie dough:
- Preheat the oven to 180C/356F. Place one oven rack near the bottom of the oven and one right at the top. This top rack will house a piece of foil to stop the pastry from over baking.
- Take the block of pastry and place it on a liberally floured sheet of baking paper. I use tapioca flour. It should be soft enough to feel slightly malleable, but firm enough that there is no melting butter.
- Gently roll the dough out with a rolling pin, stopping every couple of rolls to flour both sides of the dough. ‘Turn’ the dough regularly (pick it up and flip it over) to prevent it from sticking. If at any point the dough becomes soft and difficult to work with, place it flat in the fridge or freezer for a few minutes.
- Once you have rolled it out to a couple of sizes larger than the pie plate, invert the pie plate gently in the centre of the pastry dough in whatever position maximises pastry overhang.
- Use one hand to pull a corner of the baking paper towards you, and slide the other underneath the baking paper directly in the centre of the pie dish. Flip the dish, letting the pastry fall into it.
- Don’t stretch the pastry into the dish – be generous with letting it fall into the dish. Patch up any tears as necessary, and then trim any overhang, redistributing it to places that may have none.
- Once you’re happy with how the pie dough is sitting, fold the top of the pastry over themselves (outwards towards the pie dish) to create a smooth pie edge. This will create a flat and even pie edge, which is helpful when you’re putting the pastry lid on. It also just looks neater. Use your fingers to crimp the pastry edge (there’s a link to a YouTube video on how to do this in the notes).
- Scrunch up a piece of large baking paper and place it into the pie dish. Ideally, some paper will hang over the edges – this will protect them from over browning during the blind baking time.
- Gently fill the pie with your pie weights. I really recommend using enough weights to go right up the edges of the pastry – this pastry easily buckles in. I use dried chickpeas and rice for my pie weights and they go right up to the edge of the pie dish.
- Place a large piece of foil flat on the top rack of the oven, then place the pie in the oven on the bottom rack. Bake for 30 minutes. Take the pie out of the oven and very gently remove the pie weights and baking paper, noting that they will be extremely hot (don’t put them in something ceramic, and don’t handle the bowl while they cool).
- Gently brush the pie crust (sides, base and top) with milk or egg wash and return to the oven for 10 minutes.
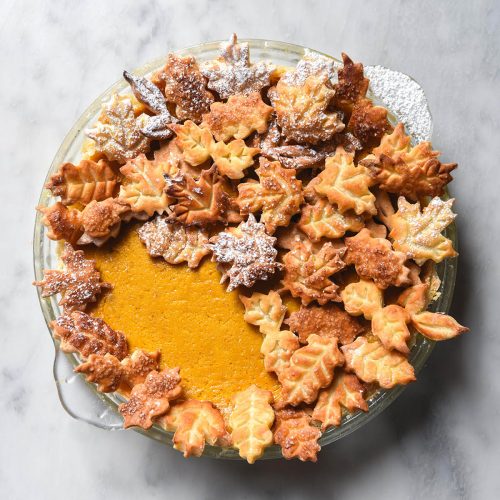
- If you want to use the leftover pastry to decorate the pie, roll and slice the pieces while you wait for the base to bake.
To make the pumpkin filling and assemble:
- Combine the ingredients for the pumpkin filling in a bowl. Taste and adjust for spices and whisk to ensure the mixture is smooth.
- Once the pumpkin pie base is cooked, remove it from the oven. Pour the pumpkin pie filling into the pastry and decorate with pastry decorations if you are using them. Brush them with milk or egg wash prior to placing them on the pie.
- Return the pie to the oven and bake for 50 minutes to 1 hour, depending on how firm you like your filling and what dairy you have used (see notes). Allow the pie to cool for 4-5 hours before serving. I find it is best when made the day before and refrigerated overnight.
- Leftovers can be sliced into pieces and frozen. Keeps well in the fridge for 3-4 days.
Notes
- I have covered FODMAP notes in the body of the post.
- Monash has recently (as of November 2024) updated their entry for Japanese/Kent pumpkin. It is low FODMAP in serves of 75g and up to 161g. In serves of 162g or more, it contains moderate amounts of fructans. It was previously 500g per person.
- This pie uses 425g pumpkin puree. You can safely eat 1/4 of the pie and remain under the low-moderate threshold.
- See the body of the post for a xanthan gum free option.
- Both canned pumpkin puree (not pumpkin pie filling) and homemade puree are suitable here. See the body of the post for FODMAP notes and an easy method for making your own puree.
- Lactose free heavy cream and coconut cream are suitable replacements for the cream cheese. Use 225g (8oz) of either ingredient and weigh it to ensure accuracy.
- I found that pies made with either of these liquid creamy ingredients took longer to bake. They also really benefit from being in the fridge overnight, so I recommend making them the day before.
- Coconut cream is needed for this recipe, not coconut milk.
- If you use the coconut cream option, I recommend adding 50g (1.7oz) less sugar to the filling.
- See this video here for visual instructions to crimping your pie crust.
Tried this recipe?Let us know how it was!