Gluten free greens pie with flaky pastry (FODMAP friendly, vegetarian)
Ingredients
For the pastry:
- 100 g (just over 3/4 cup) brown rice flour
- 100 g (just over 3/4 cup white teff) flour or sub for extra brown rice flour
- 75 g (3/4 cup) tapioca flour
- 185 g butter
- 115 g sour cream
- Ice water to finish (8-10 tablespoons ish)
For the greens pie:
- 700-750 g greens I used a mix of spinach, rocket and kale
- 200 g ricotta
- 2 spring onions, finely chopped (green part only for FODMAP) optional
- 1 bunch dill
- 1/2 teaspoon nutmeg
- Pinch of clove
- Zest of 1 lemon
- Juice of 1 lemon
- Lots of freshly cracked black pepper
- 200 g feta
- 2 extra large eggs
Instructions
To make the greens pie:
- Begin by cooking down the greens in a dry skillet over a medium heat until they are soft but still verdant. Place them into a colander or sieve over a bowl and allow them to cool. As they’re cooling, gently squish the majority of the liquid out. They don’t need to be bone dry but most of the liquid needs to go (to prevent a soggy pie).
- Preheat the oven to 200C/400F.
- Take half the block of pastry and place it on a liberally (rice) floured sheet of baking paper.
- Gently roll the dough out with a rolling pin, stopping every couple of rolls to flour both sides of the dough. ‘Turn’ the dough regularly (pick it up and flip it over) to prevent it from sticking. Once the dough gets too big to turn, take another piece of well floured baking paper and place it atop the dough. Working quickly, lift the dough up and flip it onto the newer piece of baking paper. Then you can continue rolling.
- If at any point the dough becomes soft and hard to work with, place it flat in the fridge or freezer for a few minutes.
- Once you have rolled it out to a couple of sizes larger than the pie plate, place it flat in the fridge or freezer for about 5 minutes to get ready for the pie plate.
- Lay the pastry flat on a working surface like a table so you have a bit of space underneath for your hands. Place the pie plate gently in the centre of the pastry dough in whatever position maximises pastry overhang.
- Use one hand to pull a corner of the baking paper towards you, and place the other directly underneath the centre of the pie dish. As you pull the pastry off the table, your other hand will push the pastry into the pie dish, after which you will quickly flip the dish, letting the pastry fall into it.
- Don’t stretch the pastry into the dish – be generous with letting it fall into the dish. Patch up any tears as necessary, and then trim excessive overhang, redistributing it to places that may have none.
- Once you’re happy with how the pie dough is sitting, trim any extra overhang (you can cook this as little biscuits or use for extra decoration.) Use the palm of your hand to press down on the edges of the pie plate. This will create a flat and even pie edge, which is helpful when you’re putting the lid on.
- Scrunch up a piece of large baking paper and place it into the pie dish. Ideally, some paper will hang over the edges – this will protect them from burning during the long blind baking time.
- Gently fill the pie with your pie weights. I really recommend using enough weights to go right up the edges of the pastry – this pastry easily buckles in. I use dried chickpeas and rice for my pie weights and they go right up to the edge of the pie dish.
- Place the pie pastry in the oven for 40 minutes. Take the pie out of the oven and very gently remove the pie weights and baking paper, noting that they will be extremely hot (don’t put them in something ceramic, and don’t handle the bowl if you put them in metal.)
- Place the pie back in the oven for 10 minutes. After this, egg wash the entire pastry and cook it for a final 10 minutes.
- Once done, remove from the heat and allow to cool while you get on with your filling.
To make the greens:
- Finish wringing out your greens, and then add them to a large mixing bowl. Add and combine all the ingredients except for the egg – this allows you to taste and adjust as you see fit. I like to make mine quite lemony because the pastry and the feta are rich, but you do you.
- Once you’re happy with how it tastes, add the eggs and mix to completely combine. Place in the fridge while you roll out the lid of your pastry.
To finish:
- Roll out the second half of the pastry using the same method as you did for the pastry base.
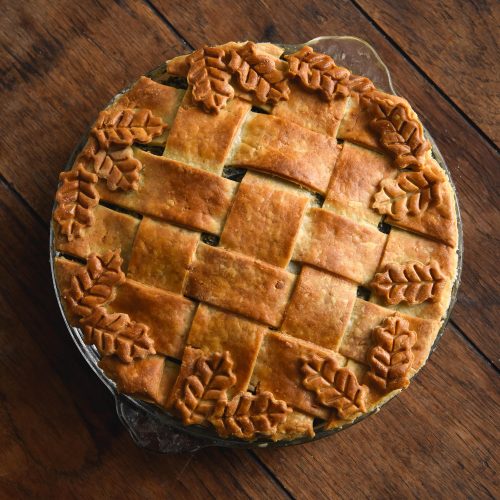
- You can either make a complete lid to cover the whole pie or create latticing. There is a link above to a visual demonstration on latticing.
- If you’re making them, make the pastry decorations while you’re at it.
- Gently pour the greens filling into the pie and smooth the top. Lightly brush the cooked edges with egg wash, and begin placing the pastry on top, pressing gently to adhere. Trim any edges (I like to trim them shorter than the pie dish and tuck them in for latticing) and brush liberally with eggwash.
- Return to the oven with 20-30 minutes, finishing with the grill function for extra colour if necessary.
- You can serve this pie hot or cold and it keeps well in the fridge for at least a few days.
Tried this recipe?Let us know how it was!