Gluten free hot cross buns without yeast
Yeast free, xanthan gum free, egg free, dairy free/vegan option *This recipe uses Australian cups and measures. Use gram and ml for international accuracy.Australian tablespoons are 20ml, whereas US, NZ, British and Canadian tablespoons are 15ml.
Ingredients
For the binder:
- 250ml (1 cup)* boiling water see notes
- 200 g plain unflavoured thick yoghurt, regular or plant based
- 20 g psyllium husk powder
For the dough:
- 125ml (1/2 cup)* vegetable oil or neutral oil
- 300 g light buckwheat flour
- 150 g light brown sugar
- 1 tablespoon cinnamon (4 US, NZ, British and Canadian teaspoons)
- 1 teaspoon nutmeg (use less if grating it fresh)
- 1 teaspoon allspice (optional, for those who like their buns extra spicy)
- orange zest, to your tastes (optional)
- 5g (1 teaspoon) gluten free baking powder
- 2.5g (1/4 teaspoon) baking soda (for browning)
- 50-75 g raisins or dark chocolate chips (see FODMAP notes in body of post)
For the crosses (optional):
- 1 tablespoon glutinous rice flour or starch of choice (4 US, NZ, British and Canadian teaspoons)
- 1/2 tablespoon white rice flour
- 1 teaspoon plain oil I used vegetable oil
- Water to form a smooth but cohesive paste (2-3 teaspoons as a rough guide)
- Maple syrup or citrus jam to brush the buns after baking
Instructions
To make the dough:
- Preheat the oven to 180C/356F and line a 24 x 24cm (9.5 inch x 9.5 inch) square brownie/cake tin with baking paper, leaving some overhanging to act as handles later.
- Combine the boiling water and yoghurt in a medium mixing bowl. Add the psyllium husk and whisk vigorously until there are no lumps remaining. Set aside for 15 minutes to form a gel.
- In a large mixing bowl, whisk together the remaining ingredients for the buns, except for any mix ins you are using.
- Once the gel is ready, pour it into the dry ingredient bowl along with the oil. Use a spoon to combine most of the way, then get your hands in and squelch the dough through until all the flour has been picked off up the bottom of the bowl.
- Continue until the dough is a uniform light brown with no light patches from the yoghurt and no lumps of flour. This will take about 5 minutes but is necessary for an edible bun, so keep going until you get a uniform consistency.
- I find this dough works best when it can hold it's own shape but is too sticky to roll or hold in a dry hand. If yours is drier than this, adjust as necessary. If yours is wetter, I'd suggest leaving it. Your buns might spread into one giant bun, but they will be nice and moist.
- Add the mix ins, if you are using them. Use your hands to distribute them through the dough.
- Thoroughly wet your hands with water, then divide the dough into 9 balls. I do this on the bench so I can eyeball that they are roughly the same size.
- Thoroughly wet your hands again, then roll each piece of dough into a ball with a smooth top. The smoother the top is before baking, the nicer the bun will look after baking.
- If you only have a baking dish that is larger than the one specified, use smaller dishes to tuck the buns in tightly. They will spread if left to their own devices.
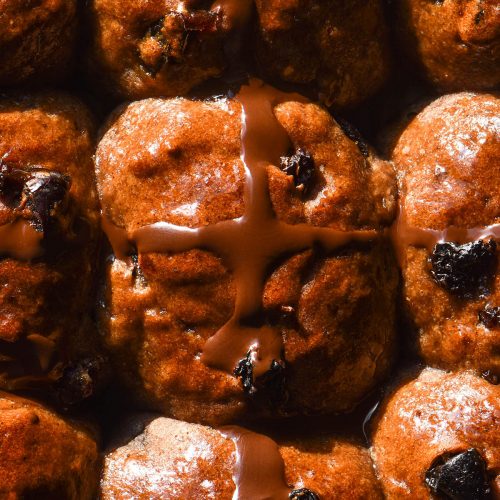
To make and pipe the crosses (optional)
- Combine all the ingredients in a small bowl and whisk to combine. Add water until you have a smooth but pipe-able consistency. If you overshoot it, add equal parts of each flour until you’re back in the game.
- Use a piping bag or small sandwich bag with the corner cut off to pipe crosses onto the buns.
To bake:
- Place the buns in the oven for 25-30 minutes or until golden brown and firm to the touch.
- As soon as the buns come out of the oven, brush them with maple syrup or marmalade (ideally strained) so they have a glossy and delicious finish. Allow them to cool for 15-20 minutes at least before eating.
- These buns are best on the day of baking. However, they can be toasted and smeared with butter for a great result thereafter. You can also microwave or steam heat them to restore them to their former glory.
Notes
- Read the tips section in the body of the post to get the most out of this recipe. I don't write it for fun, I promise.
- I haven't tried this recipe in the stand mixer, but I think it would work nicely. Where possible, I try to make my recipes as inclusive as they can be - not everyone has a stand mixer.
- Personally, I found that the coconut yoghurt/vegan version tasted less spicy than the dairy version. This might just be me, but I'd suggest adding a little extra spice to the vegan version if you like well spiced buns.
- I have only tried light buckwheat flour in this recipe because it's all I have access to in Australia.
- See the body of the post for FODMAP notes and hydration notes.
- I don't often pipe the crosses these days, but I have added the option in case you'd like to.
- If you only have a baking dish that is larger than the one specified, use smaller dishes to tuck the buns in. They will spread if left to their own devices.
Tried this recipe?Let us know how it was!