Gluten free biscuits (American style)
Nut free, FODMAP friendly option, egg freeMeasures are in American cups and tablespoonsMakes 6-7 large sweet biscuits
Ingredients
For the biscuits:
- 125-150 g (1 stick + 1 tablespoon - 1 1/3 sticks) good quality unsalted butter, cold (see notes)
- 1 cup (160g) fine white rice flour
- 1 1/4 cup + 1/2 tablespoon (160g) tapioca flour
- 75 g (1/3 cup) white sugar
- 10 g psyllium husk powder
- 1 tablespoon (15g) baking powder
- 3/4 teaspoon xanthan gum
- 1/4 - 1/2 teaspoon fine salt
- 200 g heavy or thickened cream full fat buttermilk, full fat sour cream or thick yoghurt (see notes)
- 1/4 cup+ (60ml+) milk of choice, only if truly needed
For the ‘egg’ wash:
- 2 teaspoons (10g) milk of choice
- 1/2 teaspoon maple syrup
Instructions
To make the dough:
- Begin by freezing the butter for 10 minutes to make it easier to grate.
- Combine all the dry ingredients in a large mixing bowl.
- Grate the butter on the largest hole size of your grater. Gently spread it out and return it to the freezer for 10-20 minutes. Freeze for 10 in winter or a cold kitchen and 20 in summer or in a hot kitchen.
- When the butter is ready, add the cream (or dairy of choice) to the flour mix and stir to combine. The dough should be shaggy with some wet spots and some dry spots. If needed, add the milk, 1 tablespoon at a time. Your ideal dough is 90% hydrated with just a few minor dry spots. It should look a little dry and shaggy and but feel mostly hydrated. If in doubt, stop adding milk - an overly hydrated scone is chewy and dense. You want the dough to be hydrated but without a drop more liquid than necessary.
- A handful at a time, incorporate the butter into the dough. Use a light touch and try to evenly disperse the butter chunks throughout the dough without breaking them down too much. Repeat until you have incorporated all the butter. The dough should just come together in a rectangle when you press it. There should be no dry bits of flour or too much hardship with bringing the dough into a ball. If there is, add a tablespoon of milk at a time until it just comes together. Cover and place the dough into the fridge for 30 minutes.
To laminate the dough:
- Flour a piece of baking paper with tapioca flour. Set down the rectangle of dough and flour the top lightly. Use a rolling pin to roll the dough out into a long rectangle that is roughly 30cm long and 15-20cm wide.
- Take the top third of the dough, pick it up and fold it back onto the middle of the dough. Dust it off for excess flour. Now, take the bottom third of the dough and fold it up onto the middle of the dough. Press it down gently to secure. This is called a business letter fold.
- Pick up the dough and flour the baking paper. Turn the dough so that the skinny side of the rectangle faces upwards. Roll the dough out again, dust it off, and fold it up in the same way as above.
- For our final fold, we’re doing something a bit different. Roll the dough out and flip it over. The underside will be lumpy and bumpy – that’s fine. Dust off the excess flour, then use 1-2 teaspoons of milk to moisten the dough just very lightly. This will help our laminated biscuits hold together. Fold the dough in a business letter fold as you did previously, then place it back into the bowl, covered, and into the fridge for 15-20 minutes. Preheat the oven to 200c or 400F.
To cut the biscuits:
- Remove the dough from the fridge and place it on a floured piece of baking paper. Use a rolling pin to roll the dough out to a rectangle about 2 inches tall. The biscuits don’t grow too much in the oven, so you need the dough to be tall now for a tall biscuit.
- Use a cutter or a sharp, non-serrated knife to cut the biscuits into 6-7 large biscuits. Place the biscuits into a 8-10 inch cake tin and into the freezer for 10-20 minutes, weather dependent.
To bake the biscuits:
- Retrieve the biscuits from the freezer and place them on a heavy baking tray. This will stop the bottoms of the biscuits from burning. Ensure your oven has had plenty of time to preheat and is nice and hot.
- Lightly brush the biscuits with the ‘egg’ wash, and place into the oven for 15-20 minutes. Check on the biscuits – if the tops are getting dark, it’s time to cover them. Very gently tent a piece of baking paper over the biscuits without touching them. Turn the oven down to 180C or 356F and bake for 20 more minutes or until the biscuits are cooked through.
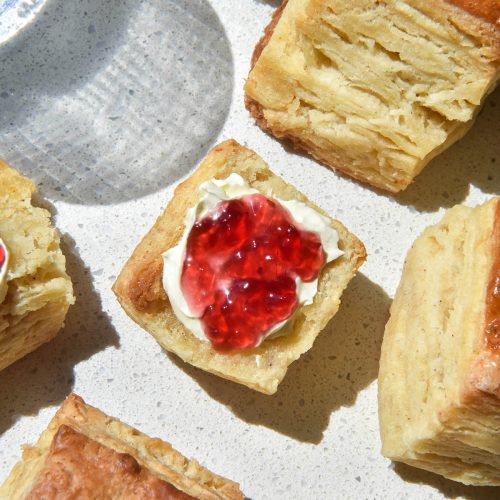
- Remove from the oven and set the biscuits on a wire baking rack. These biscuits are best eaten on the day of baking with cream (lactose free, if need be) and jam. Leftovers store well in an airtight container and are best reheated with steam (in the microwave or in an oven with a small tin of boiling water).
Notes
NOTES
1 American cup white rice flour: 160g
1 American cup tapioca flour: 120g
1 American cup tapioca flour: 120g
- These biscuits work with 125-150g butter. You can experiment with what works for you. If you find that the biscuits are seeping a lot of butter, try the lesser 125g.
- The longer you can leave the biscuit dough to chill, the flakier your biscuits will be.
- I have tested full fat heavy/thickened cream, full fat buttermilk, full fat sour cream and full fat thick pot set yoghurt in these biscuits. Each required a slightly different amount of milk to finish achieve the right amount of moisture.
• You can use all buttermilk if you are using the buttermilk option. I needed 250g in my testing, but you might need more or less.
Tried this recipe?Let us know how it was!